Smart Lunch Box Using PTC Heating Wireless Control
Info: 13260 words (53 pages) Dissertation
Published: 27th Jan 2022
Overview
The Lunch box, alternatively known as a lunch pail or lunch kit is a container used to store and carry food for later consumption. It is capable of protecting the food from the surroundings and delaying the time of the food becoming spoilt. There are several models of lunch boxes in the market nowadays which have a range of uses: boxes that double as bowls and containers; that have movable dividers for different foods; that are dish-washer safe/ microwave safe; stackable containers, collapsing containers and so on.
Though the materials keep getting upgrades, the functionality of the box hasn’t had many changes. Lunch Boxes do an average job at keep food warm to begin with. The ideas of portability and introducing new technologies to keep food warm haven’t been explored all too much. Thus came about the need to have a way to heat up food that is portable, easily accessible, decreases human intervention and actually brings warmth of food up to adequate temperatures. The Smart Lunch Box uses PTC heating wireless control through Bluetooth connectivity and an Android application to heat up the containers.
Information Technology
Information Technology, here, refers to the application of computers to store, study, retrieve, transmit and manipulate data. ‘Information Technology’ or, ‘IT’ is a generic name given to all improvements that are taking place in our world due to the inter-linked advancement in technology, learning, and information. The term refers to recent technological developments that are taking place in our world as a result of better technology, due to better information. [1] The facility of internet and surfing opens us to the world of information superhighway enabling us to seek the information that we want.
With the possibility of downloading programmes and information through a computer to a paper, our task of gathering information is a few minutes affair. In this manner, today the process of gathering knowledge and information has become, easy, cheap, fast, and enjoyable. This has been the greatest advantage of IT boom. IT revolution has also altered the very face of business operations and E- commerce is big part of it. The IT revolution is sweeping over the world. Although, IT boom has revolutionised the western world beyond recognition it is still to make much headway in changing lives in India. The boom has, however, affected only the affluent and the urban India. The benefits of IT boom needs to penetrate down to the ordinary men and women living in our country.
Embedded Systems
Embedded systems are a part of Information Technology that deal with computer systems that are designed for limited or no human interaction. An embedded device is an object that contains a special-purpose computing system. The system, which is completely enclosed by the object, may or may not be able to connect to the Internet. Embedded systems have extensive applications in consumer, commercial, automotive, industrial and healthcare markets. [2] It’s estimated that by 2015, over 15 billion embedded devices will be connected to the Internet.
An embedded system employs a combination of hardware & software (a “computational engine”) to perform a specific function; is part of a larger system that may not be a “computer”; works in a reactive and time-constrained environment. Software is used for providing features and flexibility. Because embedded systems have limited computing resources and strict power requirements, writing software for embedded devices is a very specialized field that requires knowledge of both hardware components and programming.
The use of processing power in small packages has further driven the digital revolution. Embedded systems are a large part of the process of scaling down on the size of the devices and customizing the device to perform only what is required. [3] Embedded systems are used in situations where general-purpose computers, like PCs are too obtrusive, bulky or over-priced for a majority of products. The embedded devices incorporate an embedded system technology that allows the core functionality to be within a small device without having to rely on a PC. There are also situations when the general-purpose solutions fail to meet certain functional or performance requirements such as size-limitations, reliability, real-time performance, power-consumption, etc. Using embedded systems, we are able to downsize on the physical devices needed to run a specific operation onto one device. The use of processing power in small packages has further driven the digital revolution.
Conventional Heating Methods
Heat transfer is the physical act of thermal energy being exchanged between two systems by dissipating heat. Temperature and the flow of heat are the basic principles of heat transfer. The amount of thermal energy available is determined by the temperature, and the heat flow represents movement of thermal energy. [4] On a microscopic scale, the kinetic energy of molecules is the direct relation to thermal energy. As temperature rises, the molecules increase in thermal agitation manifested in linear motion and vibration. Regions that contain higher kinetic energy transfer the energy to regions with lower kinetic energy. The conventional methods of warming up food involve a manual control of devices with wired connection to heat up the contents of the device following the principles of conduction, convection or radiation. According to a study of food safety and hygiene, when reheating food, it should be steaming hot all the way through or reach a temperature of 70 ˚ C for more than 2 minutes. [5]
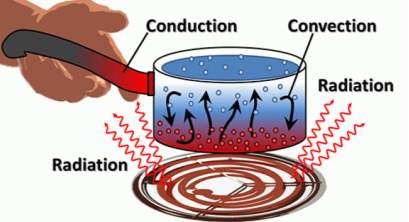
Figure 1.1: Pictorial Representation of Heating Methods
Conduction
Conduction is the process of transmission of heat through the material of the substance for which the temperature difference is applied. Conduction transfers heat via direct molecular collision. An area of greater kinetic energy will transfer thermal energy to an area with lower kinetic energy. Higher-speed particles will collide with slower speed particles. The slower-speed particles will increase in kinetic energy as a result. Conduction is the most common form of heat transfer and occurs via physical contact. Cross-section and path of travel both play an important part in conduction. The greater the size and length of an object, the more energy that’s required to heat it. And the greater the surface area that’s exposed, the more heat is lost. Smaller objects with small cross-sections have minimal heat loss.
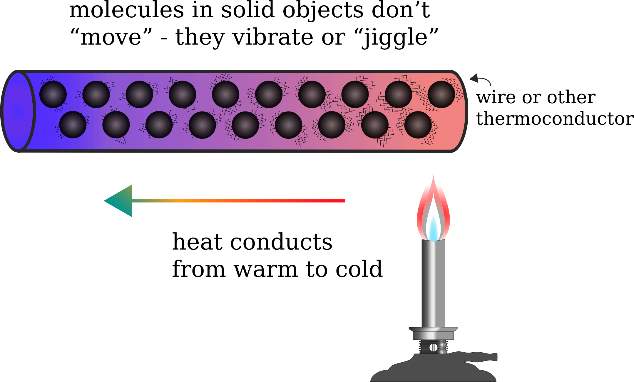
Figure1.2: Pictorial Representation of Conduction
Convection
Convection is the transfer of heat due to the movement caused within the fluid due to the tendency of hotter, less dense material to rise and colder, denser material to sink under gravity. When a fluid, such as air or a liquid, is heated and then travels away from the source, it carries the thermal energy along. This type of heat transfer is called convection. The fluid above a hot surface expands, becomes less dense, and rises. At the molecular level, the molecules expand upon introduction of thermal energy. As temperature of the given fluid mass increases, the volume of the fluid must increase by same factor. This effect on the fluid causes displacement. As the immediate hot air rises, it pushes denser, colder air down. This series of events represents how convection currents are formed.
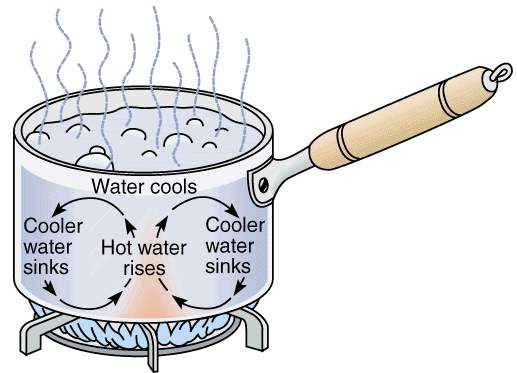
Figure1.3: Pictorial Representation of Convection
Radiation
Radiation is the transfer of heat in form of electromagnetic waves. Thermal radiation generates from the emission of electromagnetic waves. These waves carry the energy away from the emitting object. Radiation occurs through a vacuum or any transparent medium (either solid or fluid). Thermal radiation is the direct result of random movements of atoms and molecules in matter. Movement of the charged protons and electrons results in the emission of electromagnetic radiation. All materials radiate thermal energy based on their temperature. The hotter an object, the more it will radiate. The sun is a clear example of heat radiation that transfers heat across the solar system. At normal room temperatures, objects radiate as infrared waves. The temperature of the object affects the wavelength and frequency of the radiated waves. As temperature increases, the wavelengths within the spectra of the emitted radiation decrease and emit shorter wavelengths with higher-frequency radiation.
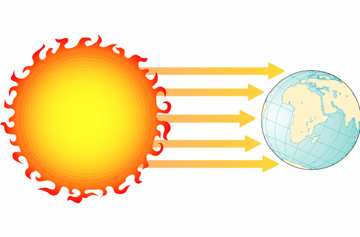
Figure1.4: Pictorial Representation of Radiation
History of Lunch Box
The concept of lunch box has been around for a very long and there isn’t much information about who invented it, but the earliest recorded usage was in the late 19th century. Some of the earliest examples were woven baskets with handles where the meal would be wrapped in a handkerchief. During the same period, the wealthier would have fancy wooden boxes for their food. Afterwards, the metal variety was introduced; when the containers became a marketable product to the youth. It was one of hundreds of consumer goods produced for the post-war market in 1950’s U.S.A.
The industrial revolution led Americans to work in factories, which made it difficult to go home to lunch every day. [6] Thus, raised need for a container to protect and transport a meal. The Thermos, a vacuum flask which enabled hot or cold beverages to remain at optimal temperatures until lunchtime, was introduced in 1904. It was suitable for either hot or cold beverages to remain at optimal temperatures until lunchtime. [7]
Over time, lunch boxes were manufactured using various materials. Children’s lunch boxes were made of plastic or vinyl, while the adults had ones made of tin or aluminium- due to the greater need for durability. The first use of plastics was the lunch box, but it later spread to the entire box. [8] In the 1960s, insulated foam replaces the vacuum boxes. The trend continued to present manufacturing types. Today, lunch boxes are generally made of plastic, with foam insulation and an aluminium/vinyl interior. These are better at retaining their temperature but are less rigid/ protective.
Figure1.5: Lunch box for children and adult
Basic Characteristics of Lunch Box
Characteristics of a lunch box are important for research and product development to augment the existing systems. Therefore, a continuous study is required in order to an understanding to enhance a creative development. There are a few characteristics that can be identified in a basic lunch box, which are:
Material
In manufacturing terms, ‘Material’ refers to substances used in fabricating thermal heated, lunch box products. The type of material used to manufacture the product is important in how effective it is as a product for the user. Research on characteristic of the material should be done first and ensure it is safe to use and does not affect human health.
Storage
Storage space refers to the capacity or volume that a lunch box is capable of holding. The allowance in the containers effects the user’s ultimate decision of using the product or not. There are several studies that state the differences between volumes of food that different people require per meal. [9] A study that compares genders eating habits show that the average female adult consumes less food than the average male adult. Children usually only require half the meal size of that of an adult. [10] As for result, different sizes of lunch box appear in the market, targeted at different demographics.
Food Protection
Food protection characteristic in the lunch box is another feature should be considered. It refers to the capability to cover the food and protect it from dust or water which will spoil the food. This also depends on the materials encasing the containers and the actual substances the containers are composed of. The essential purpose of a lunch box is to separate the food from contact of external surroundings, because the air contains dust or bacterial cultures which will affect the taste and freshness of the food. Spoilage Aerobic; bacteria than needs oxygen to grow is could be a possibility if the food is exposed to air. [11] Some lunch boxes also come with an air seal or leak proof feature to ensure it is fully protected from moisture and air.
Temperature Resistance
Temperature resistance on plastic lunch box is the ability to withstand heat without causing chemical reaction. If the temperature resistance is not high enough it may react and endanger human health when using it. When developing an electric lunchbox, the material’s heat resistance determines the durability and safety; with regard to health, of the product. [12] It is important to test the material’s temperature resistance at various temperatures before deeming it acceptable for holding food.
Thermal Insulation
Thermal insulation refers to the characteristic of the material capable of reducing rate of heat transfer. The transmission of heat could happen in one of three modes: conduction, convection or radiation. Thermal insulation is the method of preventing heat from escaping a container or from entering the container. [13] It can be applied to keep the food warm for longer period of time. Material selection become important as it will affect the rate of heat transfer.
Mobility
Mobility refers to the object capable of being in motion. In other word, it is the ability to bring along when traveling from a distance. Weight of the product should be as light as possible to allow user carry. The size of the product should also be small. When the size is small it allows is easy to be keep and bring along.
Arduino
In order to prototype this project, Arduino Pro Mini is used. It is a microcontroller board based on the ATmega328. It has sets of digital input/output (I/O) pins, an on-board resonator, reset button and holes for mount pin headers. This board is meant for applications and installations where space is premium and projects are made as semi-permanent setups. To dump code on the microcontroller, there is an integrated development environment (IDE) called Arduino IDE; that works on most operating systems (OS), for programming on embedded C and deploying the code to Arduino. The IDE contains a text editor for writing code, a text console and a toolbar with buttons for common functions. The software was used to code the Arduino Pro Mini board; for it to communicate with the Android application on the user’s phone.
Connectivity and Communication
The interior of the lunch box has all the major components which are connected with connector cables and take power from the rechargeable lithium ion batteries. Wireless connectivity between the box and user’s Android application is possible through Bluetooth connectivity. The Arduino Pro Mini is responsible for conveying commands to the mechanical relays, PTC heating elements based on the instructions it receives from the Android application through the Bluetooth HC-05 module.
Android Application
On the Linux based kernel Operating System (OS), an application is developed to run. Google provides Android Studio to develop, debug, test, deploy Android applications. The Smart Lunch Box application is developed to communicate with the box over a Bluetooth connection to send commands to heat the containers; either to start heating immediately or at set time. to retrieve. The application is coded in Android studio using Java programming language. The Smart Lunch Box application was coded to work in Android phones with APIs 15 and higher.
Analysis
Existing System
Present products of lunch boxes can be divided into a few categories. Overall, they are classified into two general groups. That is, the conventional lunchboxes which focuses on material but not technology and the lunchboxes which focus on incorporating latest technology into the storage and/or temperature system. Our focus is on the lunchboxes that have undergone modifications based on applied science as opposed to manufactured materials. The present trends in lunch boxes are focused on a variety of factors to make the user experience first-rate.
These factors have branched off from the basic of functionality of the lunch box to protect the food. The design, durability and portability of the container are areas that manufacturers are focusing on. A product sold by ‘Foodskin’ is a flexible lunchbox which has elasticised silicon skin, maintains the shape of the food inside; without crushing it. [14] Their target was developing a container which would take up minimum space and keep the food safe at the same time. The development of lunch boxes has expanded to electric lunchboxes.
Electric Lunch Boxes started cropping up when people realized that the lunch boxes up till that point weren’t doing a great job keeping the food warm for more than a couple of hours. The new electrically wired lunch boxes allowed the consumers to plug their box into a socket to heat up food at their convenience. These are powered by some type of power source to heat up the food. The sub categories under electric lunchboxes are wired and wireless. There are different approaches to maintain the warmth of the food inside containers; whether it is a wired product or heat-persisting materials.
Types of Lunch Boxes
The types of lunch boxes we have categorized as traditional: different manufacturing processes/materials, wired: different power sources or wireless: controlled from a non-physical location. Our focus is on the lunchboxes that have undergone modifications based on applied science as opposed to manufactured materials. Thus, for this study, the categories of boxes fall under either wired or wireless.
Wired Lunch Box
Most electric heated lunch boxes are classified as wired lunch boxes. There isn’t any recorded data of the first inventor of the electric lunch box but there have been attempts at creating them from the late 90s. [15] Some patents have been established in the 2010s for Electrical Lunch Boxes that were meant to be plugged into AC outlets or car cigarette lighter to warm the containers. [16]There are several models of electric lunch boxes that have been coming into the market the past decade.
Prepology Electric Warming Lunch Box is a plug-in lunch box that allows user to steam food at their desk. [17] The user has to pour water into the base, put food in the container and wait for approximately twenty minutes. The box has a disadvantage as the inner cooking container doesn’t seal shut and has been reviewed as being difficult to use. It is trademarked by IC Marks, Inc., based in Wilmington, Delaware.
The Koolatron LBS-01 plugs into a car’s cigarette lighter, targeted at users who want to be able to heat their food on the go. [18] It’s meant to keep foods steam but it is not for cooking foods; despite the brand’s claim. It isn’t durable enough for daily use, doesn’t always heat the food and is not accessible to all users as it only works if plugged into the cigarette lighter in your car. It is manufactured by Koolatron Corporation, based in Canada.
Tayama EBH-01 Electric uses very little power but can still heat your dishes up by using a PTC heating element. Where it makes up for in concept, it lacks in design as it was built poorly. It also takes approximately one to two hours to get to high temperatures. It is manufactured by Tayama Appliance Inc., based in California, USA. [19]
HeatsBox is a multi-sided warming lunch box. It is said to feature a leak-proof design that distributes heat evenly to all the food. It uses a USB C-type charging cable to power the box; even allowing user to heat up box from their laptop. It is compact and the power source is not all to reliable as a laptop as a charging dock will lead to degradation of its battery. The HeatsBox is made by the start-up Faitron, based in Switzerland. [20]
The Yescom Portable Electric Heating Lunch Box/ Food Storage Warmer uses PTC heating and uses a regular power outlet to heat the food. It takes a minimum of forty-five minutes to heat the food. It does not have detachable containers, making maintenance rather difficult. There are also instances of the box leaking even though there is a locking lid. It is manufactured by Yesccom, based in USA. [21]
Wireless Lunch Box
Wireless lunch box aren’t as common as the wired variety. There have been very few successful products that have been released as a ‘wireless heating container’. Though, over the years, small start-ups have proposed some ideas of a potential wireless heating container, none have followed through with building the product. The possibility of a lunchbox with an in-built battery operated heater was suggested on various industrial design forums, but the idea was not executed. [22] There hasn’t been a successful wireless lunchbox in the market till now. In 2016, a Switzerland based company called Hibachi proposed a self-heating lunchbox wireless lunch box. [23] It seemingly doesn’t need an external device to be plugged into a socket to heat the food. Though their proposal is fascinating, they haven’t disclosed further details nor do they have any news presence to support their claims.
Drawbacks of Existing System
The existing systems are focused singularly on protecting the food from the environment, introducing materials that retain heat, collapsible containers or aesthetically pleasing designs. But there isn’t much focus on providing functionality for the lunch box itself to heat up food, wirelessly. Coming to electric lunch boxes, they are almost all of the wired variety. These are not as portable as they are marketed because the user will always be looking for a power outlet to connect the box to. Also, the user still has to manually turn the power switch on and plug the device on. The existing systems are not automated enough.
Proposed System
Our main aim is to provide an interface to the user where he is able to control the timer for heating the Smart Lunch Box over a wireless Bluetooth connection and refer to a countdown timer that depicts time until food is ready. The proposed system is an attempt at improving the interaction between a user and the physical lunch box: in lessening human intervention and providing an alternate method to ensure food is warm enough.
Advantages of Proposed System
The proposed system uses Positive Temperature Coefficient (PTC) heating technology, Bluetooth connectivity and rechargeable batteries to introduce automation to the process of heating up with a electric lunch box. PTC heating is a unique technology that eschews traditional resistance and replaces it with ceramic stones/chips. These are safer than normal heating elements. They also last longer and are easier to maintain. Bluetooth connectivity helps to bring wireless control of the lunch box; by using the Android application. The rechargeable batteries allow the box to be charged for multiple rounds of heating the containers without having to ever depend on a power outlet connection to charge the box.
Software and Hardware Specifications
Software Requirements
- IDE: Arduino 1.8.2 IDE
- Operating System: Linux, Windows or any equivalent OS
- Android Development: Android Studio 2.2.2
- Website for Application: WordPress Website
Hardware Requirements for Computer
- RAM: min 512 MB
- Processor: min 1.0 GHz
- Android Phone: API 15 or higher
Hardware Requirements for Kit
- Lunchbox: Containers fitted with copper plates and aluminium foil
- Microcontroller: Arduino Pro Mini
- Bluetooth Module: Bluetooth HC-05
- Heating Elements: PTC Heating Elements
- Mechanical Relays: One-Channel Relay Module
- Power Supply: Rechargeable Lithium Ion Batteries (12V)
- Connectors
Modules
Module Specifications
There are mainly five modules in our project, they are:
- User Module
- Hardware Module
- Android Module
- Arduino IDE Module
- Administrator Module
Hardware Module
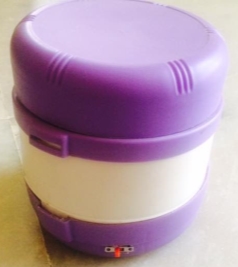
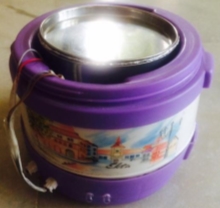
The hardware of the Smart Lunch Box consists of several components fitted into the base of the box. They are the Arduino Pro Mini microcontroller, Rechargeable Lithium Ion batteries, Bluetooth HC-05, Mechanical Relays and PTC Heating Elements; in the containers. The two containers in the box are coated with copper plates and aluminium foil. One on/off switch and two LEDs are fitted to the side exterior surface of the Lunch Box.
User Module
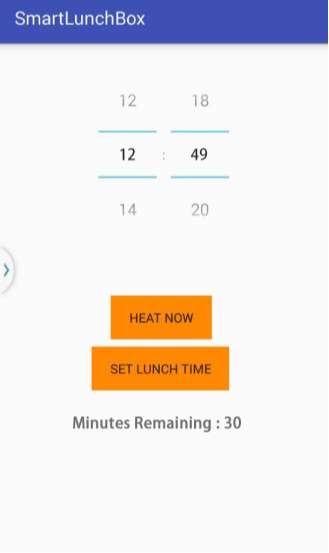
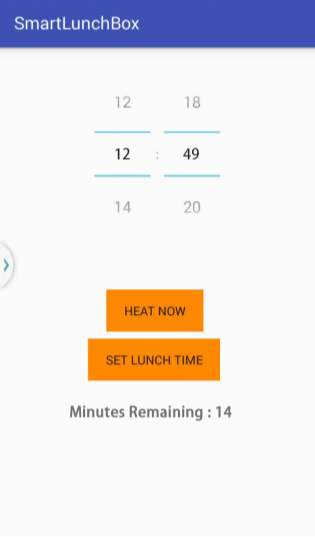
In this module, Users are required to download the android application onto their Android phones from the ‘SmartLunchBox’ wordpress website. The user manually switches on the Lunch box switch before opening the application on their phone. The application prompts them to allow permission for turning Bluetooth on, if not already done. The application allows the user to either ‘Heat Now’ or ‘Set Lunch Time’ to begin heating their food placed in the containers.
Android Module
This module is coded entirely in Android Studio to create the Android application that is to be downloaded by the user. It includes functionality for connectivity to the Bluetooth Module HC-05. The application has two screens: Home and Set Time. The Home screen deals with establishing Bluetooth connectivity. The second screen is where the user can set time to heat lunch box in one of two options: Heat Now; to start heating immediately or ‘Set Lunch Timer’; to set a specific time to have the lunch ready by then. A countdown at the bottom shows time left for lunch box to be done heating.
Arduino IDE Module
The IDE version 1.8.2 is designed to be able to run programs on a hardware kits like Arduino Pro Mini and Bluteooth Module. The Arduino code allows the microcontroller to receive commands about heating from the Android application; over Bluetooth connection. The code allows the microcontroller to signal the PTC heating elements to start heating up. The lighting up of the two LEDs on the box that are connected to the upper and lower containers are also coded in the Arduino IDE.
Administrator Module
This module is for the administrator; which deals with him controlling the application functionality. and monitoring the WordPress website from which user can download the Android application. If changes are made to the Smart Lunch Box application, the administrator updates the new APK file to the WordPress website.
Design
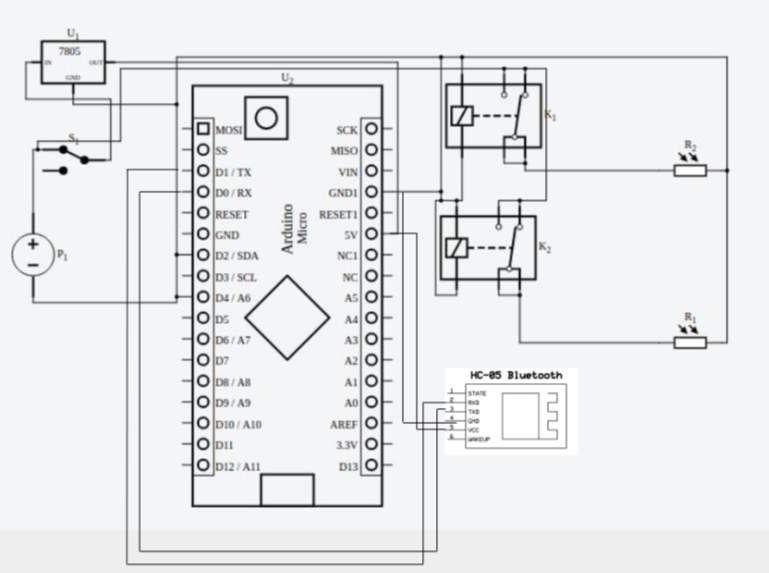
System Architecture
- Lunch Box with Switch
- PTC Heating Element in Container
- Mechanical Relay
- Arduino Pro Mini
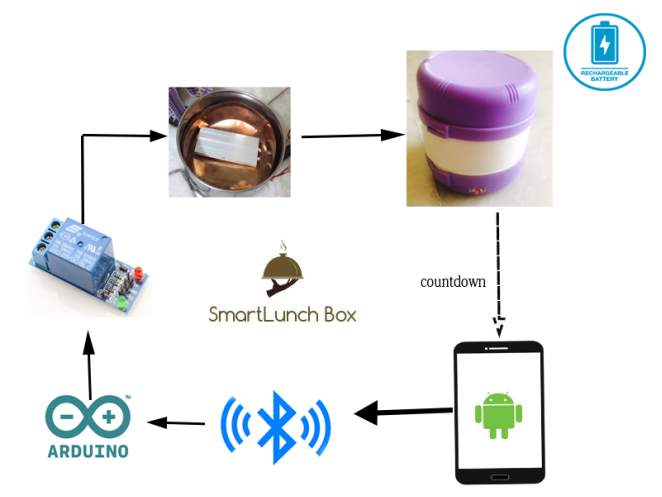
Fig 5.1 Showing the architecture of the Smart Lunch Box system
From the figure, one can infer the flow of command from Smart Lunch Box application to the Arduino Pro Mini microcontroller over a Bluetooth connection. The Arduino then signals the Mechanical Relays to close the circuit; for power to the PTC heating elements inside the containers. During heating, the countdown timer runs in the application; depicting time until food is ready.
System Flow Chart
Schematic Diagram
Unified Modelling Language
Unified Modelling Language (UML) is a standard language for writing software blue prints. The UML is a language for
- Visualizing,
- Specifying,
- Constructing
- Documenting the artefacts of a software intensive system.
The UML is a language which provides vocabulary and the rules for combining words in that vocabulary for the purpose of communication. A modelling language is a language whose vocabulary and the rules focus on the conceptual and physical representation of a system. Modelling yields an understanding of a system. UML is a method for describing the system architecture in detail using the blueprint. It represents the collection of best engineering practices that has proven successful in the modelling of large and complex systems. UML uses mostly graphical notations to express the design of software projects.
Definition
UML is a general purpose visual modelling language that is used to specify, visualize, construct and document the artefacts of the software system. UML is language that provides vocabulary and rules for communication and function on conceptual and physical representation- it is a modelling language. Specifying means building models that are precise, unambiguous and complete, in particular the UML addresses the specification of all the important analysis design and implementation decisions that must be made in developing and displaying the software intensive system. Visualization is where the UML includes both graphical and textual representation. It makes easy to visualize the system and for better understanding. Constructing is where UML models can be directly connected to a variety of programming languages and it is a sufficiently expensive and free from any ambiguity to permit the direct execution of models.
Building Blocks of UML
The vocabulary of the UML encompasses three kinds of building blocks:
- Things
- Relationships
- Diagrams
Things are the abstractions that are first-class citizens in a model; relationships tie these things together; diagrams group interesting collections of things.
Things in the UML
There are four kinds of things in the UML:
- Structural things
- Behavioral things
- Grouping things
- Annotational things
Structural things are the nouns of UML models. The structural things used in the project design are:
First, a class is a description of a set of objects that share the same attributes, operations, relationships and semantics.
| Window |
| Origin
Size |
| open()
close() move() display() |
Fig 5.2: Classes
Second, a use case is a description of set of sequence of actions that a system performs that yields an observable result of value to particular actor.

Fig 5.3: Use Cases
Third, a node is a physical element that exists at runtime and represents a computational resource, generally having at least some memory and often processing capability.
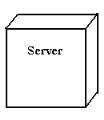
Fig 5.4: Node
Behavioral things are the dynamic parts of UML models. The behavioral thing used is:
Interaction:
An interaction is a behaviour that comprises a set of messages exchanged among a set of objects within a particular context to accomplish a specific purpose. An interaction involves a number of other elements, including messages, action sequences (the behaviour invoked by a message, and links (the connection between objects).
Fig 5.5: Messages
Relationships in the UML
There are four kinds of relationships in the UML:
- Dependency
- Association
- Generalization
- Realization
A dependency is a semantic relationship between two things in which a change to one thing may affect the semantics of the other thing (the dependent thing).
Fig 5.6: Dependencies
An association is a structural relationship that describes a set links, a link being a connection among objects. Aggregation is a special kind of association, representing a structural relationship between a whole and its parts.

Fig 5.7: Association
A generalization is a specialization/ generalization relationship in which objects of the specialized element (the child) are substitutable for objects of the generalized element (the parent).
Fig 5.8: Generalization
A realization is a semantic relationship between classifiers, where in one classifier specifies a contract that another classifier guarantees to carry out.
Fig 5.9: Realization
Diagrams in the UML
A diagram is a graphical representation of set of elements, most often rendered as a connected graph of vertices (things) and arcs (relationships).
There are two types of diagrams; they are:
- Structural
- Behavioral
Structural Diagrams
The UML‘s four structural diagrams exist to visualize, specify, construct and document the static aspects of the system. One can view the static parts of system using one of the following diagrams. The structural diagrams represent the static aspect of the system. These static aspects represent those parts of a diagram which forms the main structure and therefore stable. These static parts are represents by classes, interfaces, objects, components and nodes. Structural diagrams consist of Class diagram, Object Diagram, Component Diagram, Deployment Diagram.
Use-Case Diagram:
A use case is a set of scenarios that describing n interaction between a user and a system. A use case diagram displays the relationship among actors and use cases. The two main components of use case diagram are use cases and actors. An actor represents a user in another system that will interact with the system you are modelling. A use case diagram is an external view of the system that represents some action the user might perform in order to complete a task.
Activity Diagram:
Activity diagram describes the flow of control in a system. So it consists of activities and links. The flow can be sequential, concurrent or branched. Activities are the functions of a system. Numbers of activity diagrams are prepared to capture the entire flow in a system. Activity diagrams are used to visualize the flow of controls in a system. This is prepared to have an idea of how the system will work when executed. They can be used to describe business workflow or the operational workflow of any component in a system. Sometimes activity diagrams are used as an alternative to State machine diagrams.
Sequence Diagram:
Sequence diagram in UML shows how object interact with each other and the order those interactions occur. It is important to note that they show the interactions for a particular scenario. The processes are represented vertically and interactions are shown as arrows.
Behavioural Diagrams
The UML’s five behavioural diagrams are used to visualize, specify, construct, and document the dynamic aspects of a system. The UML’s behavioural diagrams are roughly organized around the major ways which can model the dynamics of a system. Behavioural diagrams basically capture the dynamic aspect of a system. Dynamic aspect can be further described as the changing/moving parts of a system. Behavioural diagrams consist of Use case diagram, Sequence Diagram, Collaboration Diagram, State Chart Diagram, Activity Diagram.
Class Diagram:
Class diagrams are used to describe the types of objects in a system and their relationships. Class diagram model class structure and contents using design elements such as classes, packages and objects. Class diagrams describe three different perspectives when designing a system, conceptual, specification and, implementation. These perspectives become evident as the diagram is created and help solidify the design. Class diagrams are arguably the most used UML diagram type. It is the main building block of any object-oriented solution. It shows the classes in a system, attributes and operations of each class has three parts, name at the top, attributes in the middle and operations or method at the bottom. In large systems with many classes related classes are grouped together to create class diagrams. Different relationships between diagrams are shown by different types of arrows.
Use Case Diagram:
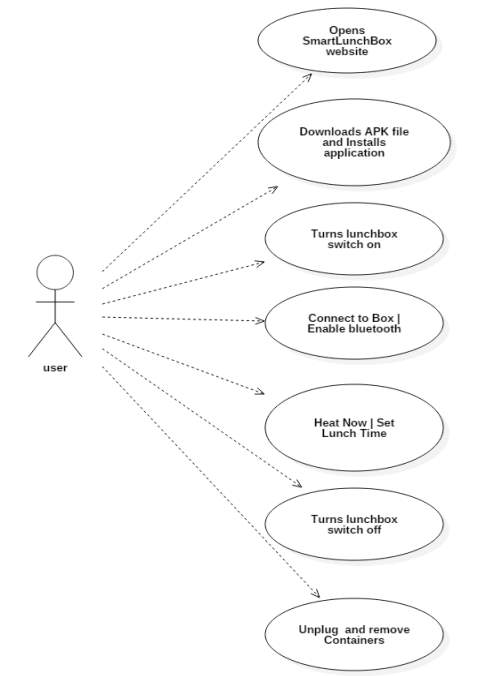
Fig 5.10 showing the use case diagram for user in the project
The above diagram is the use case diagram of our system.It shows the set of actions performed by a user. As described earlier, the content in the Ovals are actions performed in the system and those actors are like symbols represent users in system. Those dashed lines from user to action means users are performing those actions respectively.
Class Diagram:
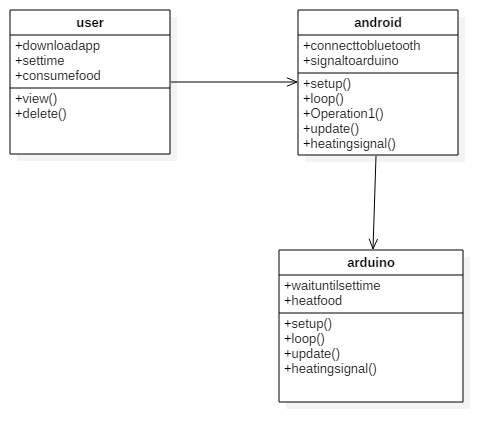
Fig 5.11 showing the use case diagram for user in the project
The above diagram represents class diagram of our system i.e., it shows various classes used in our system and the relationship with one class to other in the system. Each rectangle box represents a class and the upper portion of it represents class name and middle portion represents attributes of the class and the lower represents the functions performed by that class.
Activity Diagram:
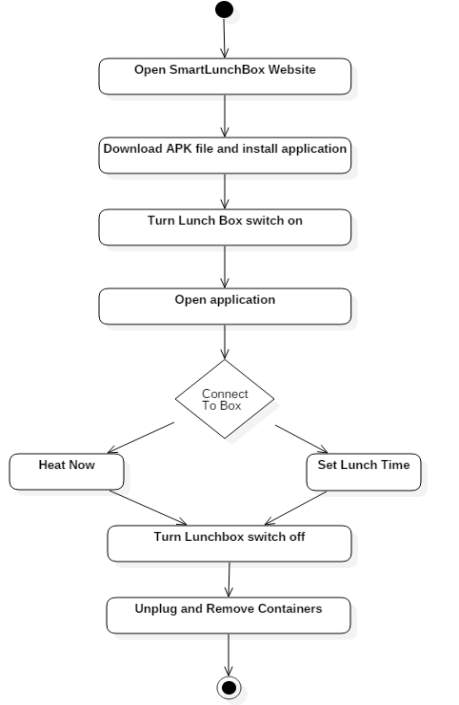
Fig 5.12 showing the activity diagram for user in the project
The above diagram represents activity diagram of the system i.e., it represents the flow of activities in our project. Dot at the start represents starting and dot with circle represents ending and an activity is represented as curve sided rectangle. On seeing it we can understand the flow activities that has to be gone from start to end
Sequence Diagram:

Fig 5.13 showing the sequence diagram for user in the project
The above diagram Show sequence diagram for a user. It represents sequence or flow of messages in system. The rectangle boxes at top represent objects that are invoked by the user and the lines dropping from those boxes are life lines which shows existence of the object up to what time. The boxes on the dashed lines are events and the lines connecting them represent messages and their flow.
Code
Arduino Code
int PTC1=4;
int PTC2=2;
//The relay board runs on active low configuration, so HIGH=LOW and LOW=HIGH
int LED1=7;
int LED2=8;
String inString= “”;
int timeToWait=0;
int inByte;
int k=0;
void setup(){
Serial.begin(9600);
pinMode(PTC1, OUTPUT);
pinMode(PTC2, OUTPUT);
pinMode(LED1, OUTPUT);
pinMode(LED2, OUTPUT);
pinMode(LED_BUILTIN, OUTPUT);
digitalWrite(PTC1, HIGH);
digitalWrite(PTC2, HIGH);
digitalWrite(LED_BUILTIN,HIGH);
digitalWrite(LED1,HIGH);
delay(1000);
digitalWrite(LED_BUILTIN,LOW);
digitalWrite(LED1,LOW);
delay(1000);
digitalWrite(LED2,HIGH);
digitalWrite(LED_BUILTIN,HIGH);
delay(1000);
digitalWrite(LED2,LOW);
digitalWrite(LED_BUILTIN,LOW);
delay(1000);
digitalWrite(LED1,HIGH);
digitalWrite(LED2,HIGH);
digitalWrite(LED_BUILTIN,HIGH);
delay(1000);
digitalWrite(LED1,LOW);
digitalWrite(LED2,LOW);
digitalWrite(LED_BUILTIN,LOW);
delay(1000);
}
void loop() {
if(Serial.available()){
int i=0;
int p=0;
inByte = Serial.read();
timeToWait = inByte;
//Serial.println(inByte);
if(isDigit(inByte)){
inString +=(char)inByte;
}
if(inByte == 101){
timeToWait = inString.toInt();
digitalWrite(LED1,HIGH);
digitalWrite(LED2,HIGH);
digitalWrite(LED_BUILTIN,HIGH);
delay(2000);
digitalWrite(LED1,LOW);
digitalWrite(LED2,LOW);
digitalWrite(LED_BUILTIN,LOW);
Serial.println(timeToWait);
while(p *60){
delay(1000);
p++;
}
for(i=0; i
Android Code
Screen 1
package com.example.rohi.smartlunchbox;
import android.support.v7.app.AppCompatActivity;
import android.os.Bundle;
import android.view.View;
import android.widget.Button;
import android.content.Intent;
public class Screen1 extends AppCompatActivity implements View.OnClickListener {
Button connect;
@Override
protected void onCreate(Bundle savedInstanceState){
super.onCreate(savedInstanceState);
setContentView(R.layout.activity_screen1);
connect= (Button)findViewById(R.id.Button);
connect.setOnClickListener(this);
}
@Override
public void onClick(View v){
Intent i=new Intent(getApplicationContext(), Screen2.class);
startActivity(i);
}
}
Screen 2
package com.example.rohi.smartlunchbox;
import android.bluetooth.BluetoothAdapter;
import android.bluetooth.BluetoothDevice;
import android.bluetooth.BluetoothSocket;
import android.content.DialogInterface;
import android.content.Intent;
import android.support.v7.app.AlertDialog;
import android.support.v7.app.AppCompatActivity;
import android.os.Bundle;
import android.util.Log;
import android.view.View;
import android.widget.Button;
import android.widget.TextView;
import android.widget.TimePicker;
import android.widget.Toast;
import java.io.IOException;
import java.util.Calendar;
import java.util.UUID;
import android.os.CountDownTimer;
import java.io.OutputStream;
public class Screen2 extends AppCompatActivity implements View.OnClickListener {
private static final String TAG = “SmartLunchBox”;
TimePicker timePicker;
Button btnOn,btnSetTime;
private static final int REQUEST_ENABLE_BT = 1;
private BluetoothAdapter btAdapter = null;
private BluetoothSocket btSocket = null;
private OutputStream outStream = null;
CountDownTimer countDownTimer;
TextView textView;
private static final UUID MY_UUID = UUID.fromString(“00001101-0000-1000-8000-00805F9B34FB”);
private static String address = “98:D3:32:10:55:7A”;
@Override
protected void onCreate(Bundle savedInstanceState) {
super.onCreate(savedInstanceState);
Log.d(TAG,”In onCreate()”);
setContentView(R.layout.activity_screen2);
btnOn = (Button)findViewById(R.id.button2); //heatnow
btnOn.setOnClickListener(this);
btnSetTime = (Button)findViewById(R.id.button3);
btnSetTime.setOnClickListener(this);
timePicker=(TimePicker)findViewById(R.id.timePicker);-
timePicker.setIs24HourView(true);
textView = (TextView)findViewById(R.id.textView);
btAdapter = BluetoothAdapter.getDefaultAdapter();
checkBTState();
}
Button connect;
@Override
public void onClick(View v) {
switch (v.getId()) {
case R.id.button2:
sendData(“1e”);
countDownTimer = new CountDownTimer(31 * 60 * 1000, 60 * 1000) {
@Override
public void onTick(long millisUntilFinished) {
textView.setText(“Minutes Remaining : ” + millisUntilFinished / 60000);
}
@Override
public void onFinish() {
textView.setText(“Heating Completed”);
}
}.start();
Toast.makeText(this, “Heating command sent”, Toast.LENGTH_LONG).show();
break;
case R.id.button3:
Calendar cal = Calendar.getInstance();
long lunchHour = timePicker.getCurrentHour();
long lunchMinute = timePicker.getCurrentMinute();
long currentHour = cal.get(Calendar.HOUR_OF_DAY);
long currentMinute = cal.get(Calendar.MINUTE);
long waitHours = abs(lunchHour – currentHour);
final long waitMinutes = abs(lunchMinute – currentMinute) + waitHours * 60;
DialogInterface.OnClickListener dialogClickListener = new DialogInterface.OnClickListener() {
@Override
public void onClick(DialogInterface dialog, int which) {
switch (which) {
case DialogInterface.BUTTON_POSITIVE:
sendData(waitMinutes + “e”);
break;
case DialogInterface.BUTTON_NEGATIVE:
break;
}
}
};
AlertDialog.Builder builder = new AlertDialog.Builder(v.getContext());
builder.setMessage(“Are you sure you want to fix this as Lunch Time?”).setPositiveButton(“Yes”, dialogClickListener)
.setNegativeButton(“No”, dialogClickListener).show();
countDownTimer = new CountDownTimer(waitMinutes * 60 * 1000, 60 * 1000) {
@Override
public void onTick(long millisUntilFinished) {
textView.setText(“Minutes Remaining : ” + millisUntilFinished / 60000);
}
@Override
public void onFinish() {
textView.setText(“Heating Completed”);
}
}.start();
break;
}
}
@Override
public void onResume() {
super.onResume();
Log.d(TAG, “…In onResume – Attempting client connect…”);
// Set up a pointer to the remote node using it’s address.
BluetoothDevice device = btAdapter.getRemoteDevice(address);
try {
btSocket = device.createRfcommSocketToServiceRecord(MY_UUID);
} catch (IOException e) {
errorExit(“Fatal Error”, “In onResume() and socket create failed: ” + e.getMessage() + “.”);
}
btAdapter.cancelDiscovery();
Log.d(TAG, “…Connecting to Remote…”);
try {
btSocket.connect();
Log.d(TAG, “…Connection established and data link opened…”);
} catch (IOException e) {
try {
btSocket.close();
} catch (IOException e2) {
errorExit(“Fatal Error”, “In onResume() and unable to close socket during connection failure” + e2.getMessage() + “.”);
}
}
// Create a data stream so we can talk to server.
Log.d(TAG, “…Creating Socket…”);
try {
outStream = btSocket.getOutputStream();
} catch (IOException e) {
errorExit(“Fatal Error”, “In onResume() and output stream creation failed:” + e.getMessage() + “.”);
}
}
@Override
public void onPause() {
super.onPause();
Log.d(TAG, “…In onPause()…”);
if (outStream != null) {
try {
outStream.flush();
} catch (IOException e) {
errorExit(“Fatal Error”, “In onPause() and failed to flush output stream: ” + e.getMessage() + “.”);
}
}
try {
btSocket.close();
} catch (IOException e2) {
errorExit(“Fatal Error”, “In onPause() and failed to close socket.” + e2.getMessage() + “.”);
}
}
private void checkBTState() {
// Check for Bluetooth support and then check to make sure it is turned on
// Emulator doesn’t support Bluetooth and will return null
if(btAdapter==null) {
errorExit(“Fatal Error”, “Bluetooth Not supported. Aborting.”);
} else {
if (btAdapter.isEnabled()) {
Log.d(TAG, “…Bluetooth is enabled…”);
} else {
//Prompt user to turn on Bluetooth
Intent enableBtIntent = new Intent(btAdapter.ACTION_REQUEST_ENABLE);
startActivityForResult(enableBtIntent, REQUEST_ENABLE_BT);
}
}
}
private void errorExit(String title, String message){
Toast msg = Toast.makeText(getBaseContext(),
title + ” – ” + message, Toast.LENGTH_SHORT);
msg.show();
finish();
}
private void sendData(String message) {
byte[] msgBuffer = message.getBytes();
Log.d(TAG, “…Sending data: ” + message + “…”);
try {
outStream.write(msgBuffer);
} catch (IOException e) {
String msg = “In onResume() and an exception occurred during write: ” + e.getMessage();
if (address.equals(“00:00:00:00:00:00”))
msg = msg + “. Update your server address from 00:00:00:00:00:00 to the correct address on line 37 in the java code”;
msg = msg + “. Check that the SPP UUID: ” + MY_UUID.toString() + ” exists on server. ”;
errorExit(“Fatal Error”, msg);
}
}
}
Screen 1 Activity
android_id=”@+id/activity_screen1″
android_layout_width=”match_parent”
android_layout_height=”match_parent”
android_paddingBottom=”@dimen/activity_vertical_margin”
android_paddingLeft=”@dimen/activity_horizontal_margin”
android_paddingRight=”@dimen/activity_horizontal_margin”
android_paddingTop=”@dimen/activity_vertical_margin”
tools_context=”com.example.rohi.smartlunchbox.Screen1″
tools_background=”@android:color/white”>
Screen 2 Activity
android_layout_width=”match_parent”
android_layout_height=”match_parent”
android_fitsSystemWindows=”true”
tools_context=”com.example.rohi.smartlunchbox.Screen2″”>
Manifest File
Screenshots
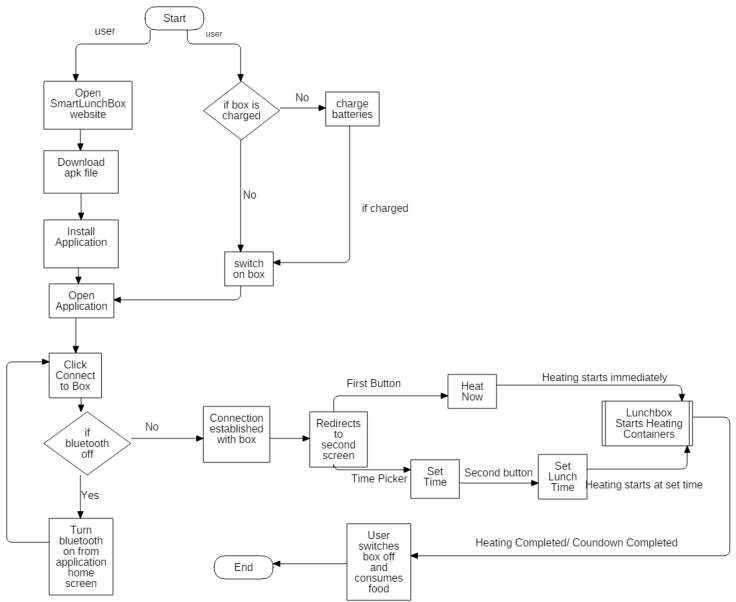
User opens SmartLunchBox website at https://smartlunchbox.wordpress.com/ from their android mobile phone to access the necessary download file.
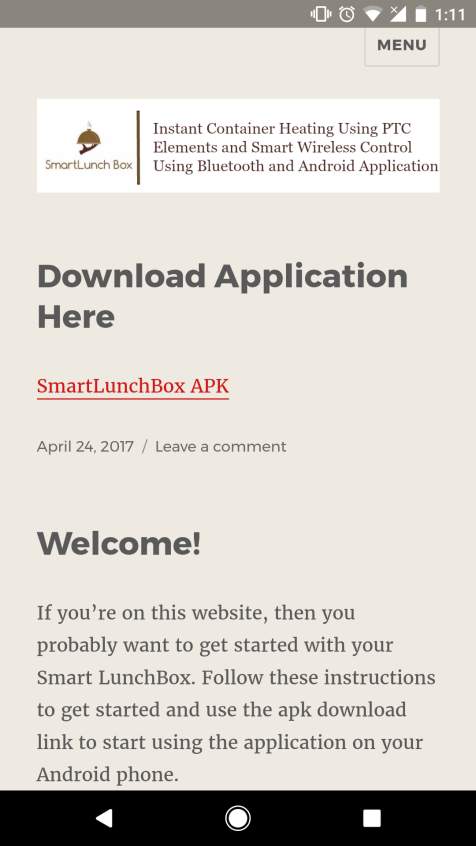
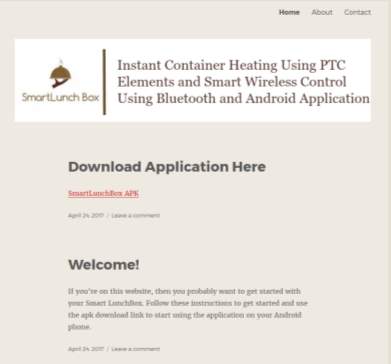
Note: The website when accessed from a computer, looks as follows.
Link redirects to MediaFire where user downloads link for the APK file.
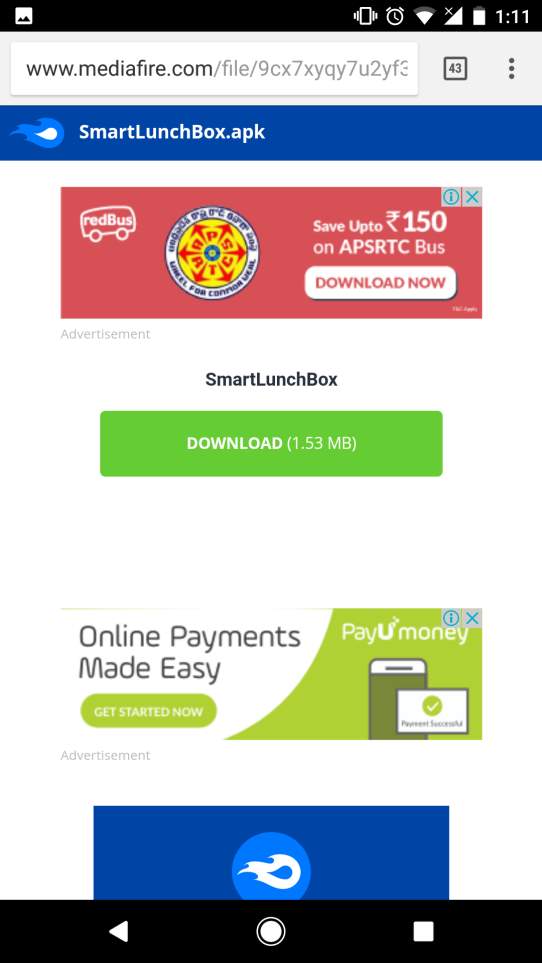
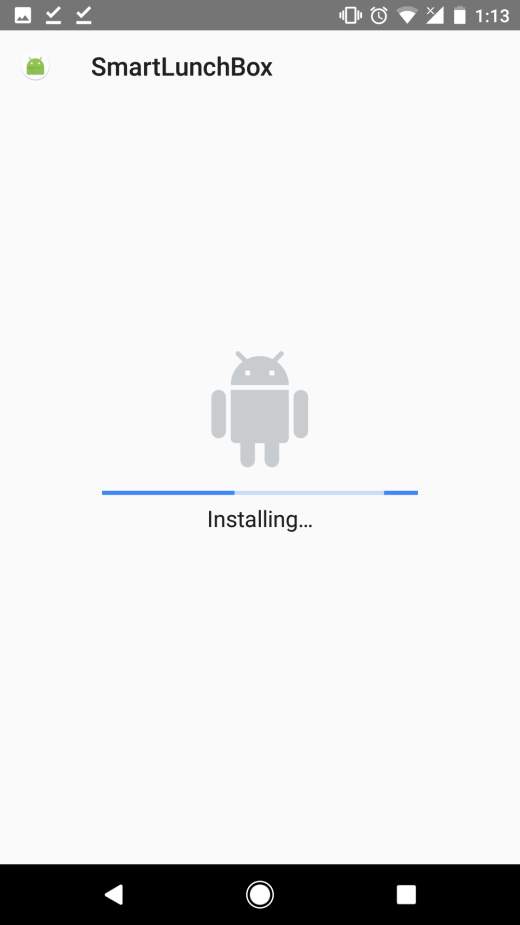
User downloads the APK file and installs it.
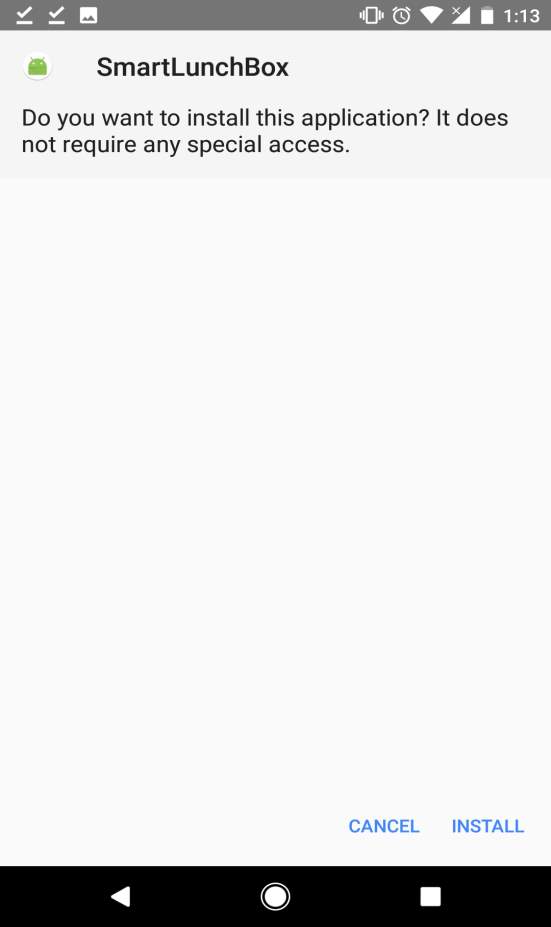
Note: Application does not require any special access.
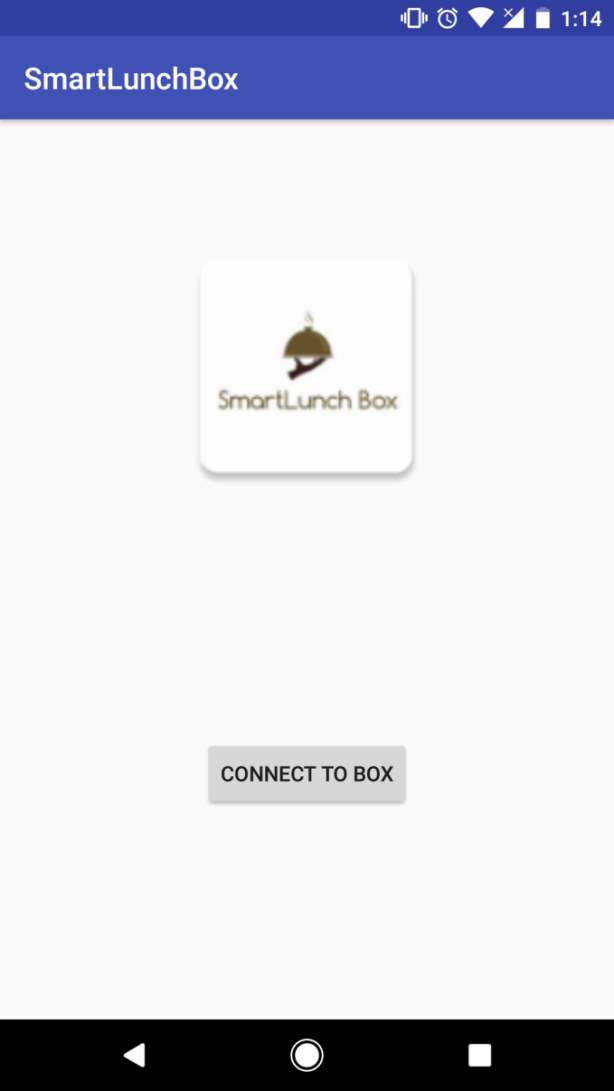
User opens application after installation is completed and is directed to the SmartLunchBox home screen.
User manually switches an on/off switch on the side of the Lunch Box.
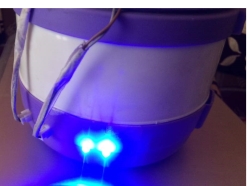
Note: The blue LED’s light up when the box is turned on.
Upon clicking connect to box, a connection is established with Arduino Pro Mini controller and the application will redirect to the second screen. If the Bluetooth is turned off, a prompt to enable Bluetooth will pop up; user must select ‘Turn On’. After turning Bluetooth on, user will select ‘Connect to Box’ to proceed.

In the second screen, the user has two options to begin heating the lunch box; ‘Heat Now’ or ‘Set Lunch Time’.

On clicking ‘Heat Now’, the android application hints the Arudino pro mini which in turn activates the PTC heat sensors to start heating the food immediately. This occurs with the help of the entire hardware set up at the bottom of the lunch box.
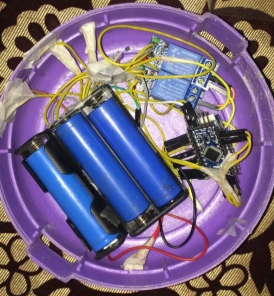
The PTC heat sensors are placed on copper foil ,which acts as a conductor and it is covered with aluminium foil so that the food doesn’t stay in contact with any of the electrical components.
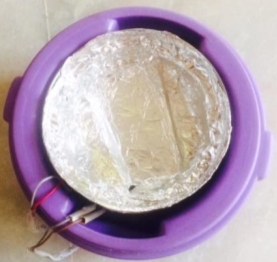
These PTC sensors are charged via lithium batteries and are connected to it externally as in shown in the figure.
The user can also choose ‘Set Lunch Time’ option, using which the food gets heated by a certain set time.
Note: The Arduino Pro mini waits till the set time and activates the heat sensors 30 minutes prior to the set lunch time to heat the food. By the end of the set time the food gets heated and can be consumed.
Meanwhile, we can also see the ‘Minutes Remaining’ feature on the application which shows the amount of time remaining for the food to get heated.
Once the food is heated, unplug the switch and remove containers to consume the food.
Testing
The purpose of testing is to discover errors. Testing is the process of trying to discover every conceivable fault or weakness in a work product. It provides a way to check the functionality of components, sub assemblies, assemblies and/or a finished product It is the process of exercising software with the intent of ensuring that the software system meets its requirements and user expectations and does not fail in an unacceptable manner. There are various types of tests. Each type addresses a specific testing requirement.
Types of Testing
Unit Testing
Unit testing involves the design of test cases that validate that the internal program logic is functioning properly, and that program inputs produce valid outputs. All decision branches and internal code flow should be validated. It is the testing of individual software units of the application .it is done after the completion of an individual unit before integration. This is a structural testing, that relies on knowledge of its construction and is invasive. Unit tests perform basic tests at component level and test a specific business process, application, and/or system configuration. Unit tests ensure that each unique path of a business process performs accurately to the documented specifications and contains clearly defined inputs and expected results.
Integration Testing
Integration tests are designed to test integrated software components to determine if they actually run as one program. Testing is event driven and is more concerned with the basic outcome of screens or fields. Integration tests demonstrate that although the components were individually satisfaction, as shown by successfully unit testing, the combination of components is correct and consistent. Integration testing is specifically aimed at exposing the problems that arise from the combination of components.
Functional Testing
Functional tests provide systematic demonstrations that functions tested are available as specified by the business and technical requirements, system documentation, and user manuals. Functional testing is centered on the following items:
Valid Input: identified classes of valid input must be accepted.
Invalid Input: identified classes of invalid input must be rejected.
Functions: identified functions must be exercised.
Output: identified classes of application outputs must be exercised.
Systems/Procedures: interfacing systems or procedures must be invoked.
Organization and preparation of functional tests is focused on requirements, key functions, or special test cases. In addition, systematic coverage pertaining to identify Business process flows; data fields, predefined processes, and successive processes must be considered for testing. Before functional testing is complete, additional tests are identified and the effective value of current tests is determined.
System Testing
System testing ensures that the entire integrated software system meets requirements. It tests a configuration to ensure known and predictable results. An example of system testing is the configuration oriented system integration test. It is based on process descriptions and flows, emphasizing pre-driven process links and integration points.
White Box Testing
White Box Testing is a testing in which in which the software tester has knowledge of the inner workings, structure and language of the software, or at least its purpose. Its purpose is to test areas that cannot be reached from a black box level.
Black Box Testing
Black Box Testing is testing the software without any knowledge of the inner workings, structure or language of the module being tested. Black box tests, as most other kinds of tests, must be written from a definitive source document, such as specification or requirements document, such as specification or requirements document. It is a testing in which the software under test is treated, as a black box .you cannot ‘see’ into it. The test provides inputs and responds to outputs without considering how the software works.
Unit Testing
Unit testing is usually conducted as part of a combined code and unit test phase of the software lifecycle, although it is not uncommon for coding and unit testing to be conducted as two distinct phases.
Test strategy and approach
Field testing will be performed manually and functional tests will be written in detail.
Test objectives
- Lunch Box should be powered up : LED
- APK file must function properly
- Bluetooth Connectivity should be established
Features to be tested
- Communication established with Lunch Box
- LED lighting up at appropriate times
- Heating of containers according to set time
- Accurate ‘minutes remaining’ displayed
- All button should perform correct operations.
Integration Testing
Software integration testing is the incremental integration testing of two or more integrated software components on a single platform to produce failures caused by interface defects. The task of the integration test is to check that components or software applications, e.g. components in a software system or – one step up – software applications at the company level – interact without error.
Test Results: All the test cases mentioned above passed successfully. No defects encountered.
Acceptance
User Acceptance Testing is a critical phase of any project and requires significant participation by the end user. It also ensures that the system meets the functional requirements.
Test Results: All the test cases mentioned above passed successfully. No defects encountered.
Test Cases
Smart Lunch Box Website
| S.No | Test Case | Excepted Result | Test Result |
| 1 | On entering Smart Lunch Box website link in mobile browser. | Smart Lunch Box website opens up to Home Screen. | Successful |
| 2 | On clicking external Download Link from mobile browser. | Redirect to MediaFire download link | Successful |
| 3 | On clicking MediaFire APK download link from phone | APK file downloads onto the Android phone | Successful |
Fig 8.1 showing the test cases for Smart Lunch Box Website
Application Communicating with Lunch Box
| S.No | Test Case | Excepted Result | Test Result |
|
|
On manually switching on Lunch Box on/off switch | Blue LED1 and LED2 light up to indicate turned on | Successful |
|
|
On Clicking the Connect To Box Button | Enable Bluetooth/ Application connects to Lunch Box over Bluetooth connectivity and LEDs light up | Successful |
|
|
On clicking Heat Now | Lunch Box starts heating immediately: signalled by LEDs on (alternatively). | Successful |
|
|
On clicking Set Lunch Time | Lunch Box waits and heats at set time; signalled by LED on (alternatively). | Successful |
|
|
On clicking Heat Now/ Set Lunch Time | Display Minutes remaining at bottom of Application screen. | Successful |
|
|
On exiting application and opening to check Minutes Remaining | Application second screen opens with Minutes Remaining displayed at the bottom of the screen | Successful |
|
|
On Minutes Remaining: 0 | Lunch Box finishes heating, LEDs off | Successful |
Fig 8.2 showing test cases for communicating with the lunch box through Application
Testing Heating of Various Food Types
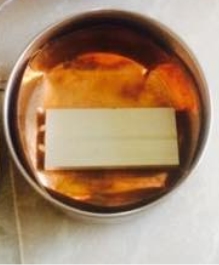
The effect of heating varies depending on the type of food in the container, the extent of heating must be understood clearly so that it would not make food unfit to consume. For this testing the following components were used—
- Cooked rice 100 grams
- Oatmeal 100 grams
- Cooked Noodles 100 grams
- Thermometer ranging -50˚to 300˚celsius.

Fig 8.3 showing the Experimental Setup

Fig 8.4 showing Thermometer (range: -50 to 300˚C)
| Time (min) | Cooked Rice (˚c) | Oatmeal (˚c) | Cooked Noodles (˚c) |
| 0 | 27.1 | 29.9 | 29.3 |
| 2.5 | 38.1 | 30.7 | 37.3 |
| 5 | 58.1 | 32.2 | 46.5 |
| 7.5 | 68.2 | 39.3 | 55 |
| 10 | 68.9 | 52.5 | 65.3 |
| 12.5 | 72.1 | 65.6 | 71.6 |
| 15 | 73 | 78.4 | 81.3 |
| 17.5 | 73.3 | 81.6 | 86.5 |
| 20 | 73.4 | 85.8 | 87.3 |
| 22.5 | 74.5 | 86.4 | 88.1 |
| 25 | 75.1 | 87.3 | 88.9 |
| 27.5 | 76.4 | 88 | 90.3 |
| 30 | 77.6 | 88.8 | 91.4 |
Fig 8.5 showing table for Experiment Readings
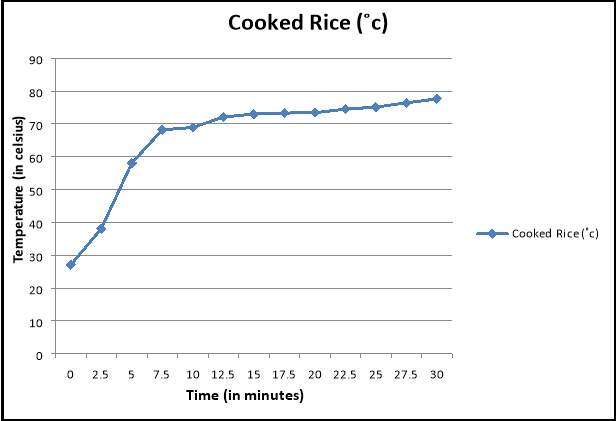
Fig 8.6 showing graph for heating of Cooked Rice
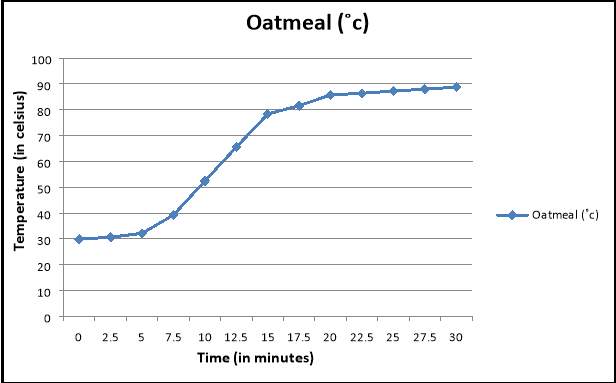
Fig 8.7 showing graph for heating of Oatmeal
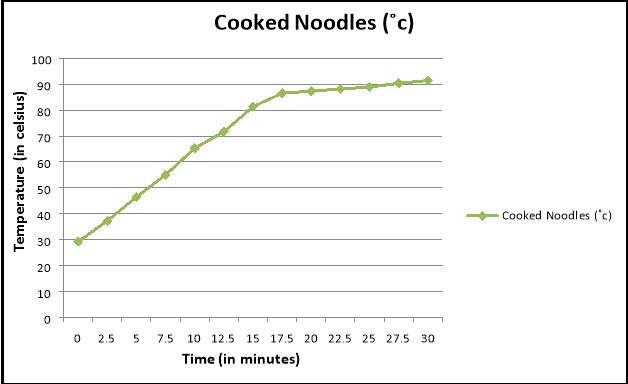
Fig 8.8 showing graph for heating of Cooked Noodles
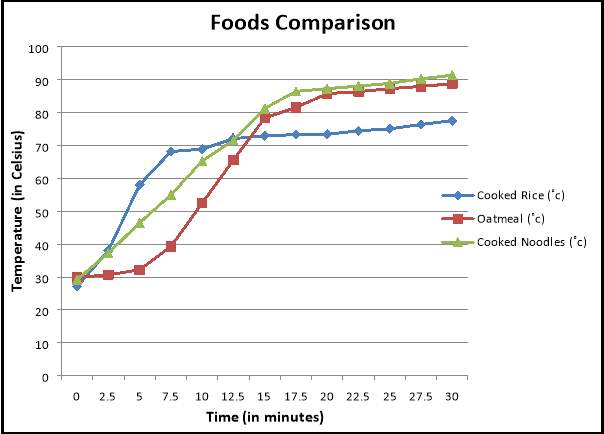
Fig 8.9 showing graph for comparing heating of all three foods
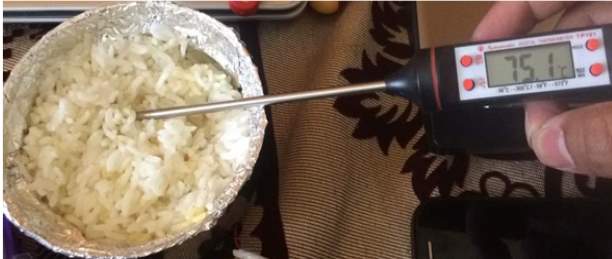
Fig 8.10 showing temperature of rice at 25 minutes of heating
The experiment shows that the temperature increases exponentially within the first 10 minutes for all three foods. Following the 10 minute mark, the rice and noodles slowly heat up. But for the oatmeal, this observation occurs at the 15 minute mark. This difference in temperature rise is dependent on the type of food substance used. From the ‘Food Comparison’ graph, we can tell that the cooked rice has the most rapid increase in temperature while oatmeal takes longer.
When reheating food, it should be steaming hot all the way through or reach a temperature of 70 ˚C for more than 2 minutes. The tested foods satisfied this condition at times 12.5 minutes for rice and noodles and at 15 minutes for the oatmeal.
Conclusion and Scope for Future Enhancements
The Smart Lunch Box allows the user to control their wirelessly controlled, heating lunchbox from their phone. This system offers automation of some traditional features; such as being able to send commands to the lunch box without having to physically set timer for heating food. The device will serve as an alternative to using conventional microwaves for the purpose of heating food. This will make life easier for users who want to have hot food on the go. It eliminates the need to have an external power source at the time of heating and therefore, will serve as a quick alternative. For future additions, we would like to address several areas:
- Improving the battery capacity for the Lunch Box’s power supply for longer usage time.
- An addition of a power outlet and/ USB port for alternative options to charge the box in the situation where batteries aren’t charged or based on user preference.
- A feature to charge the batteries directly from a port on the box without having to remove them each time recharging is needed.
- An addition for setting temperature as well as timer for Lunch Box such that user can customize the heat settings.
- Further automate the process such that user can choose either the physical switch or a setting in the application to completely switch the box off.
- A sleeker design of the lunchbox for materials with higher retaining materials to store food and exterior materials that has higher insulating properties.
References
The Rise of Big Business under article History of the United States Industrialization and reform, N.d, Article on The USA Online, Retrieved from http://www.theusaonline.com/history/industrialization.htm [6]
Sam Arora. 2016, “Does Food Spoil In Vacuum”, retrieved from https://www.quora.com/Does-food-spoil-in-a-vacuum para3 [11]
Rico Francois. 2010, Electrical Lunch Box Patent, US 20100275615, under United States Patent Office, retrieved from http://www.google.co.in/patents/US20100275615 claim 19 [16]
Ramachandra Budihal 2010, “Emerging Trends in Embedded Systems and Applications”, retrieved from http://www.eetimes.com/author.asp?section_id=36&doc_id=1287560 [3]
Rachel Johnson. 2006, “Men and Women: Differences in How Men Eat and How Women Eat”, retrieved from http://www.eatingwell.com/nutrition_health/nutrition_news_information/his_hers_eating p.1 [9]
N.d., “Future of Embedded and Career Options”, retrieved from http://www.digit.in/technology-guides/fasttrack-to-embedded-systems/future-of-embedded-systems-and-career-options.html para7 [2]
N.d. “Insulation Materials”, retrieved from https://energy.gov/energysaver/insulation-materials para6 [13]
Michael D. Grissom 2004, “Battery powered hot lunch box” under Lunchbox with In-built Battery Operated Heateron CreativityPool website, retrieved from http://www.creativitypool.com/forums/viewtopic.php?t=1524#p4934 [22]
Mandy Francis. 2014, The Electric Lunch Box, under “The plug-in lunchbox that cooks your food at your desk”, on DailyMail UK, retrieved from http://www.dailymail.co.uk/femail/article-2670078/The-plug-lunchbox-cooks-food-desk.html [17]
Lunch Box. N.d. Wikipedia Article. Retrieved from https://en.wikipedia.org/wiki/Lunch_box p.1 para2 [7]
Lisa Bramen 2009, “The History of the Lunch Box”, Article on Smithonian Magazine Retrieved from http://www.smithsonianmag.com/arts-culture/the-history-of-the-lunch-box-98329938/ para7 [8]
Kyle Munkittric. 2011, “In Which Technological Era Are We Living”, retrieved from http://www.popbioethics.com/2011/05/in-which-technological-era-are-we-living/ [1]
Katrina Turril 2016, “How big child food portions should be compared to adults’”, retrieved from http://www.express.co.uk/life-style/food/687383/what-portion-sizes-we-should-be-giving-to-our-children [10]
Jo Lakin 2011, “Cooking and Re-heating Food”, retrieved from https://www2.warwick.ac.uk/services/healthsafetywellbeing/guidance/foodhygieneandsafety/cookingandreheatingfood/ para4, [5]
Jen Lowry 2013, “Cheap Metals/Plastics that are heat resistant”, retrieved from http://www.scienceforums.net/topic/75074-what-are-some-cheap-metals-plastics-that-are-heat-resistant/ [12]
Heating Lunch Box, N.d. Product Listing, under Thermal Lunchbox, retrieved from http://www.tayama-usa.com/index.php/additionalitems/285.html [19]
Google Patents N.d, Heated Electric Lunch Boxes, under Google-listed patents, retrieved from https://patents.google.com/?q=lunch+box&q=compartment&q=fig&q=lid&q=lunch&before=20061208&scholar [15]
Faitron 2016“HeatsBox Makes Post Workout Meals Easy” and “Faitron Funded Closing Seed Round Raising More Than Six Digits” on HeatsBox website, retrieved from http://www.heatsbox.com/heatsbox-makes-post-workout-meals-easy/ para5 [20]
Daniel Imperiale 2017, Koolatron LBS-01 under “7 Best Electric Heated Lunch Boxes” , retrieved from https://wiki.ezvid.com/best-electric-heated-lunch-boxes para1 [18]
Carlos Gonzalez 2015, “What’s the Difference Between Conduction, Convection, and Radiation?” , retrieved from http://www.machinedesign.com/whats-difference-between/what-s-difference-between-conduction-convection-and-radiation [4]
2013, “Foodskin Flexible Lunchbox: Save Your Sandwiches” Article on Huffington Post, retrieved from http://www.huffingtonpost.com/2013/09/16/flexible-lunchbox_n_3920451.html para3 [14]
“Yescom Portable Electric Heating Lunch Box” under Lunch Boxeson Amazon USA, retrieved from https://www.amazon.com/dp/B01LW8W976/?tag=vladflip-20 [21]
“Yescom Portable Electric Heating Lunch Box” under Lunch Boxeson Amazon USA, retrieved from https://www.amazon.com/dp/B01LW8W976/?tag=vladflip-20 [23]
Cite This Work
To export a reference to this article please select a referencing stye below:
Related Services
View all


DMCA / Removal Request
If you are the original writer of this dissertation and no longer wish to have your work published on the UKDiss.com website then please: