Impact and Fatigue Loading on Cold-worked Aluminium Specimen
Info: 8416 words (34 pages) Dissertation
Published: 19th Jan 2022
Tagged: Mechanics
ABSTRACT
The purpose of this project work was to investigate experimentally, impact and fatigue loading on cold-worked aluminium (AA6063). Impact test and fatigue tests were carried out. Results from the impact test were statistically analysed using modified Thompson technique. These results showed low impact energy values, an indication of brittle fracture. The fatigue test on the other hand was conducted using rotating fatigue machine which applied a cyclical stress to samples of AA6063 with neck radius of 4mm. Samples of the cold-worked AA6063 material were loaded with stresses ranging from 0.9 to 0.6 of the yield strength.
The resulting number of cycles to failure were used in conjunction with the stress values to plot a stress vs. cycles (S-N) diagram. An endurance limit (fatigue strength) of 51.5MPa was extrapolated from a curve fit based on a reference number of cycles to failure, 107.
Finally, the number of cycles to failure were compared to the predicted number of cycles to failure calculated. The differences in these values were attributed to inaccuracies in specimen dimensions, surface finish and error in loading.
Keywords: impact, fatigue, aluminium, cycles, stress
Table of Contents
Click to expand Table of Contents
CHAPTER ONE: INTRODUCTION
1.1 Background of study
1.2 Problem Statement
1.3 Objectives
1.4 Scopes
1.5 Relevance
CHAPTER 2: LITERATURE REVIEW
CHAPTER 3: METHODOLOGY
3.1 Tensile testing
3.2 Fatigue testing
3.2.1 Description of the rotating fatigue machine (SM1090)
3.2.2 Fatigue specimen
3.2.3 Rotating cantilever
3.2.4 Stress in the specimen
3.2.5 Predicted number of cycles
3.2.6 Low and high cycle fatigue
3.2.7 Endurance limit
3.2.8 Wohler or S-N curve
3.2.9 Fatigue and temperature
3.3 Impact test
CHAPTER 4: RESULTS AND DISCUSSION
4.1 Material
4.2 Impact properties
4.3 Tensile properties
4.4 Analysis of fatigue tests
5.1 CONCLUSION
5.2 RECOMMENDATIONS
References
List of figures
Figure 1: Instron 600DX universal tensile testing machine
Figure 2: dimensions of tensile test specimen
Figure 3: A rotating fatigue machine (SM1090)
Figure 4: dimensions of fatigue test specimen
Figure 5: Rotating fatigue machine with specimen in loading position
Figure 6: the rotating cantilever
Figure 7: cycles and reversals
Figure 8: specimen orientation and dimensions when fixed in the machine
Figure 9: Charpy impact specimen
Figure 10: Charpy v-notch apparatus
Figure 11: graph of load vs extension for both specimens
Figure 12: experimental log-log S-N plot
Figure 13: theoretical log-log S-N plot
Figure 14: S-N graph comparing experimental to theoretical
CHAPTER ONE: INTRODUCTION
1.1 Background of study
All materials have several properties that result in advantages and disadvantages. The study of these properties is key to the design of a mechanical system and for the selection of the right materials for a given part. The goal of this experiment is to study the behaviour of cold worked aluminium (AA6063) under impact and fatigue loading. To do this, impact test as well as fatigue test will be carried out. Impact test is a means used in studying a material’s toughness.
Toughness is defined as the capacity of a material to absorb energy and deform plastically before fracture occurs. In general, toughness depends on ductility, strength, loading rate, temperature, geometrical discontinuities (such as notches), microstructure and other factors. A non-notched bar of ductile metal at room temperature will not fracture under the effect of impact loading. It would only bend plastically. In order for fracture to take place, a notch has to be introduced in the specimen [1]. This notch will cause localized high stress concentrations, absorb energy in a localized region, restrict the drawing-out action (i.e. artificially reduced ductility), and induce brittle fracture. The term “notch effect” or “notch sensitivity” is the tendency of a ductile material to act like a brittle material when tested as a notched specimen.
The notch sensitivity of a material or its ability to absorb energy can be tested using the impact test. Impact test involves the sudden and dynamic application of load to a test specimen. For this reason, a pendulum is released from a fixed height in order to strike the standard impact specimen. There are two common methods of impact testing namely; Izod test and Charpy test. These methods are different in the way the specimen is placed. In Izod test, the specimen is placed in a vertical position and the notch area is facing the pendulum where as in the charpy test, the specimen is placed horizontally with the un-notched area facing the pendulum.
The most common way of measuring impact strength (i.e. Charpy test) is used in this experiment. The test result gives an indication of how brittle a material is. Materials are usually classified loosely as either brittle or ductile depending on the characteristic features of the failure. Brittle fracture often occurs due to a single crack propagating through the specimen while ductile fracture is as a result of the nucleation, growth and coalescence of voids in the material. Brittle materials have the following features:
- Very little plastic flow occurs before the specimen fails
- The two sides of the fracture surface have a good fit well after fracture.
- The fracture surface has a facet appearance
- Fracture occurs along certain crystallographic planes or along grain boundaries.
Ductile materials on the other hand have the following features:
- There’s extensive plastic flow in the material before fracture
- Considerable necking is evident
- Fracture surfaces don’t fit together
- The fractured surface has a dimpled appearance quite often with second phase particles inside them.
Fatigue is the failure or weakening of a material as a result of prolonged stress [2]. Fatigue may be due to of a lot of factors, all of which are not fully understood [3]. Still, it is apparent that when a mass is continuously loaded cyclically at a location on the material, cracks begin to develop. These cracks then spread enough ultimately breaking the piece at the location and causing failure. Fatigue failure occurs when the metal is subjected to a repetitive or fluctuating stress and will fail at a stress much lower than its tensile strength. Subsequently, in designing a mechanical system, the knowledge of these limits is of importance [3].
Catastrophic fatigue failure can cause a large loss in money as well as result in loss of lives due to a poor design. Fatigue occurs as a result of a cumulative process consisting of crack initiation, propagation and final fracture of a component. Localized plastic deformation may take place at the highest stress site during cyclic loading. This plastic deformation causes permanent damage to the component and crack begins to form. As the component experiences an increase in the number of loading cycles, the crack length also increases. After a certain number of cycles, the crack causes the component to fail. The component or part will fail at a level of stress below that at which failure would occur under static loading.
This phenomenon is recognised as fatigue failure and is responsible for the majority of failures in several mechanical components. The fatigue testing method involves testing specimens under various states of stress amplitude; the number of cycles required to cause total failure of the specimen or part is recorded. Stress amplitude refers to the maximum stress in tension and compression to which specimen can be subjected. Quantitative data for the fatigue properties of a given material can be obtained by subjecting a number of standard specimens to cyclic loads until fracture takes place.
1.2 Problem Statement
It has been discovered that at least 75% of all machine and structural failures have been due to some form of fatigue [4]. Failures due to fatigue occur most often in moving machinery parts e.g. shafts, connecting rods, axles, spring and valves. Even the fuselage and wings of an airplane or the hull of a submarine are likewise susceptible to fatigue failures because in service they are faced with variations of stress. Because it is essential to avoid premature fractures in such components and it isn’t always possible to predict when and where fatigue failure will occur during service; hence, full-scale testing on aircraft wings, engine pods, fuselage and others is carried out. This involves providing support for the particular aircraft section, car chassis in jigs or submarine hull and applying cyclically varying stresses with the help of hydraulic cylinders having specially controlled valves.
According to the problems stated above, there are two main problems related to this work which are:
- Knowing the time for preventive maintenance.
- Inevitable breakdown time of component.
1.3 Objectives
- To determine the impact energy of the specimen (which is a measure of the material’s toughness).
- To determine the fatigue strength of the material.
- To measure the number of cycles at different stress levels the specimen can withstand before fatigue failure takes place.
1.4 Scopes
Keeping in mind the above objectives, the following scopes have been recognized:
- Material for this experiment is an alloy of aluminium (AA6063).
- Lathe conventional machine as well as the milling machine will be used for fabricating.
- Charpy impact test, tensile test and fatigue test will be performed.
- All data from the experiment will be analysed.
1.5 Relevance
A failure that results from cyclic loads is called fatigue failure. Since numerous structural components are subjected to cyclic loads it is essential for the design engineer to have some quantitative measure of the material’s capacity to withstand such repeated loads. In spite of the fact that fatigue tests conducted on small specimens do not exactly give the fatigue life of a large part, such tests do provide data on the fundamental fatigue crack initiation behaviour of the metal or alloy. As a result, such data can be utilized to develop criteria to prevent fatigue failures in engineering design. Cases of the utilization of small-specimen fatigue test data can be found in the premises of the fatigue design codes for complex welded, riveted, or bolted structures, automotive and aerospace components, boilers and pressure vessels.
Additionally, when structures that will be subjected to dynamic loading are designed, the impact behaviour of the material should be put into consideration. The impact behaviour involves not only the topic of stresses induced, but also an important consideration of energy absorption at brittle rupture. The Charpy V-notch (CVN) test specimen and associated test methodology is a viable cost-saving tool for the aluminium industry. The specimen is quite easy to prepare, several specimens can be prepared at one time, different specimen orientations can be tested, and a relatively low-cost apparatus is used to test the specimen. In many structural applications, the CVN test can be used: (1) as a quality control tool, (2) to check conformance with impact requirements in standards, and (3) to predict service performance of components.
1.6 Definition of terms
J – Joules (unit for energy)
Std. dev – standard deviation
avg – average
M – Bending moment
F – Applied load
I – Second moment of area
l – Distance from a given load
D – Neck diameter
N – Fatigue life (number of cycles to failure)
Nref – reference number of cycles
X – Intermediate value based on the reference number of cycles
σmax– maximum stress
σmin – minimum stress
σ – Stress range
σultimate– ultimate strength (stress)
σendurance – endurance strength (stress)
σapplied – applied stress
CHAPTER 2: LITERATURE REVIEW
With the advancement of industry and technology, the utilization of aluminium and its alloys is on the rise. In recent years, aluminium and its alloys have seen a high rate of consumption compared to iron-steel products and are being used more in industries such as chemical, electrical, medicine, construction, automotive, aviation and their sub-industries, increasing their importance the more [5] [6]. AlMgSi alloys, apart from their importance in the aluminium industry and being called 6000 series, are also known for their high corrosion resistance, good extrudability and having lower costs of processes in order to get a moderate level of strength after hot deformation and a clear surface.
Owing to their high strength, high corrosion resistance and good workability, AlMgSi alloys present a very important group of construction materials, which are used because of their specific properties in various areas including automotive and aviation, transportation, construction sector, architecture industries and decoration applications [7] [8] [9]. Quite often, products made from these materials must meet very high requirements during long periods of time. Therefore, it is a must to get thorough information about their mechanical properties.
Turbalioglu [10] carried out a study in which the change occurring in the mechanical properties of the alloy AA 6063 was determined by changing the metal temperature and the casting speed during the production of the aluminium alloy with the vertical continuous casting method. As a result of the mechanical tests (hardness and tensile tests) conducted on the aluminium billets produced by changing the metal temperature, the hardness value and the tensile strength tends to decrease with increase in metal temperature. On the contrary, the percentage elongation value tends to increase. Also while the hardness values increase with the increase of the casting speed, the tensile strength and the percentage elongation values tend to decrease. In both of the altered parameters, the homogenization heat treatment increased the mechanical properties of the analysed alloys.
D.E Esezobor et al [11] examined the solution heat treatment of an extruded 6063 alloy. The study showed that the strength and fracture resistance of this metal alloy can be influenced to an appreciable extent by the solution heat treatment used in their investigation. Their work has shown that aged material is generally stronger than as cast material and appropriate solution treatment temperature and holding time has decisive effects on the strengthening, hardening and ductility of aluminium alloy 6063. The precipitation of Mg2Si particles and the subsequent dislocation multiplication are major parameters responsible for this deduction.
D. Alexopoulos [12] studied the impact properties of A357 aluminium cast alloy by conducting experiments using an instrumented charpy impact testing machine. The evaluated impact properties for 25 different artificial aging heat treatment conditions were analysed and discussed in conjunction with the respective tensile properties. Correlations were proposed to establish useful relationships between impact resistance and tensile strain energy density properties. The established correlations, well supported by the performed experiments, can be used to estimate the tensile ductility and toughness of the A357 cast aluminium alloy from the Charpy impact test. Performed fractographic analysis were in support of the physically arbitrary correlation between tensile strain energy density and impact resistance.
The authors of [13] investigated the effect of heat treatment parameters (temperature and time) on the tensile properties and fracture toughness of 6082 aluminium alloy. He observed that as the aging time increases, a continuous increase in tensile strength, with approximately no elongation changes is noticed. From the results of the fracture toughness test of the 6082 alloy, it is seen that toughness measurements of the specimens treated at different times and temperatures of aging and with different fracture plane orientation showed quite good agreement to the results of tensile test in the presence of sharp notch. At the two test temperatures, the orientation of the crack does appear to have some influence on the toughness of the 6082 alloy. Microstructural and fractographic examinations of the tested Al alloy confirmed that cracks initiated at void clusters and were facilitated by their growth and coalescence.
N. Nanninga [14] studied the high cycle fatigue behaviour of hollow extruded AA6082 and AA6063 aluminium extrusions. The effects of such extrusion variables on high cycle fatigue properties were studied by taking specimens from an actual car bumper extrusion. He discovered that extrusion die lines create large anisotropy differences in fatigue properties, while welds themselves have little effect on fatigue lives. The effects of elevated temperatures and exposure of specimens to NaCl solutions was also studied. Exposure to the salt solution greatly reduced the fatigue lives of specimens, while elevated temperatures showed more moderate reductions in fatigue lives.
N. Nanninga et al [15] characterized the effect of specimen orientation and extrusion seam welds on the fatigue life of specimens machined from a hollow AA6063 aluminium alloy extrusion profile in the form of S–N curves. They found out that specimen orientation with respect to the extrusion direction had a large effect on fatigue life due to the extrusion die lines orientation. Transverse specimens exhibited only a fraction of the high cycle fatigue life shown by specimens in the longitudinal direction. The existence of seam and/or charge welds, oriented both longitudinal and transverse to the loading direction led to reduction in fatigue life. However, the effects of these welds were not as significant as the effects of orientation alone and appeared to be related to increase in surface roughness at the welds. Variations in fatigue life were explained by surface roughness and changes in microstructure. Grain boundary separation was the principal mechanism of fatigue crack initiation in their study. Results from an Auger energy spectroscopy and transmission electron microscope analysis suggest that localized strain in precipitate free zones assisted in this behaviour.
M. Yahya et al [16] investigated the low cycle fatigue (LCF) behaviour of aluminium alloy AA 6063 at room temperature condition. The influence of strain amplitude and strain rate on the LCF behaviour of AA6063 in the normalized condition was reported. The tests were conducted at a constant strain rate of 2×10⁻³ s-1 and various strain amplitudes (0.4%, 0.5%, 0.6%, 0.7%, 0.8% and 1%). Fatigue life was found to decrease with increase of strain amplitude and decreasing frequency. Microstructural features and failure mechanisms studied through scanning electron microscopy (SEM) confirmed low cycle fatigue failure nature. The high amplitudes of testing was marked by the extensive crack branching and formation of secondary cracks.
Borrego, L. P., et al [17] performed low cycle fatigue tests on two Al-Mg-Si aluminium alloys with different chemical composition, viz. 6082-T6 and 6060-T6 alloys. The tests were undertaken in strain control with a strain ratio (RƐ = 1). The geometry of the hysteresis loops and the occurrence of Masing behaviour were also analysed. The observed behaviour was discussed in terms of the chemical composition of the alloys with Mg2Si hardening particles and Mn dispersoid content and fracture mechanisms. Alloy 6060-T6 exhibits nearly ideal Masing behaviour, while alloy 6082-T6 presents significant deviations from the Masing model.
The type of cyclic deformation behaviour in Al-Mg-Si alloys seems to be influenced by the dispersoid phase. The authors of [18] examined the changes in hardness of AA6063 alloy when heat treated at different pre-aging treatments. The alloy was solution treated for 1 hour at 525±3°C and quenched in water. After quenching, some samples were subjected to five different pre-aging times; 2 hours, 1 day, 3 days, 7 days while some were not pre-aged. The hardness values of the under aged alloys were measured and it was found that when the pre-aging time was 7 days, the hardness values of the specimens increased.
S.O. Adeosun et al [19] carried out a study on the effect of deformation on the tensile strength, toughness, hardness and electrical resistance of aluminium 6063 alloy. The study conducted revealed that cold working of 6063 aluminium alloy impacts significant effects on its mechanical and electrical properties. Results show significant improvement in hardness and electrical resistance properties of the alloy. Substantial improvement in toughness, strength, hardness and low resistance to current flow was feasible at a thickness reduction in the neighbourhood of 5 percent.
D. Jarfalou et al [20] investigated the mechanical properties (surface hardness, tensile strength, fatigue, and fretting fatigue behaviour) of AA 6063 processed by equal channel angular pressing. Following the severe plastic deformation (SPD) process, samples were subjected to heat treatment (HT), hard anodizing (HA), and a combination of HT and HA. Rotating-bending fretting fatigue tests were performed to explore the samples’ response to the fretting condition. From the experimental fatigue and fretting fatigue tests, it was ostensible that the SPD treatment had a positive effect on enhancing the fatigue and fretting fatigue lives of the samples at low and high-cyclic loads compared with the HT technique. The results also showed that the SPD + HT technique significantly increased the fatigue and fretting fatigue lives of the samples at high and low cycles, compared with the SPD method. HA of AA6063 increased the fatigue and fretting fatigue lives of SPD + HT-processed samples at low cycle; however, at high cycle, HA had reverse effects, whereby the fatigue and fretting fatigue lives of SPD + HT-processed samples decreased.
CHAPTER 3: METHODOLOGY
The tests conducted in this study include:
- Tensile test,
- Fatigue test, and
- The Charpy impact test
3.1 Tensile testing
Tensile test was performed in order to evaluate the yield stress which is a crucial property when carrying out fatigue tests that stress the specimen below its yield strength. The test was carried out at Midwal laboratory in Lekki. The equipment used for this test was Instron 600DX universal tensile testing machine shown in the picture below.
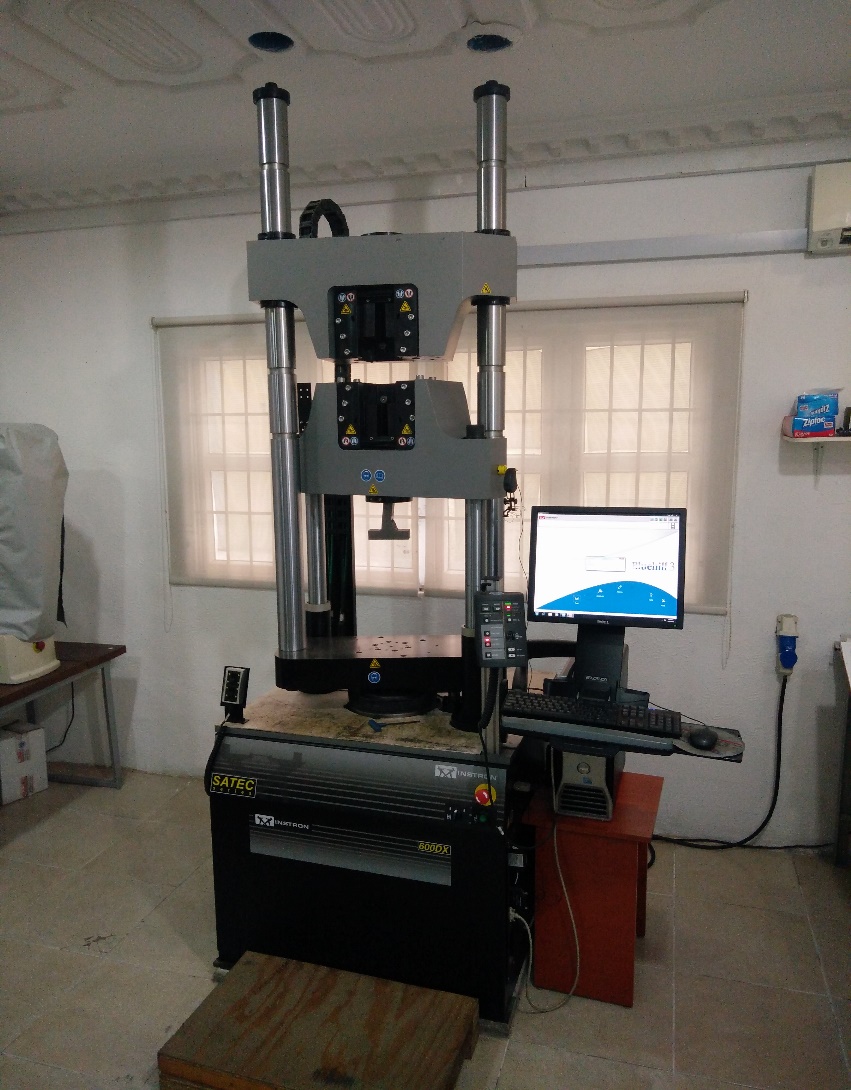
Figure 1: Instron 600DX universal tensile testing machine
The specifications for the specimen used can be seen in the figure below.
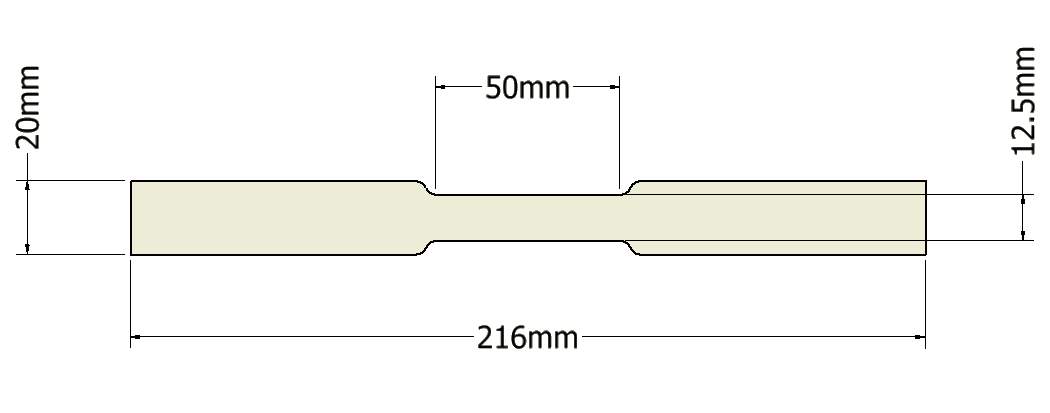
Figure 2: dimensions of tensile test specimen
3.2 Fatigue testing
A rotating fatigue machine (SM1090) was used to cyclically stress a sample of the specimens at different stress levels (90%, 80%, 70%, and 60% of yield stress).
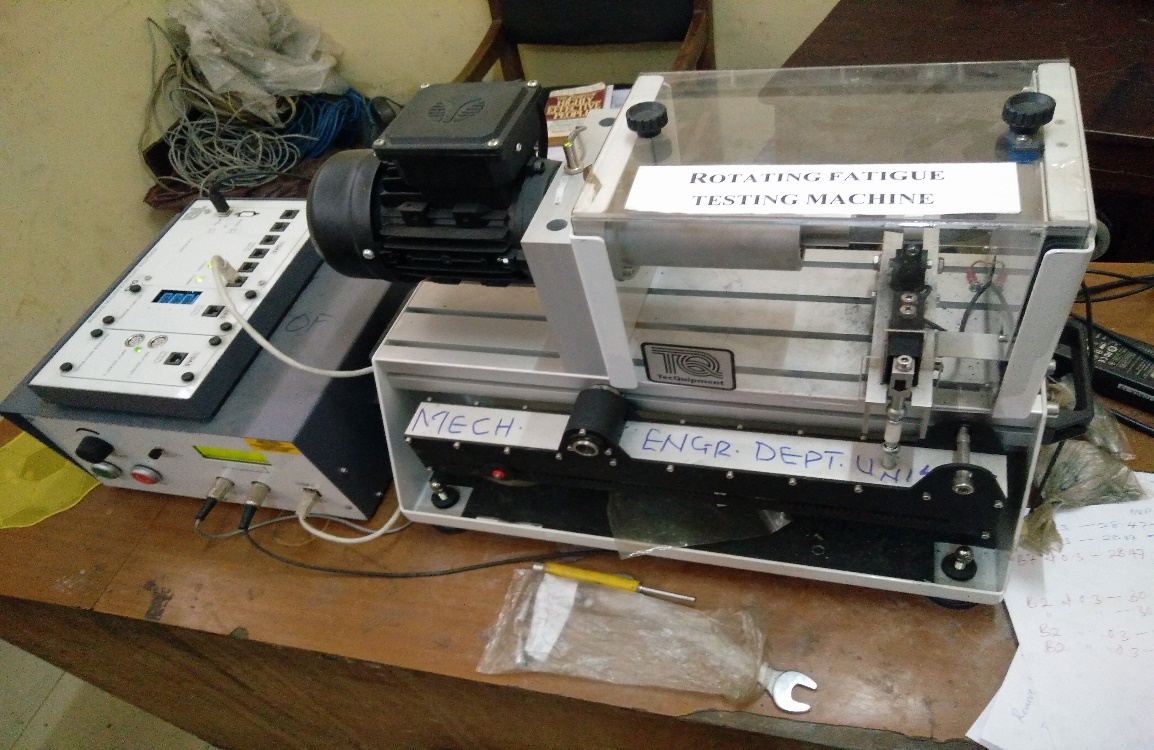
Figure 3: A rotating fatigue machine (SM1090)
3.2.1 Description of the rotating fatigue machine (SM1090)
The rotating fatigue machine consists of two major parts: a main unit and a separate control and instrumentation unit. The main unit has a motor that rotates the test specimen under constant load (stress). The motor also turns a coupling and a short driveshaft. The driveshaft turns a collet type chuck that grips the driven end of the specimen with uniform pressure around its circumference. This is necessary because it gives an even stress distribution on the specimen and grips it with minimum eccentricity.
The coupling and driveshaft help to remove any unwanted lateral forces from the mechanical link to the motor. At the loading end of the specimen, an adjustable dead weight applies a vertical (downwards) load on the specimen. It does this through a self-aligning bearing inside a gimbal. The gimbal plays an important role as it allows movement, but also ensures vertical loading even when the specimen deflects. The driven end and loading end make the specimen an axially rotating cantilever with a point load near its end.
A load cell measures the force applied to the specimen (determined by the dead weight position) and a sensor counts the rotations (cycles). A separate control box contains an electronic motor drive and a display that shows the load, speed of rotations (cycle rate) and the number of rotations (cycle count) since the start of the test. When the specimen fails, a switch at the loading end switches off the motor power and the display stops counting.
3.2.2 Fatigue specimen
The specification for the fatigue test specimen is given in the diagram below.
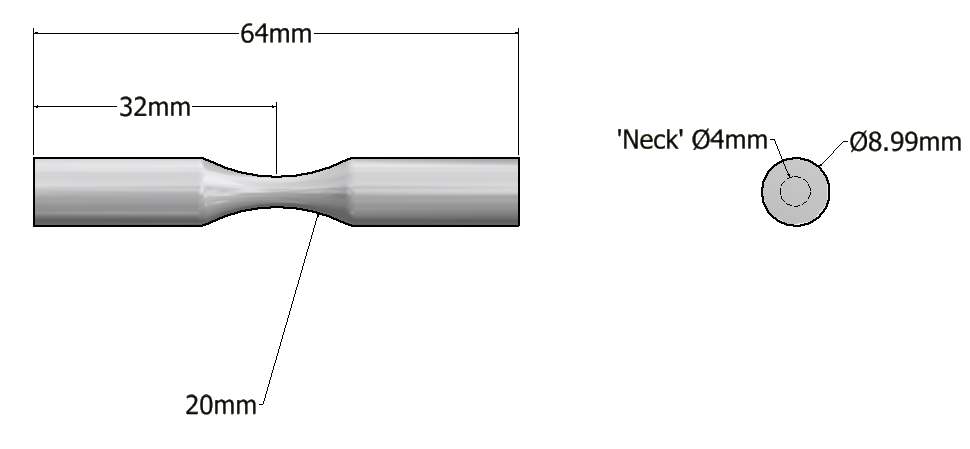
Figure 4: dimensions of fatigue test specimen
For this test, at least four identical specimens were used.
Procedure followed
The specimen was loaded in the machine and securely held in place as shown in the figure below.
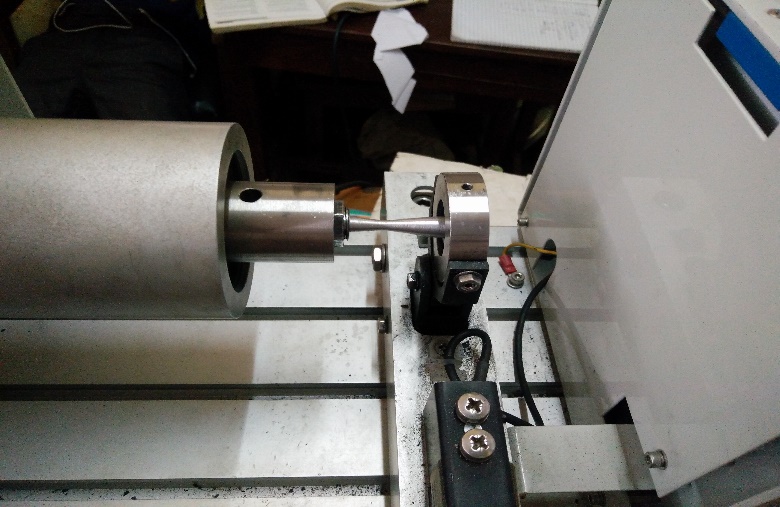
Figure 5: Rotating fatigue machine with specimen in loading position
- A vertical load was applied to the loading end of the specimen using the adjustable dead weight.
- The machine was then started and the frequency set to 60Hz to reduce vibrations.
- The readings were taken after failure occurred.
- The above steps were repeated for the different stress levels.
3.2.3 Rotating cantilever
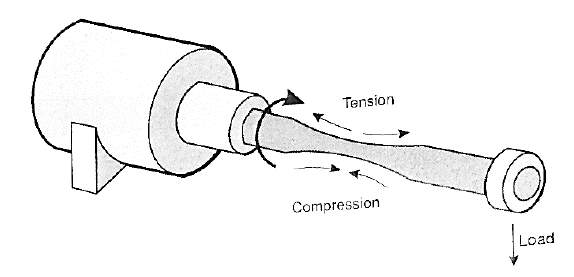
Figure 6: the rotating cantilever
It is worth noting that the fatigue machine clamps the specimen as a cantilever as shown in the figure above. The load on its free end creates tension on the top half of the specimen and compression on the lower half. However, because it rotates, there is alternate compressive and tensile stress on any given part along the unsupported length of the specimen.
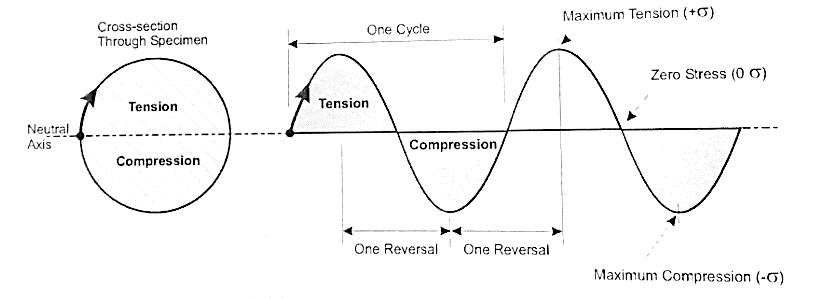
Figure 7: cycles and reversals
The figure above shows a cross-section through a specimen as it rotates. Any fixed point on the unsupported length of the specimen moves through one cycle of compression and tension. In a cycle, the stress at that point moves from a zero stress point (at the neutral axis) to maximum tension, back through zero stress and to a maximum compression point. It then goes back to zero stress and repeats the cycle. As the stress fully reverses (from positive to negative or negative to positive stress), this is called a reversal. Each cycle has two reversals.
3.2.4 Stress in the specimen
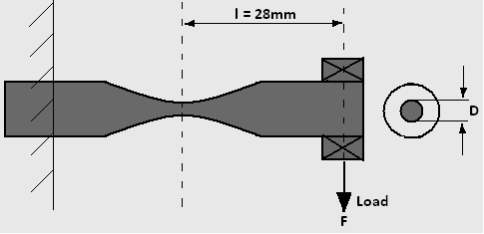
Figure 8: specimen orientation and dimensions when fixed in the machine
For the specimen as a circular cross-section cantilever, the stress is given by:
endurance = endurance strength (stress) of the material
σapplied = applied stress
N = predicted number of cycles to failure
The calculated number of cycles to failure will be compared to the actual number of cycles found from experimentation.
3.2.6 Low and high cycle fatigue
Usually, high cycle fatigue tests use forces that stress the specimen in its elastic region (below its yield strength). This will require many stress reversals (meaning more cycles) before the specimen fails. High cycle fatigue tests usually last for a minimum of 100000 cycles. Low cycle fatigue tests on the other hand use forces larger than that in high cycle tests and stresses the specimen in its plastic region (above yield strength). Low cycle fatigue tests usually last for 100 to 10000 cycles.
3.2.7 Endurance limit
For ferrous materials, (steel and iron) the level of stress below which the material can be cycled infinitely without failure is known as endurance limit [4]. This is very vital, because the consequence of exceeding this point will most likely be fatigue failure. However, for non-ferrous materials, like aluminium, there is no true endurance limit. With enough cycles, the material will fail in fatigue [21]. Hence, the endurance limit can be regarded function of a design number of cycles to failure for non-ferrous materials. Fatigue strength instead of fatigue limit will be reported, which is the stress for a specified number of cycles the metal can be subjected, usually 107 for aluminium alloys [22].
3.2.8 Wohler or S-N curve
A typical S-N curve is a graphical representation of the applied stress vs. the number of cycles. The curve helps engineers to compare different materials to choose the best for the job. A material like steel shows a fatigue limit meaning that below a given applied stress, it will not fail due to fatigue. Aluminium on the other hand will fail due to fatigue even at low cyclic stress levels. It has a zero or a very small fatigue limit. The S-N curve can be used to find a fatigue life for a given applied stress of the aluminium alloy specimen. Fatigue behaviour of materials can be practically described according to the parameters given as follows:
- Maximum stress (σmax)
- Minimum stress (σmin)
- Stress range (σ) = σmax– σmin
- Mean stress = (σmax + σmin)2
- Stress amplitude = (σmax- σmin)2
- Stress ratio = σminσmax
3.2.9 Fatigue and temperature
Temperature affects fatigue resistance in most materials. As they get hotter, they also become weaker and their fatigue life decreases. Hence all specimens were tested at room temperature.
.3 Impact test
As stated earlier, the Charpy impact test will be the method used to evaluate the toughness of the material. The Charpy impact test is a high strain rate test that measures the work required to rupture a specimen in flexure. Charpy specimens are uniform bar specimens with one notch per specimen to encourage rupture. A V-notch is machined into a bar specimen with a square cross-section which measures 10mm by 10mm and a length of 60mm as shown below.
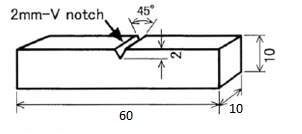
Figure 9: Charpy impact specimen
The Charpy testing machine is comprised essentially of a hammer with a striking head attached to a nearly frictionless pendulum with a known potential energy. The Charpy V-notch test apparatus used is shown below. The load is applied as an impact blow from a weighted pendulum hammer that is released from a cocked position at a fixed height. The specimen is positioned at the base. Upon release, the pendulum hammer strikes and fractures the specimen at the notch, which acts as a point of stress concentration for the high velocity impact blow. The pendulum continues its swing, rising to a maximum height which is lower than the initial fixed height.
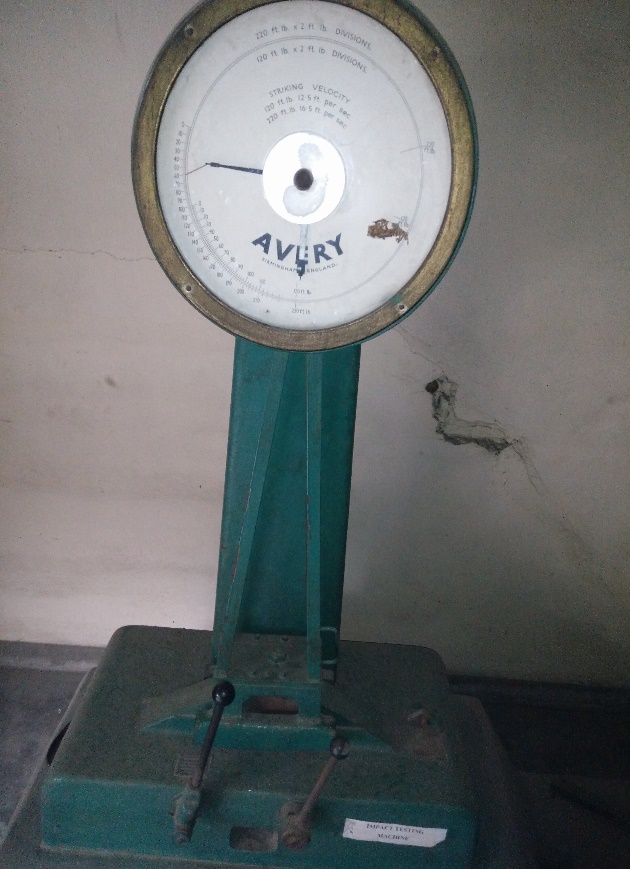
Figure 10: Charpy v-notch apparatus
After the impact and fracture of the specimen, there’ll be a loss in energy of the pendulum as measured by its reduction in maximum height. For the impact testing machine used in this experiment, the fracture energy is measured (in ft.lb) using a calibrated needle and dial combination. This value will be converted to joules
Experimental Procedure
- To account for frictional losses during the swing, the impact machine (pendulum) was calibrated. This was done by allowing the pendulum to swing freely without a test specimen taking note of the reading obtained.
- The striker was then fit with the central vertical edge in striking position.
- The charpy support block was positioned and locked
- The specimen was then placed across the block with the notch facing left, locating it centrally with the setting gauge.
- The maximum pointer was set to contact the fixed pointer on the dial and then the pendulum was released.
- The value indicated on the 220ft.lb dial by the maximum pointer was read.
CHAPTER 4: RESULTS AND DISCUSSION
4.1 Material
The specimen used for the two tests is made out of an alloy of aluminium, AA6063 with chemical composition shown in the table below.
| element | Si | Mg | Fe | Mn | Cr | Zn | Ti | Al |
| % | 0.48 | 0.86 | 0.46 | 0.9 | 0.04 | 0.005 | 0.01 | 98.82 |
Table 1: chemical composition
4.2 Impact properties
Impact test carried out on six cold-worked AA6063 specimens of the same dimensions gave the following table of results:
| Specimen | Impact energy (J) | delta=x-avg |
| 1 | 40.67 | 6.56 |
| 2 | 73.21 | 25.985 |
| 3 | 37.96 | 9.265 |
| 4 | 56.94 | 9.715 |
| 5 | 36.61 | 10.615 |
| 6 | 37.96 | 9.265 |
| Average | 47.23 | |
| Std. dev | 14.81 |
Table 2: table of values for all charpy specimens
The average of the energy values as well as the standard deviation were found. Modified Thompson tau technique was applied to the data set to find any outlying point. From the table of values for modified Thompson [23], τ is found to be 1.6563 for 6 sample size. Multiplying τ by the standard deviation gives 24.53. It can be seen that one data point has a delta value greater than 24.53. This point corresponds to specimen 2 with impact energy of 73.21J. It is eliminated from the data set as it is an outlier. The same steps are repeated for the remaining data points. It is discovered that there’s still another outlying point, specimen 4 with impact energy of 56.94J. This is likewise removed from the data set. Repeating the steps once again and it is found that there are no more outliers. A new table of values is created with a new average found:
| specimen | Impact energy (J) |
| 1 | 40.67 |
| 3 | 37.96 |
| 5 | 36.61 |
| 6 | 37.97 |
| Average | 38.3 |
Table 3: data after applying modified Thompson technique
From the experiment performed, all samples used completely fractured except specimens 2 and 4, hence why their impact energy values were a bit off. This is attributed to poor centralisation of the notch meant to induce fracture. The results from this test are in agreement with typical values for aluminium alloys in standard textbooks. In fact, charpy testing can be quite irrelevant as well as misleading for aluminium alloys. Due to the details of the charpy test, tests conducted on aluminium usually show low values. This doesn’t necessarily mean the aluminium is brittle, only that this test doesn’t perform well on aluminium. [24]
4.3 Tensile properties
Two identical specimens were used for the tensile test performed at Midwal engineering. The speed of deformation was 10mm/min. The following table of results was obtained:
| Specimen | UTL (kN) | YL (kN) | UTS (MPa) | YS (MPa) | GL (mm) |
| 1 | 20.73 | 13.56 | 189.34 | 123.84 | 50 |
| 2 | 22.88 | 14.16 | 193.30 | 119.60 | 50 |
| Mean | 21.81 | 13.86 | 191.32 | 121.72 | 50 |
Table 4: tensile test data
UTL- Ultimate tensile load
YL- Yield load
UTS- Ultimate tensile strength
YS- Yield strength
GL- Gauge length
The mean yield strength is found as
123.84+119.602=121.72MPa
The graph of load in kilo Newton against extension produced in millimetres is displayed below.
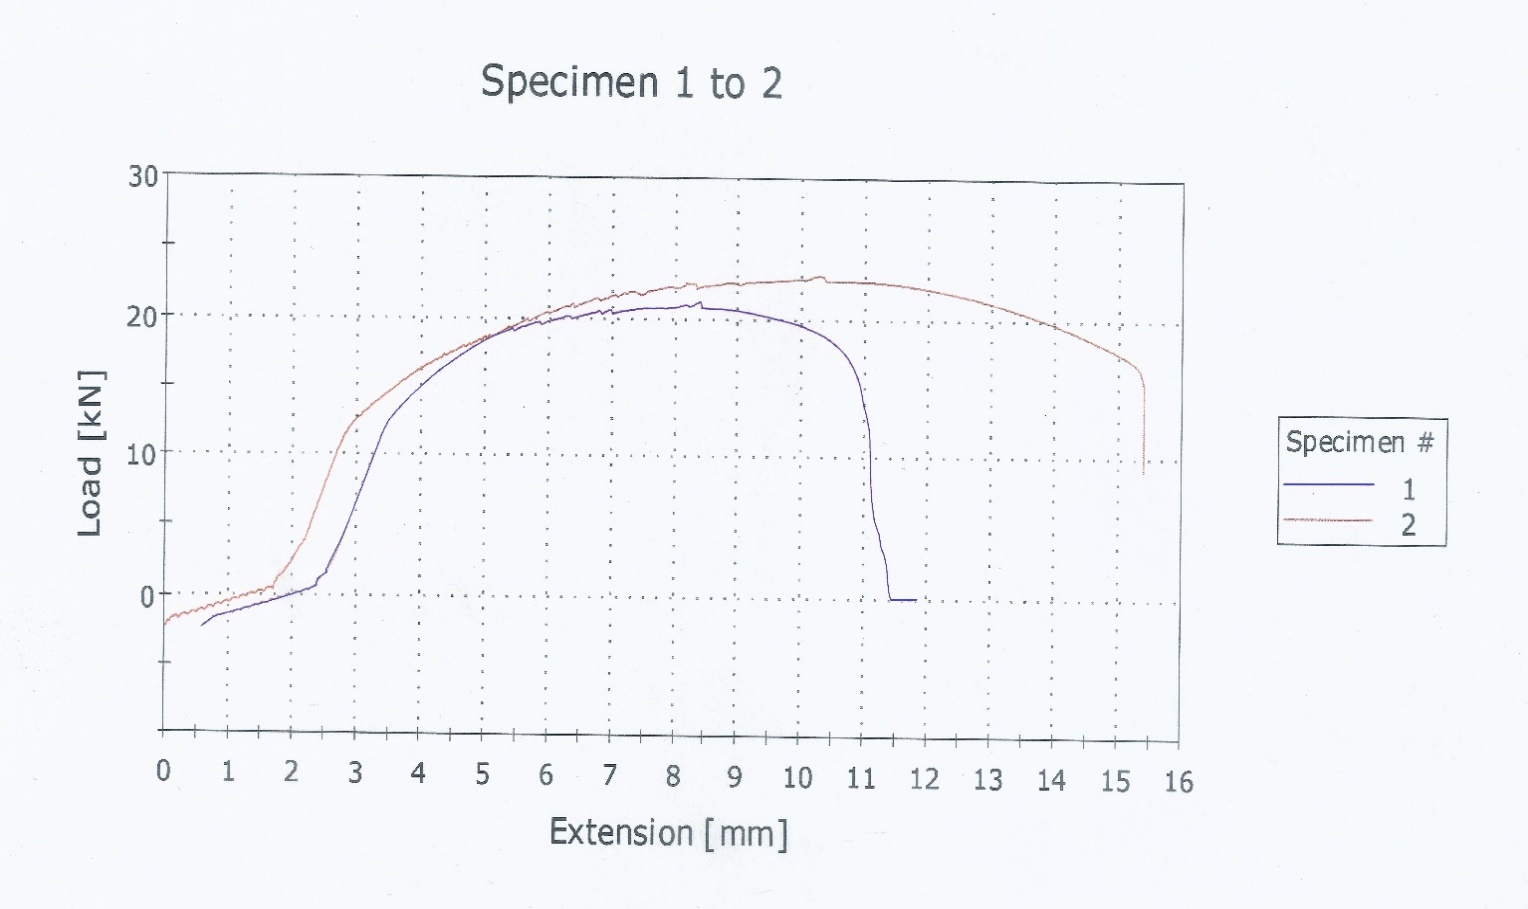
Figure 11: graph of load vs. extension for both specimens
4.4 Analysis of fatigue tests
The fatigue tests conducted at different levels of stress gave the following results:
| Stress value (MPa) | 106.6 | 97.3 | 84.3 | 72.5 |
| Load (N) | 24.6 | 21.85 | 19.1 | 16.4 |
| No. of cycles | 72195 | 102338 | 269534 | 1001853 |
Table 5: fatigue test data
To get the predicted number of cycles to failure for each stress level, equations (3.5) to (3.8) are utilised.
From eq. 3.5,
X=12log107=3.5
From eq. 3.6,
b=-13.5log0.9×191.3251.5=-0.14977
From eq. 3.7,
a=0.81×191.32251.5=575.7
From eq. 3.8,
For 0.9YS,
N=0.9×121.72575.71-0.14977=64762
For 0.8YS,
N=0.8×121.72575.71-0.14977=142188
For 0.7YS,
N=0.7×121.72575.71-0.14977=346793
For 0.6YS,
N=0.6×121.72575.71-0.14977=970660
The following table of values is obtained:
| 0.9YS | 0.8YS | 0.7YS | 0.6YS | |
| Stress value (MPa) | 109.5 | 97.4 | 85.2 | 73.0 |
| Predicted cycles | 64762 | 142188 | 346793 | 970660 |
Table 6: predicted number of cycles
To linearize the resulting curves from the plot of stress vs. number of cycles, the log of each value is taken. The resulting log values are displayed in the table below:
| Log Nexp (experimental number of cycles) | Log (Stress) | Log Ncalculated | |
| 0.9YS | 4.86 | 8.04 | 4.81 |
| 0.8YS | 5.01 | 7.99 | 5.15 |
| 0.7YS | 5.43 | 7.93 | 5.54 |
| 0.6YS | 6 | 7.86 | 5.99 |
Table 7: log values of stress and cycles
These values are then plotted on a log-log scale as seen below.
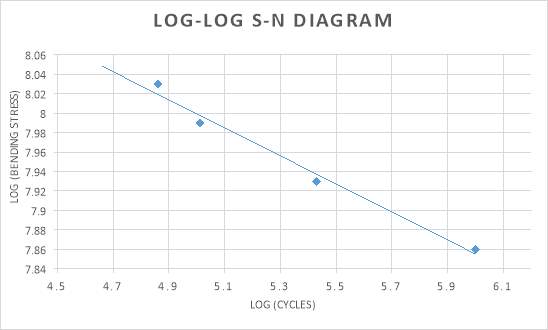
Figure 12: experimental log-log S-N plot
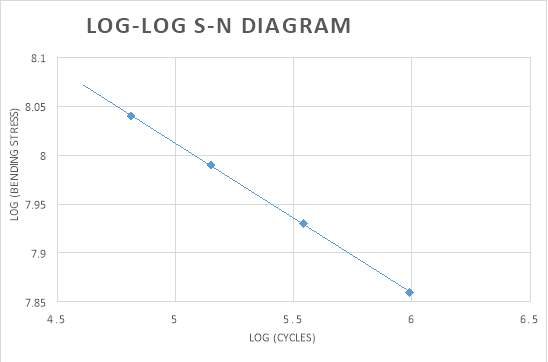
Figure 13: theoretical log-log S-N plot
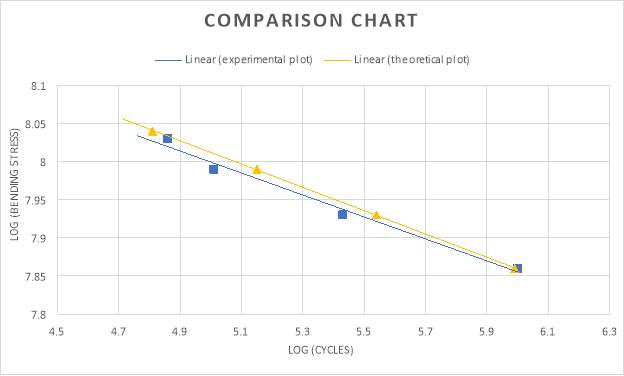
Figure 14: S-N graph comparing experimental to theoretical
Comparing the experimental plot with the theoretical plot from calculation indicates that a similar linear trend is observed. Since the material is composed of a structural AlMgSi alloy, it follows the trend of having an S-N curve that continues to fall with an increasing number of cycles. The endurance limit was found for the data assuming that Nref was equal to 107 cycles, the accepted value for nonferrous metals [22]. The linear equation y = -0.144x + 8.7195 from the experimental S-N diagram was used to find the endurance limit of 51.5MPa, with log of Nref used as the x value. The table below shows the difference between the experimental and predicted number of cycles to failure.
| Nexp | Ncalculated | % difference | |
| 0.9YS | 72195 | 64762 | -11.5% |
| 0.8YS | 102338 | 142188 | 28% |
| 0.7YS | 269534 | 346793 | 22.3% |
| 0.6YS | 1001853 | 970660 | -3.2% |
Table 8: experimental no. of cycles vs. theoretical no. of cycles
Due to the many areas where error could occur, some specimens significantly deviated from the expected number of cycles to failure. These areas include:
Error in loading: the load used to cause stress in the specimen is applied using adjustable dead weights and as such, it is difficult to get the precise value of the load required to act on a specimen at a particular stress level.
Error in specimen dimension: slight variation in the neck diameter of the specimens can affect the results [25].
Surface finish: finally, the surface is another possible source of error as it is quite impossible to have a perfect, consistent surface finish. The smaller the roughness value, the better the surface is and it will more likely take longer to cause fatigue failure and vice versa.
Note also that the predicted value is very sensitive when calculating as many values go into the final value. The number of decimals carried out in the calculations can make a significant difference.
CHAPTER 5: CONCLUSION AND RECOMMENDATIONS
5.1 CONCLUSION
Impact loading was carried out on several cold-worked AA6063 specimens. The analysed data showed that the specimens fractured in a brittle manner. The two sides of the fracture surfaces fit quite well after fracture. Analysis of the fatigue data revealed that as the level of stress is decreased, the number of cycles to failure increases. A stress vs. cycles (S-N) diagram was plotted on a log scale and the fatigue strength (endurance limit) was calculated from the linear relationship. It was also discovered that the experimental number of cycles to failure differed from the expected number of cycles to failure due to outside factors such as material dimensions, surface finish and incorrect loading
5.2 RECOMMENDATIONS
- Since charpy usually show low energy values and can be misleading for aluminium alloys, the first recommendation is to carry out Kahn tear test. Its use and interpretation are documented in the ASTM B871 specification
- Also, due to the inconsistencies in specimen dimensions which is an area for inaccuracy, computer numerical control machining may be used when carrying out machine work on the specimens.
- More specimens should be used when running the fatigue test so as to improve the accuracy of the S-N graph.
References
[1] A. LeChatalier, “On the Fragility After Immersion in a Cold Fluid,” French Testing Commission, vol. 3, 1892.
[2] J. Holman, in Experimental Methods for Engineers, 7th ed., McGraw-Hill, 2000, pp. 56-73.
[3] J. Davis, in Metals Handbook, Vol. 2, 10th ed., ASM International, 1990, pp. 145-165.
[4] J. Shigley, C. Mischke and R. Budynas, in Mechanical Engineering Design, McGraw-Hill, 7th ed., 2003, pp. 566-581.
[5] P. Arun, R. Gnanamoorthy and K. M, “Microstructural evolution and mechanical properties of oil jet peened aluminium alloy AA6063-T6,” Materials Design, vol. 31, pp. 4066-4075, 2010.
[6] Y. Sun, M. Baydoğan and H. Çimenoğlu, “The effect of deformation before ageing on the wear resistance of an alloy,” Materials Letters, vol. 38, pp. 221-226, 1999.
[7] Y. Sun and H. Ahlatci, “Mechanical and wear behaviors of Al–12Si–XMg composites reinforced with in situ Mg2Si particles,” Materials Design, vol. 32, pp. 2983-2987, 2011.
[8] Y. Birol, “The effect of homogenization practice on the microstructure of AA6063 billets,” Journal of Materials Processing Technology, vol. 148, pp. 250-258, 2004.
[9] M. Gavgali, Y. Totik and R. Sadeler, “The effects of artificial aging on wear properties of AA 6063 alloy,” Materials Letters, vol. 57, pp. 3713-3721, 2003.
[10] K. Turbalioğlu and Y. Sun, “The Improvement of the Mechanical Properties of AA6063 Aluminum Alloys Produced by Changing the Continuous Casting Parameters,” Scientific Research and Essays , vol. VI, no. 13, pp. 2832-2840, 2011.
[11] D.E.Esezobor and S. O. Adeosun, “Improvement on the Strength of 6063 Aluminum Alloy by Means of Solution Heat Treament,” 2006.
[12] N. D. Alexopoulosa, “Impact properties of the aircraft cast aluminium alloy Al-7Si-0.6Mg (A357),” in EPJ Web of Conferences 6, 02002, 2010.
[13] G. Mrówka-Nowotnik, J. Sieniawski and A. Nowotnik, “Effect of heat treatment on tensile and fracture toughness properties of 6082 alloy,” Journal of Achievements in Materials and Manufacturing Engineering, vol. 32, no. 2, pp. 162-170, 2009.
[14] N. E. Nanninga, “High cycle fatigue of AA6082 and AA6063 aluminum extrusions,” Michigan Technological University, 2008.
[15] N. Nanninga, C. White, O. Mills and J. Lukowski, “Effect of specimen orientation and extrusion welds on the fatigue life of an AA6063 alloy,” International Journal of Fatigue, vol. 32, no. 2, p. 238–246, 2010.
[16] M. M. Yahya, N. Mallik and I. Chakrabarty, “Low Cycle Fatigue (LCF) Behavior of AA6063 Aluminium Alloy at Room Temperature,” International Journal of Emerging Technology and Advanced Engineering, vol. V, no. 12, pp. 95-103, 2015.
[17] L. Borrego, L. Abreu, J. Costa and J. Ferreira, “Analysis of low cycle fatigue in AlMgSi aluminium alloys,” Engineering Failure Analysis, vol. 11, p. 715–725, 2004.
[18] D. Hulya, S. U. Bekir and M. Cevdet, “Determination of hardness of pre-aged AA6063 aluminium alloy by means of artificial neural networks method,” Mathematical and Computational Applications, vol. 9, no. 2, pp. 249-256, 2004 .
[19] S. O. Adeosun, O. I. Sekunowo, S. Balogun and L. Osoba, “Effect of Deformation on the Mechanical and Electrical,” Journal of Minerals & Materials Characterization & Engineering, vol. X, no. 6, pp. 553-560, 2011.
[20] D. M. Jafarlou, E. Zalnezhad, A. S. Hamouda, G. Faraji, N. A. B. Mardi and M. A. H. Mohamed, “Evaluation of the Mechanical Properties of AA 6063 Processed by Severe Plastic Deformation,” Metallurgical and Materials Transactions, vol. 46A, pp. 2172-2183, 2015.
[21] K. Stinson, “Fatigue Failure in Non-Ferrous Materials,” Journal of Fake Fatigue, vol. 65, pp. 45-51, 2003.
[22] “Fatigue limit,” Wikipedia, the free encyclopedia, 11 October 2016. [Online]. Available: https://en.wikipedia.org/wiki/Fatigue_limit. [Accessed 2 November 2016].
[23] “Modified Thompson tau,” [Online]. Available: http://www.mne.psu.edu/cimbala/me345/Exams/Modified_Thompson_tau_table.pdf. [Accessed 2 November 2016].
[24] A. Frank, “The fabricator,” 3 December 2014. [Online]. Available: http://www.thefabricator.com/article/aluminumwelding/aluminum-workshop-charpy-v-notch-testing-why-not-aluminum-. [Accessed 1 Novemeber 2016].
[25] D. Bayless, “Fatigue Failure Experiment,” 2004.
Cite This Work
To export a reference to this article please select a referencing stye below:
Related Services
View allRelated Content
All TagsContent relating to: "Mechanics"
Mechanics is the area that focuses on motion, and how different forces can produce motion. When an object has forced applied to it, the original position of the object will change.
Related Articles
DMCA / Removal Request
If you are the original writer of this dissertation and no longer wish to have your work published on the UKDiss.com website then please:


