Computer Forensic Tools for Investigators
Info: 10970 words (44 pages) Dissertation
Published: 10th Dec 2019
Tagged: Forensic Science
Computer forensics tools and/or the investigator’s office/laboratory
Abstract
I am going to talk in my report about computers forensic tools that the professional investigators use.
STRENGTHS: Solid product in the EnCase tradition. While the new UI is challenging at first, there are lots of capabilities and new features, including decryption, mobile device analysis and prioritized processing.
WEAKNESSES: A bit rough over the network when evidence is not at the processing computer.
VERDICT: Pretty much what one would expect from Guidance – solid performance, excepting the network issue – and loads of features to make the forensic analyst’s job easier and faster.
1. Introduction
Forensic investigators use a variety of tools both in the lab and in the field. Using open source forensic tools has certain advantages, preparing the platform to build and execute these tools can be daunting to a newcomer. However, the installation of various utilities that allow examiners utilizing Windows systems to use many of the tools and scripts. As they are “open source,” the bulk of these tools are distributed primarily in source form, that is, you’ll need to generate the executable code yourself. In other cases, the tools will be scripts that require a specific interpreter to run
The process of digital forensics can be broken down into three categories:
Acquisition. In this possess the evidence are collected and in the very specific procedures for proper collection. The important thing is that how you collect the evidence determines if that evidence is admissible in a court.
Analyzing. This process is the most time-consuming parts of a forensic investigation, and it can be the most challenging part of the hole processes. Once the digital evidence is being collected the data has to be analyzed it. In essence, any forensic investigation has to take every evident and solve the complex puzzle by putting together the data they have and finding out what sort of picture is revealed. Before final conclusion, you have to look how many evidence do you have to
Presenting. Once the investigation is finished, you will have to present that evidence in one form or another. The two most basic forms are the expert report and expert testimony. You clear use of language, and potentially graphics and demonstrations, if needed, may be the difference between a big win and a lost case.
2 Open Tools use by the Forensic Investigators in the Lab.
Open-source tools used for forensic analysis can be used on different platforms such as Linux, Mac OS X and Windows. The most important reasons to use open source tools that are specific to digital forensics.
Here are the common open-source tools use on Windows platform:
- Disk and File System Analysis
- Windows Systems and Artifacts
- Internet Artifacts
- File Analysis
- Automating Analysis and Extending Capabilities
- Validation and Testing Resources
Computer forensics tools can also be classified into various categories:
Disk and data capture tools
File analysis tools
Registry analysis tools
Internet analysis tools
Email analysis tools
Network forensics tools
Database forensics tools
File viewers
Mac OS analysis tools
Mobile devices analysis tools
FTK Imager is a free acquisition open source tool that makes a bit-for-bit duplicate image of the media, avoiding accidental manipulation of the original evidence. The forensic image is an identical copy of the original device, which includes the file slack and unallocated space, and allows for the recovery of deleted files. The forensic duplication allows you to conduct the investigation process using the image, preserving the original media. The analysis of the acquired image can be performed later in the FTK, which allows for a much more detailed investigation and the generation of the final report of the information found.
When you use FTK Imager to create a forensic image of a hard drive or other electronic device, ensure that you are using a hardware-based write blocker. By doing this, you can be certain that the system does not alter the original source at the time of attaching it to your computer.
AccessData has provided FTK Imager is a valuable tool to any responder or analyst, allowing them to not only acquire images from systems (via the appropriate write-blockers or from live systems) but also to verify file systems of acquired images, be they raw/dd or “expert witness”
(perhaps more popularly known as “EnCase”) format, VMWare vmdk file format, etc. FTK Imager recognizes a number of file system formats, including not just FAT and NTFS, but ext2, ext3, and others, as well.
In some cases, responders are not limited by the number of imaging resources (laptops and write blockers) that they have available, copying files to the root of external, USB-connected drives allows responders to perform live acquisition of a significant number of systems simultaneously.
In the below picture (Figure1) the Lite version of FTK Imager is version 2.9, and the full version of the tool is at version 3. The most notable difference between the two versions, aside from the installation process, is that version 3 now provides the capability to mount an acquired image as a physical drive or as a logical volume (or volumes) on the analyst’s workstation. You can mount images by choosing the “Image Mounting…” option from the File menu, as illustrated in Figure 1.
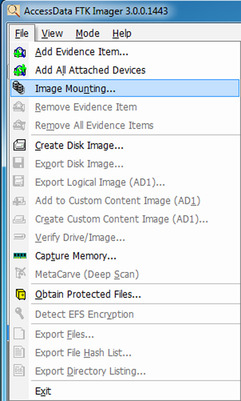 |
| Figure 1 FTK Imager 3 File menu options. |
As shown in Figure 1, you can use FTK Imager 3 to do most of the things that you’re used to
doing, such as acquiring images, verifying file systems, and capturing memory, and you can now use it to mount images.
ENCASE
EnCase Introduction
EnCase is extremely powerful forensic program used by digital forensics Investigator for recovering evidence from seized hard drives. The software comes in several products designed for forensic, cyber security, security analytics, and e-discovery use. Encase allows the investigator to conduct in depth analysis of user files to collect evidence such as documents, pictures, internet history and Windows Registry information. EnCase contains tools for several as of the digital forensic process: acquisition, analysis and reporting.
EnCase feature benefits
EnCase software offers the most advanced, comprehensive and easy-to-use tool to carry out these complicated and time-consuming tasks, across multiple file systems and languages.
- Automated Analysis: SweepCase lets examiners automatically choose the types of analysis they want to perform on a set of media instead of having to initiate each tool separately.
- Multiple Sorting Fields: Examiners can sort files according to 30 different fields, including all four-time stamps (File Created, Last Accessed, Last Written and Entry Modified), file names, file signatures and extensions, hash value, full path, permissions.
- Filters and Filter Conditions: Filters let the examiner reduce the amount of information displayed, based on user-specified criteria. More than 150 filters are provided with EnCase software, ranging from deleted files to password-protected Word documents.
- Queries: Examiners can combine filters to create complex queries using simple “OR” or “AND” logic.
- View “Deleted” Files and Other Unallocated Data in Context: EnCase offers a Windows-Explorertype view of deleted and unallocated data. This includes file slack, swap files, print spooler data and all other unallocated data files.
- International Language Support: EnCase supports Unicode data decoding and can search and display any language that Unicode supports. This allows examiners to search and view data in its native format such as German, Arabic or Kanji.
- Encrypted Volumes and Hard Drive Encryption: EnCase can analyze and acquire mounted encrypted volumes, such as PGP and DriveCrypt, and give examiners full access to data on hard drives that are wrapped with encryption technology, such as SafeBoot.
- Link File Examination: This automated process reads all forms of link (.lnk) files — both allocated and unallocated — and decodes the results for quick and easy analysis. Being able to quickly discover and interpret link files gives the examiner valuable information, such as learning that a suspect is transporting company data onto a thumb drive or external media, or what files, applications and shares the suspect commonly used.
- Active Directory Information Extractor: The Active Directory Information Extractor forensically analyzes the Active Directory database (NTDS.DIT) and extracts the username, SID, home directory, email address, last login, last failed login and next password change.
- Hardware Analysis: Automatically culls through the registry and configuration files to quickly identify the types of hardware installed on a target machine, including NIC cards, FireWire devices, thumb drives, IDE devices and other hardware information.
- Recover Folders: Automatically rebuilds the structure of formatted NTFS and FAT volumes.
- Log and Event File Analysis: EnCase provides a single means by which to analyze, search and document log and event file data.
- Symbolic Link Analysis: EnCase gives access to and analysis of symbolic link information to simplify analysis of UNIX-based file systems.
- Compound Document and File Analysis: Many files — such as Microsoft Office documents, Outlook PSTs, TAR, GZ, thumbs.db and ZIP files — store internal files and metadata that contain valuable information once exposed. EnCase automatically displays these internal files, file structures, data and metadata. Once these files have been virtually mounted within EnCase, they can be searched, documented and extracted in a number of different ways.
- File Signature Analysis: EnCase can automatically verify the signature of every file it searches and identify those modified extensions.
- Hash Analysis: EnCase can automatically create hash values for all of the files in a case.
- Built-in Registry Viewer: The integrated registry viewer organizes the registry data file into folders, giving examiners an expedient and efficient way to view the Windows registry and determine values.
- Internet and Email Search: This feature will find, parse, analyse and display various types of Internet and email artefacts across machines. The Internet and email search finds mail formats (such as Hotmail, Outlook, Lotus Notes, Yahoo, AOL, Netscape, mbox and Outlook Express) and Internet artefacts from Internet Explorer, Mozilla, Opera and Safari.
- Search Options: In addition to the standard search feature, EnCase software offers a number of options that can be used to search through data:
- Logical File Recognition: Files often span noncontiguous clusters and EnCase software can search all such allocated files. Without EnCase software, if you search Windows text files using a forensic utility that cannot logically search across data clusters, you’ll often miss search hits or receive inaccurate search results.
Sources of Acquisitions
Sources for acquisitions within EnCase Forensic Imager include:
- Previewed memory or local devices such as hard drives, memory cards, or flash drives.
- Evidence files supported by EnCase Forensic Imager, including legacy EnCase evidence files (.E01), legacy logical evidence files (.L01), current EnCase evidence files (.Ex01), current logical evidence files (.Lx01), DD images, VMware files (.vmdk), or Virtual PC files (.vhd). You can use these to create legacy EnCase evidence files and legacy logical evidence files, or you can reacquire them as EnCase Forensic Imager .Ex01 or .Lx01 format, adding encryption, new hashing options, and improved compression.
- Single files selected to create a Logical Evidence File from an existing evidence file or an acquired device.
- Network crossover using LinEn and EnCase Forensic Imager to create .E01 files or .L01 files. This strategy is useful when you want to preview a device without disassembling the host computer. This is usually the case for a laptop, a machine running a RAID, or a machine running a device with no available supporting controller.
Types of Acquisitions
EnCase Forensic Imager can acquire evidence in four basic formats:
- Current EnCase evidence files (.Ex01): .Ex01 format improves upon the .E01 format with LZ compression, AES256 encryption with keypairs or passwords, and options for MD5 hashing, SHA-1 hashing, or both.
- Current Logical evidence files (.Lx01): .Lx01 format improves upon the .L01 format with LZ compression and options for MD5 hashing, SHA-1 hashing, or both. Encryption is not available for legacy logical evidence (.L01) files.
- Legacy EnCase evidence files (.E01): . E01 format makes current acquisitions accessible to legacy versions of EnCase Forensic Imager.
- Legacy Logical evidence files (.L01): .L01 format makes current logical acquisitions accessible to legacy versions of EnCase
Types of Evidence Files
1 EnCase Evidence Files
Legacy EnCase evidence files (.E01) are a byte-for-byte representation of a physical device or logical volume. Current EnCase evidence files (.Ex01) can be encrypted; however, .Ex01 files are not backward compatible with legacy versions of EnCase.
EnCase evidence files provide forensic level metadata, the device level hash value, and the content of an acquired device.
Dragging and dropping an .E01 or .Ex01 file anywhere on the EnCase Forensic Imager interface adds it to the currently opened case.
2 Logical Evidence Files
Logical evidence files (.L01) are created from previews, existing evidence files, or Smartphone acquisitions. These are typically created after an analysis locates some files of interest, and for forensic reasons, they are kept in a forensic container.
Current logical evidence files (.Lx01) provide encryption and hashing options, but they are not backward compatible with legacy versions of EnCase.
When an .L01 or .Lx01 file is verified, the stored hash value is compared to the entry’s current hash value.
- If the hash of the current content does not match the stored hash value, the hash is followed by an asterisk (*).
- If no content for the entry was stored upon file creation, but a hash was stored, the hash is not compared to the empty file hash.
- If no hash value was stored for the entry upon file creation, no comparison is done, and a new hash value is not populated.
Documentation and Reporting
EnCase® Enterprise lets users define with detailed granularity what information is presented and how it is presented, depending on the purpose and target audience of the investigation. Almost all information revealed by EnCase software can be exported into various file formats for external reporting and analysis purposes.
Automatic Reports: Since the requirement to generate reports is so critical, EnCase has a number of automatically generated reports that can be created. These automated reports show a wealth of information depending on the type being generated. Here are some examples:
Bookmarks: These are the individual components that drive the information contained in the EnCase report. During analysis, an examiner can use bookmarks in various ways to identify and document specific clues. There are seven different types of bookmarks:
- Highlighted Data: Created when highlighting specific text
- Notes: Allows the user to write additional comments into the report
- Folder Information: Used to bookmark the tree structure of a folder or device information of specific media
- Notable File: A file documented by itself
- File Group: Indicates that the bookmark was made as part of a group of selected files
- Log Record: Contains the results of log parsing activity
- Registry: Contains the results of Windows registry parsing activity
Instant Decoding of Nontext Data: Within the reporting section of EnCase, an examiner may “decode” nontext data, so it can be presented in a more recognizable format.
Integrated Picture Viewer with Gallery View: A fully integrated picture viewer automatically locates and displays many known graphical image types, including Microsoft thumbs.db files.
Timeline: This integrated viewer allows an examiner to see all relevant time attributes of all the files in the case (or selected group of files) in a powerful graphical environment.
Intellitype: A quick way for an examiner to jump to files of relevance, instead of having to sort by a particular file attribute and scroll through the data.
Time Zone Settings: Examiners can set the time zone for each piece of media in a case, enabling simple comparison of media from different time zones.
Built-in Help: Quick and easy access to relevant information in the user manual, with topics pertaining to almost every feature of the software. The user manual is a wealth of rich product-related information that can help even the most senior examiners.
Internet and Email investigation
Two of the most critical areas of any investigation typically involve the analysis of artefacts related to the Internet and email. EnCase® software has a number of powerful features that facilitate efficient examinations, including recognition of the various files typically associated with Internet and email artifacts.
- Analysis: EnCase software has the ability to find, parse, analyze, display and document various types of email formats, including Outlook PSTs/OSTs (’97-’03), Outlook® Express DBXs, Lotus Notes NFS, webmail such as Hotmail, Netscape and Yahoo; UNIX mbox files like those used by Mac OS X; Netscape; Firefox; UNIX email applications; and AOL 6, 7, 8, 9. In some cases, EnCase can recover deleted files and depending on the email format, the status of the machine.
- Presentation: Email analysis results are placed in a common EnCase format — which is easy to navigate to — where examiners can find information necessary to support the most complex investigations.
- Browser History Analysis: EnCase has powerful and selective search capabilities for Internet
artifacts that can be done by device, browser type or user. EnCase can automatically parse,
analyze and display various types of Internet and Windows history artifacts logged when websites
or file directories are accessed through supported browsers, including Internet Explorer, Mozilla,
EnCase Layout
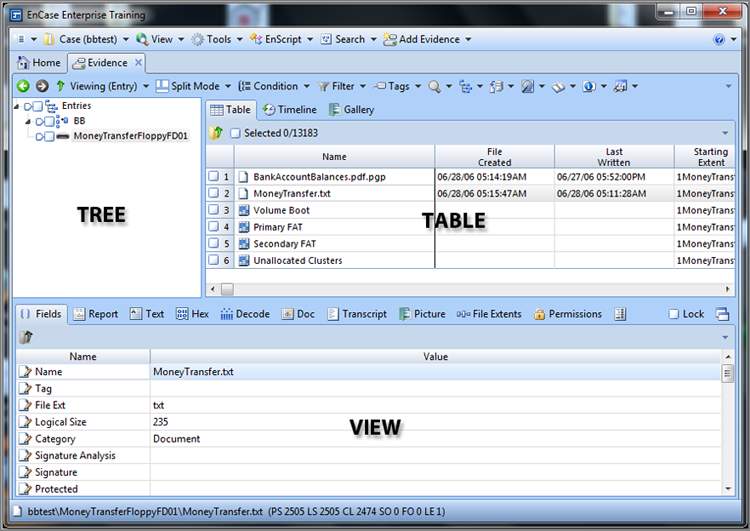
In the Entries Tree-Table view, EnCase divides its screen real estate into three windows that are named for their primary examination function: the Tree pane (formerly the Left pane), the Table pane (formerly the Right pane), and the View pane (formerly the Bottom pane), as shown in Figure 2 Granularity or detail increases as you move through the primary panes from the Tree pane to the Table pane and finally to the View pane. If you want details about an object (physical device, volume, or folder), place the cursor focus on it (in other words, highlight it) in the Tree pane, and the Table pane will display the details about that object. If you want more details about an object in the Table pane, highlight it in the Table pane, and the details will appear in the View pane. Once you get down to the data level of granularity in the View pane, you can view or interpret that data in several ways, effectively getting still more information or granularity from the View pane.
EnCase uses what amounts to a tabbed viewing environment. The tabs have labels that describe the view available under that tab. In this book and in the formal documentation, we’ll refer to the various views by the view offered by the tab, such as Report view, Hex view, and so forth. Many examiners, however, refer to the views as tabs, such as Report tab, Hex tab, and so forth. There is really no difference, so don’t be confused. The tab gives you access to the view, and it becomes, to many, a matter of preference how they name it when talking about it.
Figure 2: EnCase divides its screen real estate into the Tree, Table, and View panes.
I cover many of these other views or features later in this chapter. For now, I’ll focus on showing how to create a case and work in the Entries Tree-Table view. The option to work with the cases appears on the Home screen and also on the case drop-down menu on the application toolbar. Which you decide to use is often a matter of personal preference. For now, let’s use the Home screen and open its tab, which is the leftmost tab, as shown in Figure 6-7 (note the house icon next to it). Another reason for working from the Home screen is because you will see this screen by default whenever you open EnCase. Thus, it is from here that you will start your exploration of EnCase’s environment and features.
Creating a Case
The Tree pane is the starting point for the detail that follows in the other two panes and the location from where you will do much of your work in EnCase. However, before you can work with the Tree pane, or any pane for that matter, you need to have a case open. And before you can have a case open, you need to create a case. When EnCase starts, it opens by default to the Home screen. From the Home screen, you create a case by clicking New Case in the case file section. Alternatively, you can select Case > New Case from the application toolbar. After you click New Case, you are presented with the dialog box shown in Figure 6-8. I have sectioned this box into four major areas to assist with the discussion. Those areas are the templates area (A), case name area (B), path area (C), and the Case Info area (D). I discussed this dialog box to some degree in Chapter 5 when I covered the paths and storage locations of EnCase files.
Figure 6-8: The Case Options dialog box
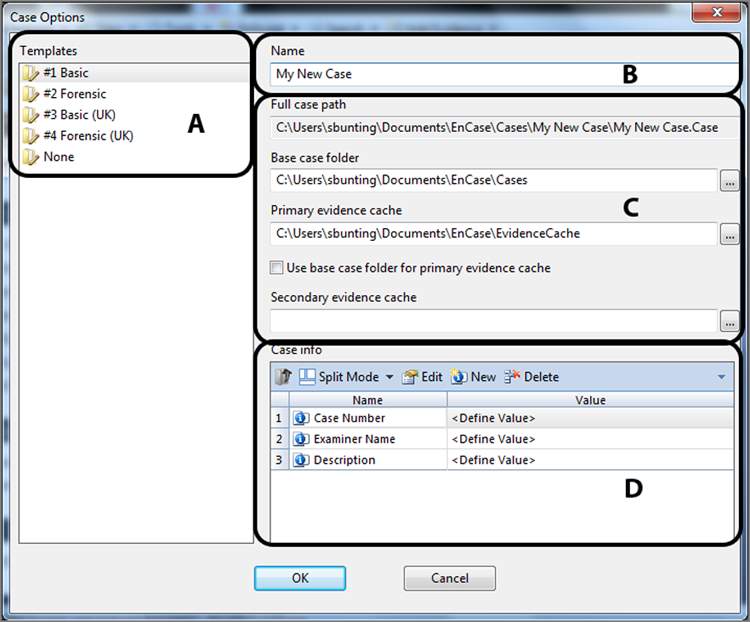
Templates Templates, section A, are new in EnCase 7. A template has an extension of .CaseTemplate and is stored in the Users<Username>DocumentsEnCaseTemplates folder. EnCase ships with predefined templates, and the user can create more if needed. Templates save time, and you are encouraged to use them. Each template contains a uniquely defined set of case template information for the following:
- Case information items with default values
- Bookmark folders and notes
- Tag names
- Report template
- User-defined report styles
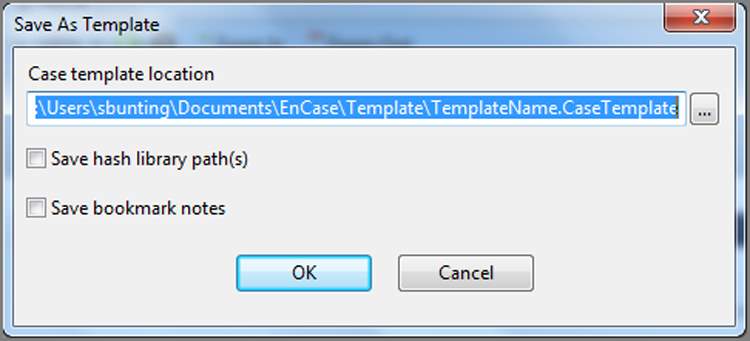
Many users prefer their own template. This is very simple to do as you create a case using a template. Once you create the various customized items you want to save, such as the examiner name or bookmark folders, simply go to the Case drop-down menu on the application toolbar and choose Save As Template. When you do, you will see a dialog box, as shown in Figure 6-9, in which you can choose a name and path, as well as whether you want to include hash library path(s) or bookmark notes to the template.
Figure 6-9: Save As Template dialog box
Name In the section labeled B, there is a field in which to enter the case name. Enter a descriptive name for your case, which may include a case or complaint number. The text you enter here will also populate the full case path immediately below, in which the containing folder will bear the case name as will the name of the case file. When you have many cases to manage, being very descriptive and detailed, while still being brief, is quite helpful.
Full Case Path The first field in the section labeled C is the full case path. This field is grayed out, and you can write to it directly. Rather, its data is a derivative of the base case folder (immediately below) and the case name (immediately above).
Base Case Folder The base case folder is the second field in the section labeled C. By default, your cases will be stored in your Documents or My Documents folder. It is usually better to have this location on a drive other than your system drive and to store your evidence and evidence cache with your case files.
Primary Evidence Cache The primary evidence cache path is the third field in the section labeled C. When EnCase loads an evidence item for viewing, it parses, and stores metadata associated with that evidence item. Each acquired evidence item is assigned a GUID, and a folder by that GUID name will contain the cached data associated with that evidence item. When the evidence processor runs, it likewise stores data in this folder. Naturally the purpose of caching this data and storing it separately for each evidence item is increased performance as well as increased scalability across large evidence sets. By selecting the box under this field, you can assign this path to the base case folder.
Secondary Evidence Cache The secondary evidence cache path is the last field in the section labeled C. This location is for previously created caches, and you can store them in this location. EnCase will only read previously stored caches from this location. All new caches will be written to the primary cache folder.
Case Info In the section labeled D in Figure 6-8, you will see several fields into which you can or should enter data pertaining to the case. Of course, the fields will vary according to the template you select in the section labeled A. Minimally you should enter your name as the examiner, along with a case number and description. Some fields will not change from case to case (your name, for example), and thus a custom template could save you time, if you take the time to create one. In the past, EnCase required you to at least enter your name to proceed; however, this is no longer required.
Case file organization and management are extremely important skills for an examiner to acquire. When computer forensics was in its infancy, best practices and technology at the time called for storing only one case image per drive to prevent comingling or cross-contamination of data. As caseloads grew and technology evolved, best practices have been modified accordingly. Because EnCase encapsulates a device image into an evidence file that has powerful and redundant internal integrity checks, cross-contamination of image files is not the issue it was in the past. In that regard and in many other areas, EnCase has changed the face of computer forensics and, with it, best practices.
Many labs have massive storage servers that hold EnCase evidence and case files. Instead of segregating storage in separate physical devices, as in the past, storage today is often networked and segregated using distinctive folder-naming conventions that are consistent with best practices for case management. In this manner, several examiners can access the same evidence files concurrently and work on different facets of the same case as a team. What used to be physical separation of cases is now facilitated by logical or virtual separation.
EnCase also allows the examiner to open multiple cases at the same time and to conduct concurrent analyses on them. Sometimes cases are created separately and are found later to be related. In these instances, EnCase facilitates examining them as separate yet related cases. Or, if the cases are separate, the examiner can multitask, working manually on one case while another case is being subjected to simultaneous automated processing.
Regardless of how you use EnCase, file management and organization are critical components for keeping case evidence and information segregated. Guidance Software recommends case folder–naming conventions that follow along the lines of those shown in Figure 6-10. In this manner, all cases are contained in the folder Cases and yet are separated by distinct subfolder names. With prior versions of EnCase, the examiner had to create this folder structure; however, with EnCase 7, the structure is automatically created when you create a new case. You need only identify the base path. EnCase creates subfolders called Email, Export, Tags, and Temp. Figure 6-10 contains these folders and two more, which are Evidence and EvidenceCache. You can place these folders anywhere you like. I like to keep them all in one place. For performance, you should consider keeping all of them off the system drive. You could place the Evidence and EvidenceCache folders on separate drives as well to, again, enhance performance. If you do, however, you add to the complexity of your configuration with more locations to track. As soon as you have created your case, EnCase 7 will automatically save the case in the root of the case folder using the case name you assigned. As you go along and do work, you should save using the Ctrl+S key combination, or you can do so from the Case drop-down menu.
It is a good practice to have the case, the case file, and the case folder all named the same, and EnCase 7 does all of that for you. It’s also wise to incorporate the case filename as part of the evidence filename. When they are all named consistently, errors and confusion are less likely to occur. Table 6-1 shows an example of a good file- and folder-naming practice. If the files are misplaced, the naming convention alone can associate them with their lost relatives.
Table 6-1: Examples of good file and folder naming conventions
| Description | Name |
| Case name entered in Case Options dialog box | ABCStockFraud_39_05_003487 |
| Case folder name under Cases folder (automatic with EnCase 7) | Cases ABCStockFraud_39_05_003487 |
| Case file name (automatic with EnCase 7) | Cases ABCStockFraud_39_05_003487 ABCStockFraud_39_05_003487.case |
| Hard drive evidence file | Cases ABCStockFraud_39_05_003487Evidence ABCStockFraud_39_05_003487_40GBWDHDD01 |
| USB thumb drive evidence file | Cases ABCStockFraud_39_05_003487Evidence ABCStockFraud_39_05_003487_1GBUSBTD01 |
Figure 6-10: Multiple cases stored in a single Cases folder
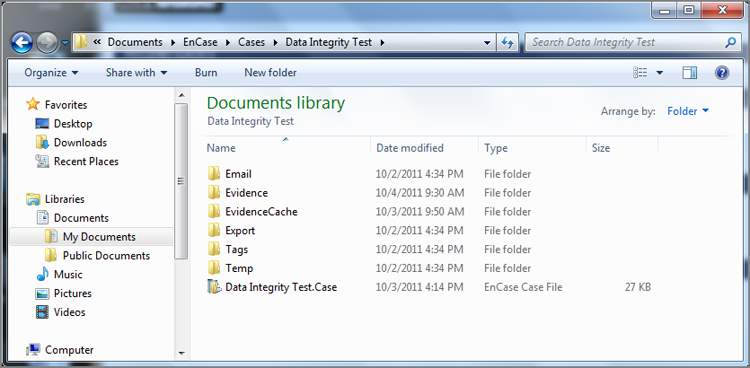
Remember that, by default, the backup case file (.cbak) is located in UsersUserNameDocumentsEnCaseCasesBackup. EnCase*Backup. This location places the backup files in very close proximity to the case files and on the same drive. By default, they had to be configured somewhere and to a location that exists. It is wise to place your backups on a drive that is separate from your case files. Also, remember that, starting with EnCase 6, multiple backup files are maintained (the frequency and number of backup files retained is configurable).
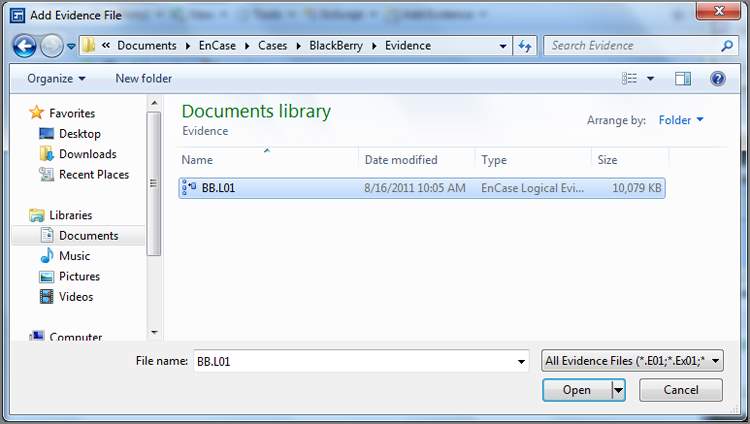
After you have created a case and it is automatically saved with first created, it is time to add evidence to that case. To do so, click Add Evidence, which is located on the Home screen. (This option is not available until you either create or open a case.) At this stage, you add a local device, add an evidence file, add a raw image, acquire a smartphone, or add a crossover preview, as shown in Figure 6-11. If you are operating in the enterprise or FIM environment, you can connect to a network device that is running the servlet. I covered adding a local device and acquiring it in Chapter 4, so now I’ll simply add an evidence file by choosing Add Evidence File and browsing to its location, as shown in Figure 6-12. Once you have added evidence to your case, save your case.
Figure 6-11: Add Evidence screen
Figure 6-12: Browsing to an evidence file
There is a saying that has its roots in Chicago: “Vote early and vote often.” In forensics, you should apply similar logic by saving early and saving often. Get into the habit of clicking the Save button (easier yet is the Ctrl+S key combination) when you have completed significant work and when you are about to embark on a new task or process. An even better practice is to use the File > Save All command!
Table Pane Navigation
Now that I’ve covered most of the case Entries view features in the Tree pane, I’ll focus on the features of the Table pane. To simplify things for now, I have not covered the various tab views in the Tree pane. I’ll return to them later. The Table pane has several tabs, but the default tab is Table View, in which the objects appear in a spreadsheet view, with the various attributes or properties of the objects appearing in columns.
Table View
From the Table view, you can sort, hide, move, lock, and otherwise configure columns to streamline your examination. There are more columns than you can see at once unless you have multiple monitors configured to accommodate such a view. Except for those lucky enough to have dual- or triple-monitor configurations, most of us need to arrange the columns so that we can view meaningful and related information.
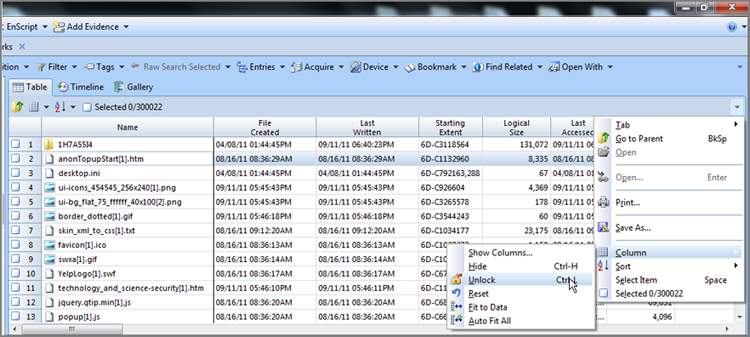
One of the most useful features is the ability to lock a column, which is most often applied to the Name column. In fact, the Name column is locked by default in EnCase 7. When the Name column is locked, you can scroll through the columns, and the object name remains visible throughout the process. If you wanted to lock a column other than Name, or perhaps lock the first two columns including Name, you must first unlock the Name column. To do so, place your cursor in the Name column. Next, open the right-side menu for the table, as shown in Figure 6-30. On the right-side menu, open the Column submenu and choose Unlock.
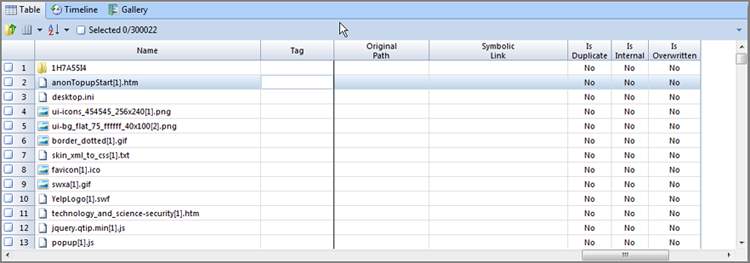
To lock a column, you simply repeat the steps, except that you lock instead of unlock. First decide which column you are going to lock. In my example, my columns are in the default configuration, with the Name column first and the Tag column second. I have decided to lock the Tag column such that I can always see both the Name and Tag columns as I scroll across the Table view. First I place my cursor focus in the Tag column. Next I go to the right-side menu, open the Column submenu, and click Set Lock. A dark line appears on the right side of the locked Tag column indicating the location of the locked column. As shown in Figure 6-31, when you scroll across the columns, both the Name and Tag columns remain visible.
Figure 6-31: A dark line marks the right edge of the locked column. The column(s) to the left of the dark line will remain locked while those to the right of it will scroll by.
Sorting columns is an excellent analysis tool. With EnCase you can apply up to six sort levels, although three levels are the most you will typically ever require.
To sort a column, you can do one of the following:
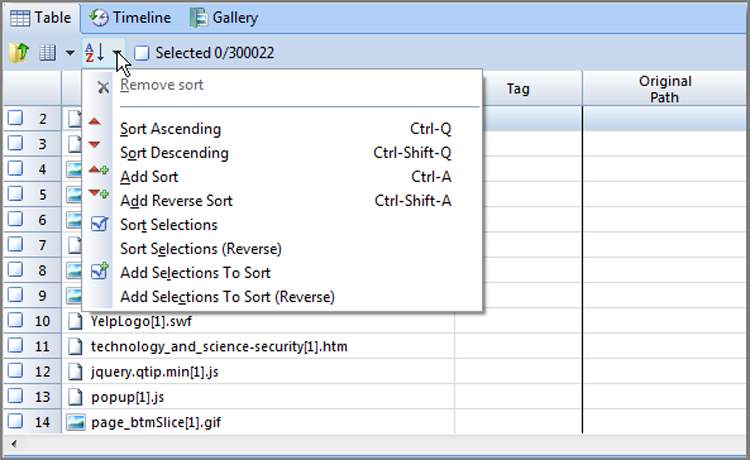
- Place your cursor in the column, and open the Sort menu from the Table toolbar, as shown in Figure 6-32. Next, pick your option from among those offered.
- Double-click the header of the column you want to sort. Double-click it again to reverse the sort order.
Figure 6-32: The Sort menu allows various sorting options for columns.
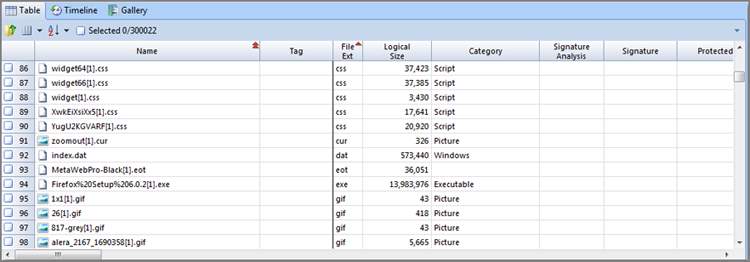
In Figure 6-33, I’ve applied a sort just to the File Ext column. The little red triangle indicates the direction of the sort. I’ve also applied a second sort to the Name column (see two triangles on that column) such that all files are sorted first by file extension and second by name. If you want to apply a second sort, simply hold down the Shift key, and double-click the column header. You can also place your cursor in the second column to be sorted and choose among the options under the Sort menu.
Figure 6-33: A second sort has been applied, shown by the two triangles on the Name column.
If you want to sort in the opposite direction, hold down the Ctrl key while double-clicking the column header. If applying a second sort, hold down both Ctrl and Shift (in other words, press Ctrl+Shift) while double-clicking the column header.
If you prefer using menus, select a column to see a variety of sort options in the Sort menu.
To remove a sort, double-click the column header. Without the Shift key, this action replaces the old sort with your new sort.
To return all columns to their unsorted state, select any column anywhere in the table, and choose Remove Sort in the Sort menu.
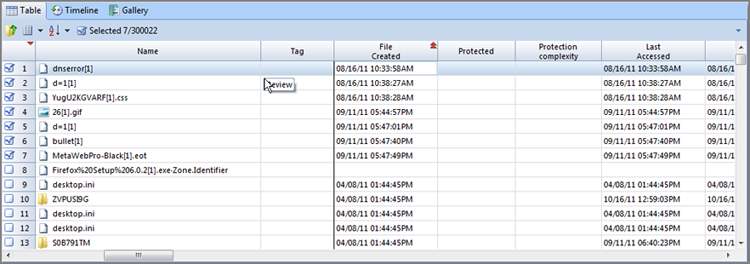
EnCase features a very useful sort that is not obvious. You can sort on the very first column (which has no name). When you have items “blue checked” and selected, a simple double-click to this column brings all your selected items to the top; that is, EnCase sorts selected items from unselected items. Once you have your files selected and sorted on the “blue check mark” column, you can add a second sort to put your selected files in chronological order. In Figure 6-34, several files of interest were selected from several hundred in the sample. Once selected with blue check marks, they were sorted by the unnamed column containing the blue check marks. They were subjected to a second sort based on time, creating a chronological listing of the files selected.
Columns can be hidden or displayed easily. This allows you to remove irrelevant data and focus on what’s important to your case. The quick way to hide a column is to place your cursor on it and press Ctrl+H. Pressing Ctrl+H again hides another column—the one your cursor moves to after you hide the first column.
Figure 6-34: An undocumented but extremely useful sort occurs when you select files and sort on the unnamed column header above the blue checked boxes. EnCase sorts between those selected and those not selected.
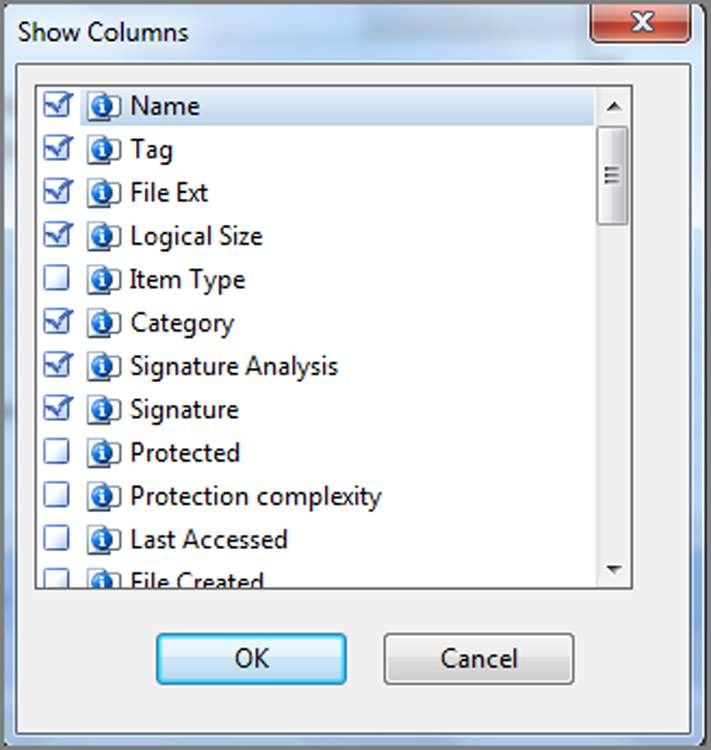
You can show a hidden column in two ways. To show, or hide, specific columns, open the Table right-side menu, open the Column submenu, and choose Show Columns, as shown in Figure 6-35. Any box that is hidden or deactivated will not have a blue check. You can place blue checks in these boxes and click OK to restore them. With this feature, you can be precise in selecting which columns to display. To restore all columns to their default view, open the Table right-side menu, open the Columns submenu, and then select Reset. This restores the window to the default settings.
Figure 6-35: Show Columns gives you precise control over which columns are displayed. Access this menu from the Table right-side menu, under the Column submenu.
Of all the tasks you can perform on columns, perhaps the most useful is the ability to pick them up and move them around. In this manner, you can compare relevant data within the context of other relevant data. It is handy to have that data next to the comparison data rather than somewhere off the screen where you can’t see it.
To move a column, click and drag the column header to where you want it moved. When you release the mouse button, the column moves to its new location. You can even replace a locked column by dragging a new column onto the locked column. If you ever get your columns hopelessly rearranged, hidden, and otherwise not to your liking, use the Reset command (see the earlier discussion of Reset) to restore the default settings.
While working in the Table pane, invariably there will be times when the data in a column exceeds the column width. You can always go to the top where the column name is, hover your mouse over the column separator, and drag it to the desired width, as shown in Figure 6-36. A faster option is to simply place your cursor over the data you want to view; a floating box will appear that displays all data for that particular entry, as shown in Figure 6-37.
Figure 6-36: Adjusting column width

Figure 6-37: Floating box reveals data too large to display in column
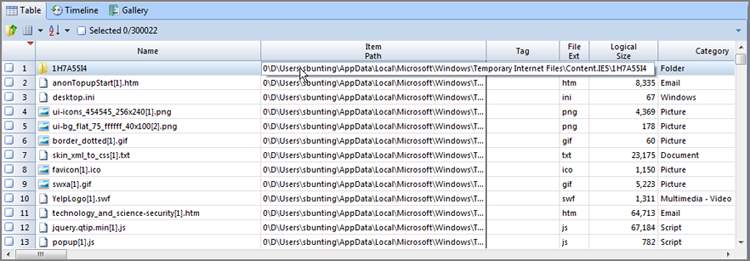
If at any point while working in the Table view you see data that you want to copy, place your cursor on the data, right-click, and choose Copy. Your data is now stored in your clipboard and can be pasted anywhere that is enabled within the Windows environment. This is most useful when need to copy a long filename, hash value, path, or the like.
Just before press time, EnCase 7.04 was released and with it came some changes. One that was nearly overlooked was the changing of the column names Signature and Signature Tag to File Type and File Type Tag. This began as a change late in EnCase 6.19, changing the column name from Signature to File Type. To be consistent, EnCase 7.04 carried through this change, extending it to include the change from Signature Tag to File Type Tag.
The column names describe the property or attribute of the objects; Table 6-2 lists the column names.
Table 6-2: Column names explained (column order is default for EnCase 7.02—use Reset in Column submenu)
*For a Boolean true or false, EnCase by default displays a dot for true and nothing for false. This display is user configurable in the Tools > Options > Global menu. For example, you could enter Yes instead of a dot or No instead of nothing.
Gallery View
Thus far, we have been working with the default tab or view in the Table pane, which is the Table view. Another view is the Gallery view, which is one of the three tabs located in the Table pane, as shown in Figure 6-38. From this view, you can see images in the case at whatever level you choose, from one folder to the entire case. Using the Set Include Folders button in the Tree pane, you can direct the content of the Table pane.
Figure 6-38: Three tabs available from the Table pane
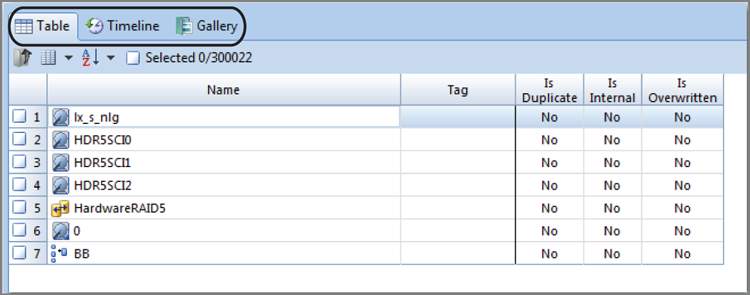
Until a file signature analysis has been done, which is a built-in function within the EnCase evidence processor and can also be run separately on selected files, EnCase displays images based on the file extension. After the file signature analysis has been completed, the files will display based on their file header information. Firefox and other browsers rename cached files and remove their extensions. Without a file signature analysis, the temporary Internet files stored by Firefox are not visible as images within EnCase. When certain peer-to-peer programs start a download, the filename has a .dat extension and remains that way until the download completes. Many files exist as partial downloads that are images but won’t display until a file signature analysis is completed. In addition to programs altering file extensions, some users may attempt to obscure files by changing their file extensions. While this may hide a file from the casual user, it is no match for forensic software. I’ll discuss how it is done in Chapter 8, but it is an important step (running the EnCase evidence processor) if you want to see all images in the Gallery view.
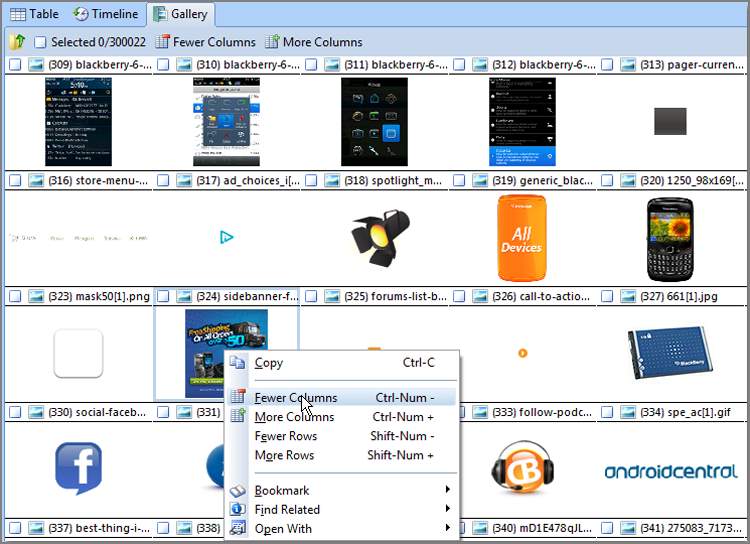
While in the Gallery view, you can select image files, bookmark image files, or copy/unerase image files, individually or in groups. Figure 6-39 shows the EnCase Gallery view. You can change the size of the image thumbnails by right-clicking in the Table pane and selecting Fewer Columns, More Columns, Fewer Rows, or More Rows, as shown in Figure 6-40.
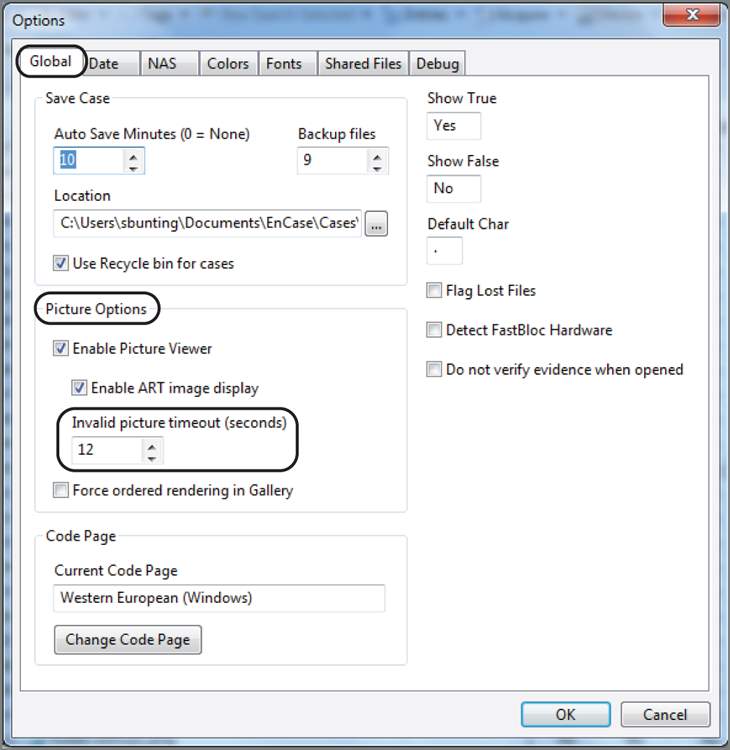
In the past, corrupted images have caused system crashes; however, starting with EnCase 5, EnCase has built-in crash protection. When corrupted images are detected, they are cached, and EnCase does not present them again. In the Tools > Options > Global menu, you can change the maximum amount of time that EnCase tries to read an invalid image before it times out and caches it. This setting defaults to 12 seconds, as shown in Figure 6-41.
Figure 6-39: EnCase Gallery view showing all images in an Internet cache by using the Set Included Folders feature
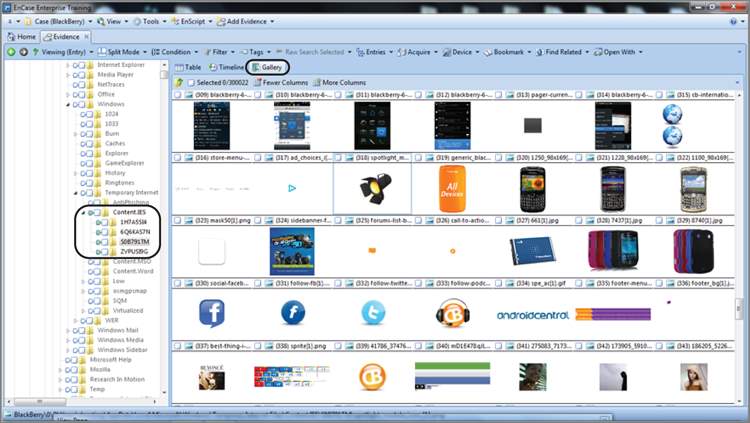
Figure 6-40: You can change the size of the Gallery view thumbnails by right-clicking and choosing more or fewer columns or rows.
EnCase supports America Online (AOL) .art files (files with an .art file extension). AOL uses a proprietary form of compression known as Johnson-Grace compression, named after the company that developed it. As a bandwidth-saving measure, AOL converts other image types to .art files, which produces an extremely high compression rate. By default, rendering AOL .art files is enabled but can be disabled by the user. If you look in the image options in Figure 6-41, you can see the box to disable rendering these files.
Figure 6-41: In the Tools > Options > Global menu, you can change the timeout period EnCase waits before caching an invalid image.
Timeline View
The Timeline view enables you to review chronological activity in a graphical view. By default, all dates and times are enabled and appear in the view. On the Timeline tab toolbar, there is a menu named Date Type from which you can enable or disable the various time stamps. In the Tree pane, by using the green Set Included Folders trigger, you can select the level of Table pane content, ranging from single folders to multiple folders, volumes, devices, or even the entire case.
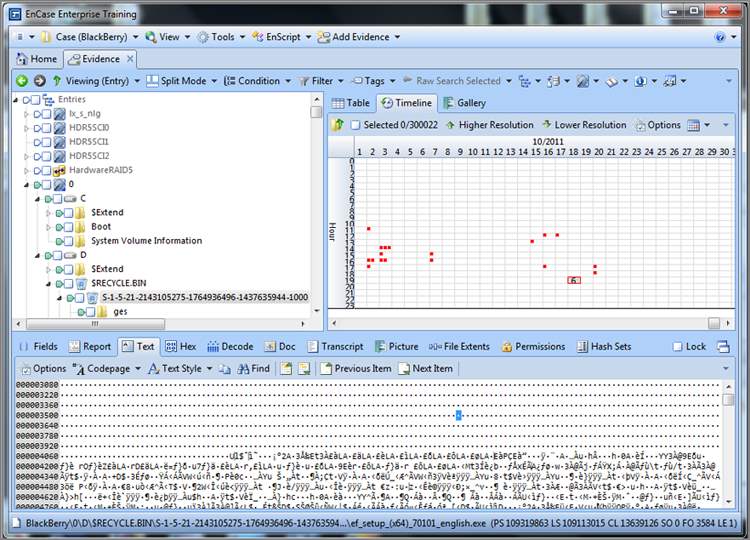
A particularly interesting view is often simply that of looking at deleted files only. If a person knew on a given date they were the target of an investigation, such a view often reveals file-deletion activity shortly thereafter. In the Timeline view, you can see this easily and visually. Figure 6-42 shows a Timeline view where the only dates and times are for file deletions. Each square represents one file, and when the number of files gets too large to show individual squares, the number of files is used instead. In Figure 6-42, you can see six files were deleted on October 18, 2011, during the hour starting at 1900.
Figure 6-42: EnCase Timeline view showing only dates and times for file deletions. Such a focused view can be quite revealing when depicted visually.
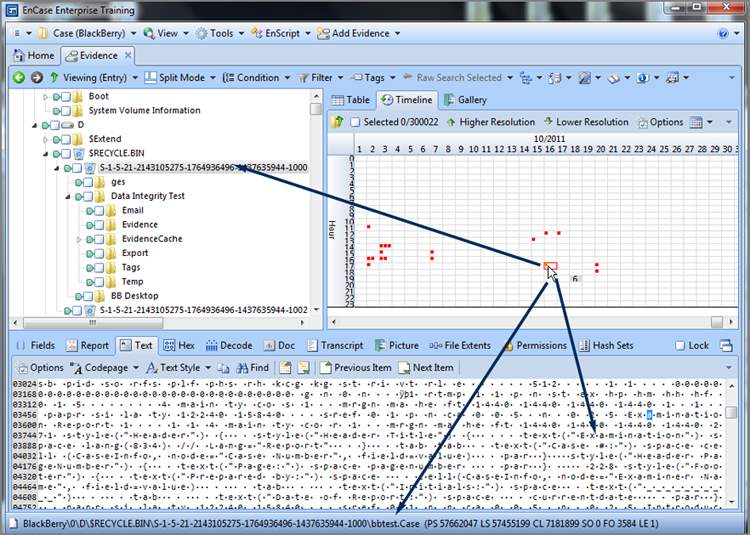
Sometimes you need to drill down and get more detail. You can double-click in numbered boxes and drill down or click Higher Resolution or Lower Resolution on the Timeline tab toolbar. Alternatively, you can use the plus and minus keys on the number pad and achieve the same result. Figure 6-43 shows drilling down to get more detail. When you place your cursor and click a square representing a file in the timeline, the contents of that file will appear in the View pane, its location is highlighted in the tree, and the full path appears at the bottom in the GPS area.
Figure 6-43: Drilling down and achieving higher resolution in the Timeline view. Each tiny red square represents a file, and placing your cursor on it displays its contents in the View pane, its location in the tree, and its path in the GPS.
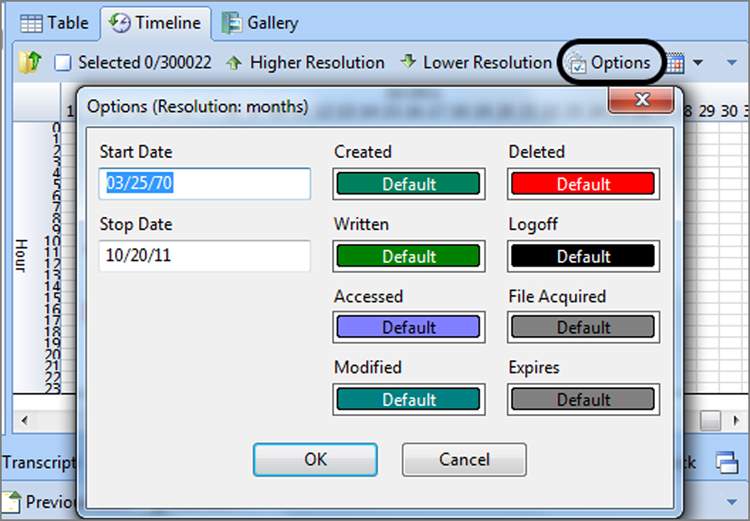
Each of the different date and time stamps is separately color-coded. Toggling each one on and off is a quick way to check which color is coming and going as you toggle. You should note that on the Timeline tab toolbar, there is an Options menu. Clicking Options provides you with the color codes, as shown in Figure 6-44, along with the ability to change them if you like. Another option is the ability to manually specify a range for the Timeline view, which is nice if you are looking at a precise period and want to exclude all other data. I encourage you to use this date range filtering tool because you will find it simply works better once you have a range on which to focus your attention.
There is no reporting or printing feature for the Timeline view. The best way to use it is to take screenshots. Those images can be included in Microsoft PowerPoint presentations or placed in your final report, be it web or print based. They can make a powerful addition as a link in a web-based report.
Figure 6-44: Color codes are available by opening the Options menu on the Timeline tab toolbar. From this dialog box, you can change the colors or manually specify a time range.
Disk View
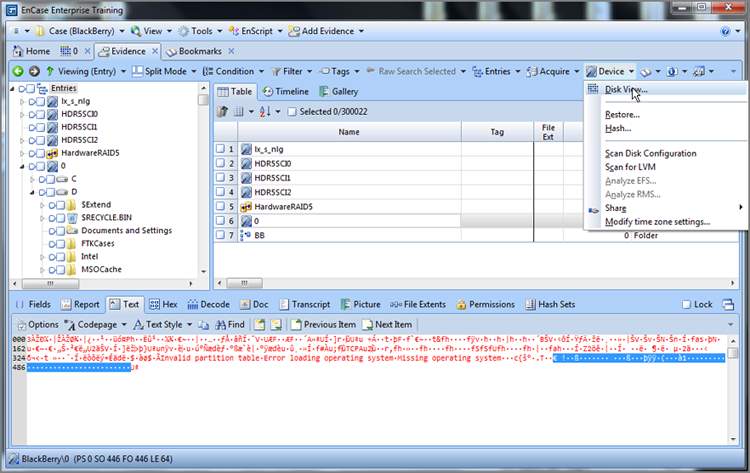
Maybe I need a life, but I make frequent use of the Disk view. Typically, this is one of the first views I go to when I first preview a device. At a glance, the topography of the drive is at your fingertips. It is no longer available as a Table view tab, but it is nearby. To use it, place the device or object you want to view in the Table pane by placing your cursor on its parent in the Tree pane. Since I want to see the device “physical disk 0” in the disk view, I place my cursor on the root of the entries in the Tree pane, and the various devices appear in the Table pane. I then place my cursor on physical drive 0 in the Table pane and click once to highlight it and make it the target for my Disk view, as shown in Figure 6-45. Let me emphasize again that the target is based only on the focus of your cursor and that blue checks don’t work for this purpose! Once you have your target in the Table pane and highlighted with your cursor, open the Device menu on the Evidence tab toolbar and choose Disk View, as shown in Figure 6-46. For those of you who have been paying attention and remember the super-secret menu (officially the right-side menu), you can also access this feature from the Evidence tab toolbar right-side menu if you drill down into the Device submenu.
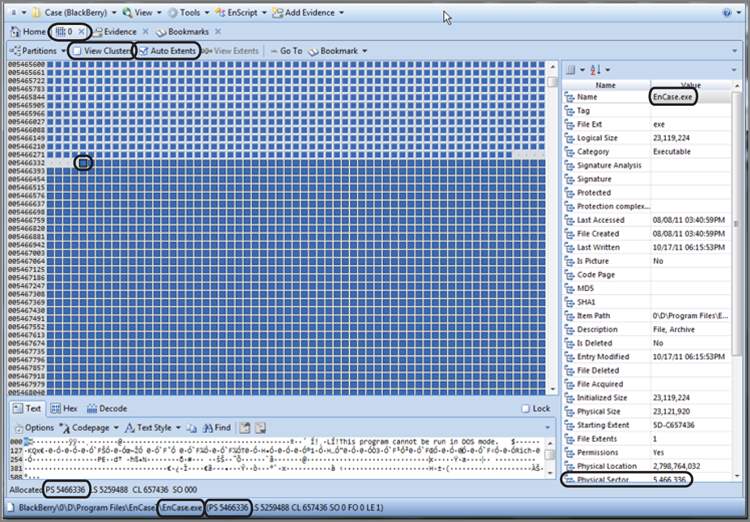
By default, you see a series of colored square blocks, each representing one sector. If you would prefer that each block represent a cluster, simply click the check box next to View Clusters on the toolbar for this view. I have circled that option in Figure 6-47. The blocks are color-coded as to their function. Former versions had a legend for these color codes, but the early releases of EnCase 7 do not. There are plans to restore the legend, so you’ll have to await for the return of that feature. Blue blocks are allocated sectors or clusters. The gray blocks with the raised bump in the center are unallocated sectors or clusters. There are many others.
Figure 6-45: The target for Disk view is in the Table pane and highlighted with the cursor.
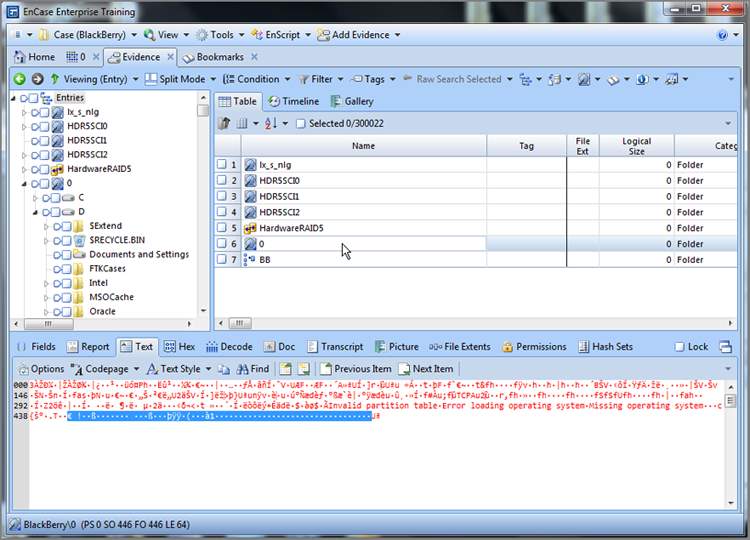
Figure 6-46: Selecting Disk View from the Device menu
When you are in the Cluster view, remember that clusters are logical units that exist within a partition. You won’t see sectors that exist outside the partition because they aren’t clusters!
I have opened disk 0 into the Disk view and have navigated to physical sector 5,466,336 (circled also in Figure 6-47), which happens to be the beginning location of a program called EnCase. Upon placing my cursor on that sector, as shown in Figure 6-47, all sectors in that set of extents become highlighted, by default. The feature is called Auto Extents and may be toggled on and off on the Disk View toolbar (also circled in Figure 6-47).
Figure 6-47: Disk view with focus on starting sector of the EnCase program file
If you right-click in the disk area, you can go to a sector by typing in the sector number. You can also use the Go To feature from its menu on the Disk View toolbar, which is shown in Figure 6-48.
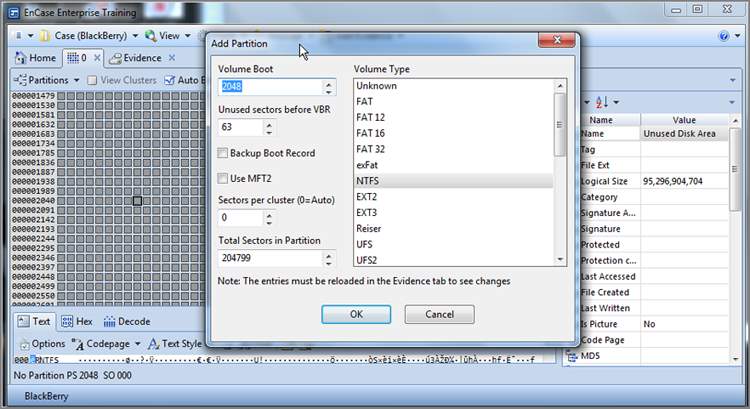
Also available from the right-click menu is the ability to add or delete partitions, which is quite helpful if someone FDISKed their drive. To add a partition, you must first locate the beginning of the partition and place your cursor in that location. Once you are at the beginning, you open the Partitions menu and choose to add a partition, as shown in Figure 6-49. In many cases, EnCase will read the partition information in the selected sector and the information needed to create the partition will be already in the window that follows, but sometimes you will need to make adjustments, which requires further knowledge. We’ll cover recovering partitions in depth in Chapter 10. Figure 6-50 shows a partition about to be recovered at physical sector 2048, which is where Windows 7 now starts its first NTFS partition on a new installation. EnCase has read the data in the volume boot record (sector 2048) and knows the partition information (type, sectors per cluster, sectors in partition, and so forth).
Figure 6-48: The Go To function is available three ways: via the toolbar menu, right-click, and Ctrl+G.
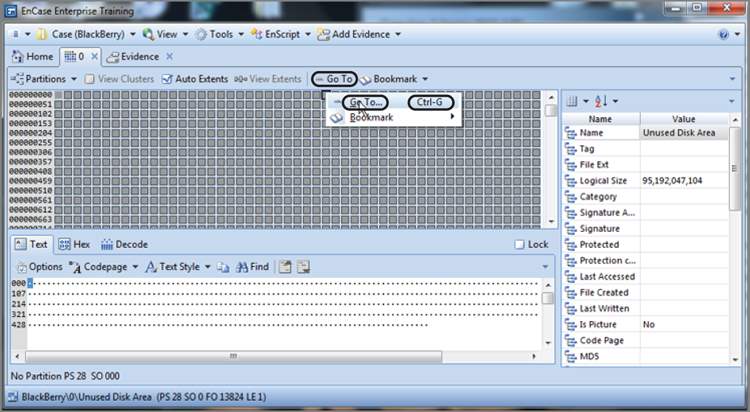
Figure 6-49: Partition menu options
Figure 6-50: An NTFS 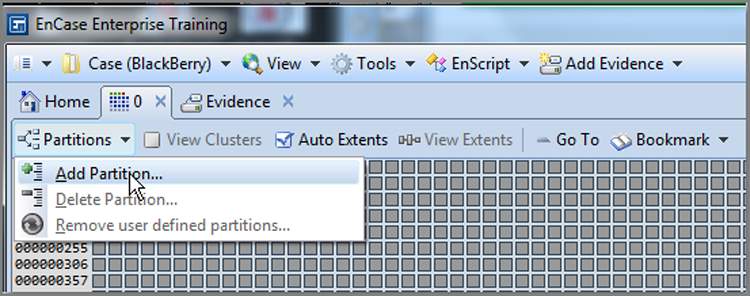 partition about to be recovered at physical sector 2048
One final function you can carry out from the Disk view is that of bookmarking. I’ll get into bookmarking in Chapter 7, but for now, just remember that you can create bookmarks while in the Disk view.
Cite This Work
To export a reference to this article please select a referencing stye below:
Related Services
View allRelated Content
All TagsContent relating to: "Forensic Science"
Forensic science, or forensics, is the application of science to criminal and civil law, usually during criminal investigation, and involves examining trace material evidence to establish how events occurred. Forensic scientists provide impartial scientific evidence that can be used in court.
Related Articles
DMCA / Removal Request
If you are the original writer of this dissertation and no longer wish to have your work published on the UKDiss.com website then please:


