Home Automation Using Internet of Things
Info: 7592 words (30 pages) Dissertation
Published: 22nd Nov 2021
Abstract
The increasing development of social economy and needs of people has led to the variety of appliances presented in the house. To overcome the problem of managing and controlling these appliances, smart home system has been proposed. Smart home system meets the requirement of security and comfort at home. It is the integration of technology and services through home networking for a better quality of living [1]. This system proposes home automation coupled with internet of things to control various home appliances.
Table of Contents
3.4 Host a website from Pi using dataplicity.
3.5 Security Consideration using Dataplicity.
3.6 Dataplicity for Mass Production.
3.7 Compare Dataplicity with Port Forwarding [7].
3.11 Appliances in form of LED.
3.12 Trigger appliances based on time.
1 Introduction
Home automation, Internet of Things and Wireless home security are the features of this project. The system presented sends alerts to the owner over email using the internet if entrance door is either opened or closed. On the other hand, if the owner identifies that the person entering his house is not an intruder but an unexpected guest of his then the owner can make arrangements such as opening the door, switching on various appliances inside the house, which are connected and controlled by the Raspberry Pi (RPi) in the system. The user can also monitor the temperature of RPi and IP address accessing the RPi. Also, owner can trigger the appliances based on time such that as soon as he enters his house from work at a set time he can make himself at full comfort without manually having to switch on the electrical appliances like heater or fill the bathtub for an example [2].
2 System Overview
Smart Home system is shown in Figure 1 and the flowchart of the whole system is shown in Figure 2. The main ideas of smart home system are home automation and internet of things. Home Automation involves the control and automation of lighting, heating, ventilation, air conditioning, and security (such as smart locks), as well as home appliances such as washer/dryers, ovens or refrigerators/freezers [3]. The Internet of things (IoT) is the network of physical devices, vehicles, home appliances and other items embedded with electronics, software, sensors, actuators, and connectivity which enables these objects to connect and exchange data [4]. The user can access home appliances via internet on a web browser using Hypertext Transfer Protocol (HTTP). The set commands by the user is sent to the webserver that is further sent to the sensors or actuators. Here RPi acts as webserver through which users can control sensors or home appliances. An RPi that is connected to a sensor and running a web server can be used to present information to the web when it is requested to do so by a web browser. The server used here is Nginx server. Hypertext Markup Language (HTML) is used for creating webpage for user interface. Dataplicity Wormhole allows to host a website from Raspberry Pi, regardless of where it is installed, at a specific address.
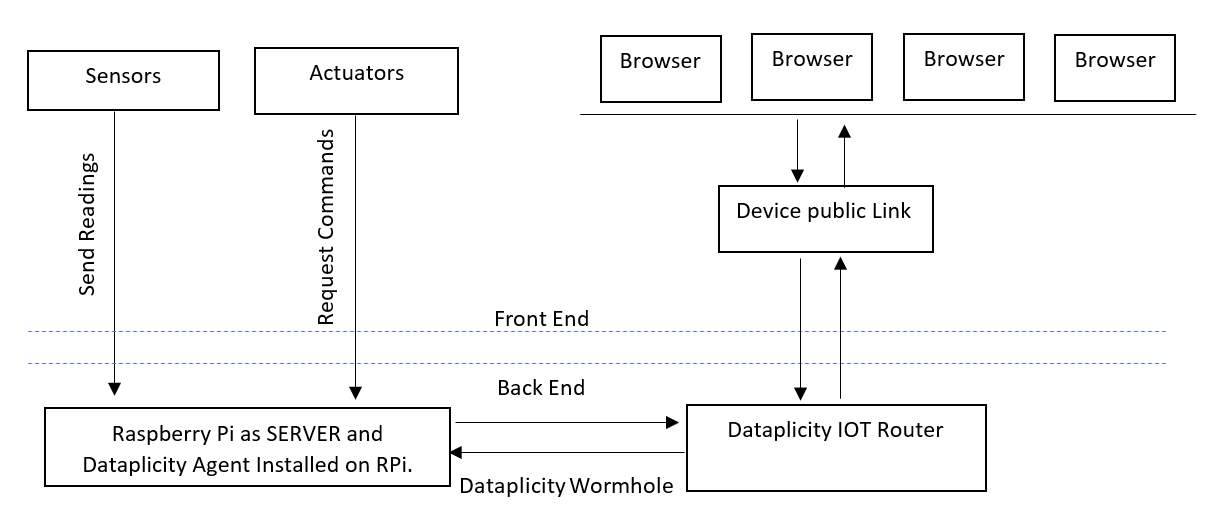
Figure 2 shows the system flowchart where user can control home appliances using webpage from anywhere in the world. The webpage is hosted on internet using Dataplicity services and each webpage is allotted a specific URL. The data sent from RPi server is routed through Dataplicity service to the internet.
3 Project Implementation
3.1 The RPi web server
Figure 3 shows the RPi that is connected to a sensor and running a web server can be used to present information to the web when it is requested to do so by a web browser. Communications take place using the Hypertext Transfer Protocol (HTTP) [5].
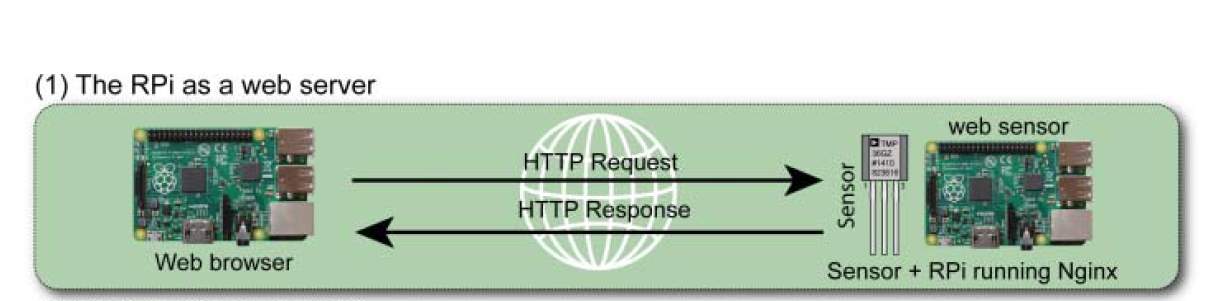
Figure 3. The RPi as a web server.
In this system webserver is installed and configured on RPi. The installing of webserver on RPi is very straightforward and has many advantages to it. Nginx server is used in this system because it is low-overhead server. It is very lightweight server and is very suitable for running on RPi. Some of the features of Nginx server are as follows:
- Present general web content to the world.
- Integrate sensors and display their values to the world.
- Integrate sensors and use it to intercommunicate between devices.
- Provide web-based interfaces to tools that are running on the RPi.
Steps to set Raspberry Pi as webserver:
- Update your Raspberry Pi
$ sudo apt update
- Install Nginx server
$ sudo apt install nginx
- Reboot
$ sudo reboot
Note: On some RPi Nginx versions you must edit the /etc/nginx/sitesavailable/default configuration file and comment out the entry “listen [::]:80 default_server;” using a # character. Also, if you have installed Apache on your RPi then you must stop it before installing Nginx; for example, by using
$ sudo service apache2 stop.
The Nginx web server runs on port number 80 by default. A port number is an identifier that can be combined with an IP address to provide an endpoint for a communications session. It is effectively used to identify the software service that is required by a client. For example, you can find out the IP address of your RPi, and the list of services that are listening to ports on the RPi by using the network statistics (netstat) command:
- Find IP address
$ hostname -I
10.0.0.108
- $ sudo netstat -tlpn
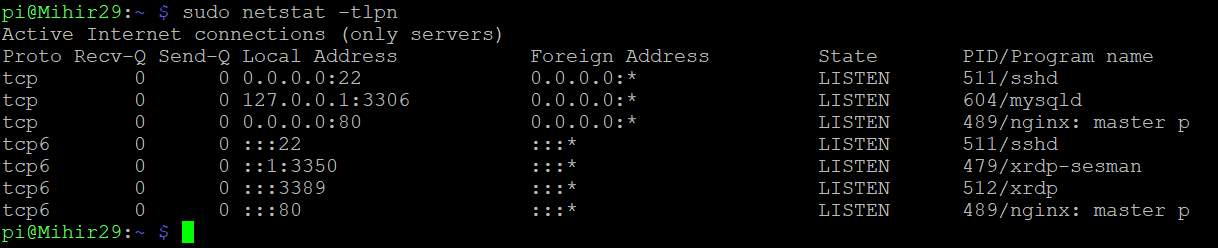
Therefore, when a network request is received for port 80, it is directed to the Nginx web server application. The usual port number for unsecured web traffic is 80; this is assumed when you enter a URL in your web browser. You can also see that traffic for port 22 is directed to the Secure Shell (SSH) server.
- You can test configuration of your Nginx server using the following:

- You can also get information about changes that you make to the server configuration before you perform a server restart, as follows:
$ sudo service nginx configtest
$sudo service nginx restart

- You can identify the current modules that have been compiled into Nginx using the following:
$ nginx -V

- To create a simple web page for the RPi web server, you can use the nano editor and some basic HTML syntax as follows:

- In the nano editor write the following code:

- Then press control + x and then Y to save the file.
- Now when you connect to the web server on the RPi using a web browser, you will see the output displayed. You can use the local IP address of the RPi.

3.2 GNU Cgicc Applications
The Common Gateway Interface (CGI) allows a web browser to pass environment and application information to a script/program using HTTP POST or GET requests [6]. Almost all programming languages can be used to build CGI applications, because their only role in the transaction is to parse the input that is sent to them by the server, and to construct a suitable HTML output response [5]. The GNU Cgicc is a C++ library for building CGI applications. It is powerful, and it greatly simplifies the process of building applications that allow you to interact with the RPi over the Internet using a HTML form-based interface.
Advantages of Cgicc are:
- It has low overhead
- Permits direct access to system calls
- Compatible with WiringPi libraries.
Steps to set up GNU Cgicc:
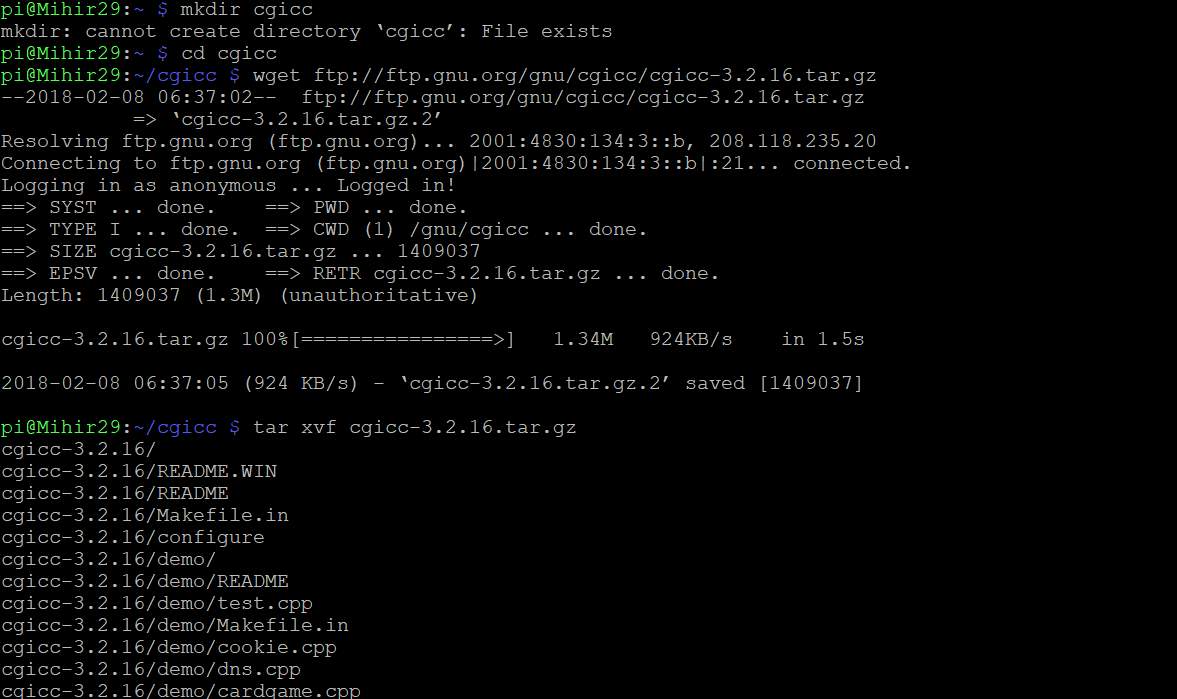
- Then follow this step:
$ cd cgicc-3.2.16/
$ ./configure –prefix=/usr
$ make
$ sudo make install
$ ls /usr/lib/libcgi*
- Make a new file using .c as an extension.
- Write the code inside the file (Code is included in later part of the report).
- Save the file.
- Now go to the folder where you have saved the file through command window using cd command.
- You can build and deploy this application as follows:

Finally, you have built a dynamic webpage and RPi acts as a web server.
You can go to any browser in your PC and enter your IP address followed by /cgi-bin/yourfilename.cgi
Eg. http://10.0.0.108/cgi-bin/hello_led.cgi
3.3 Dataplicity
Dataplicity is a remote terminal for your Pi. It offers functionality similar to SSH, but it doesn’t need any complex set-up to get it working behind firewalls and NAT.
Steps to set up Dataplicity:
- Go to www.dataplicity.com webpage.
- ‘Enter your email address’. The sign-up process generates a line of code.
- ‘Copy the line of code into your Raspberry Pi terminal to activate your remote shell’.
- Open email and click on the link sent to you.
- Copy and paste the given code in RPi.
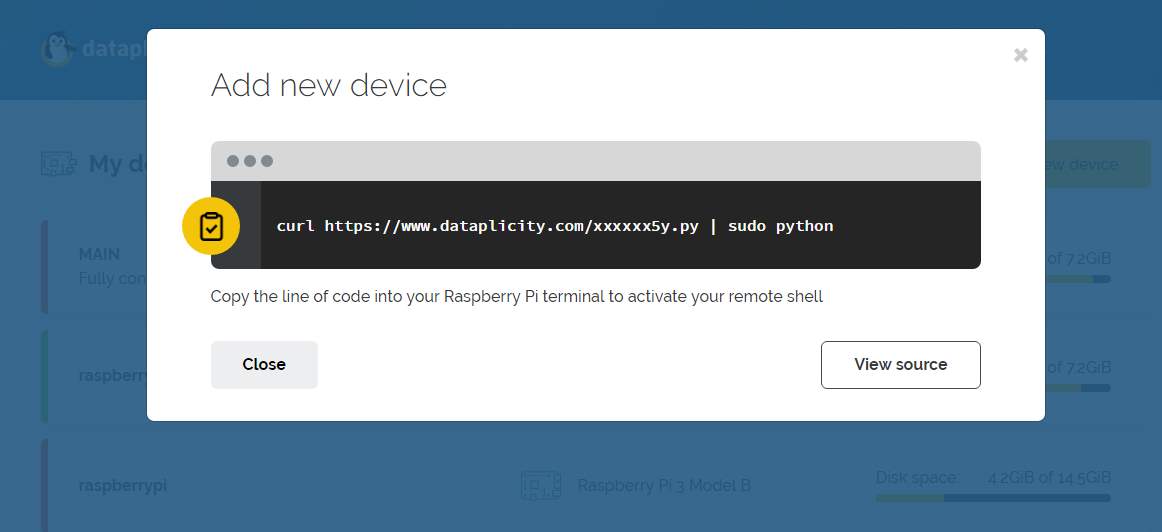
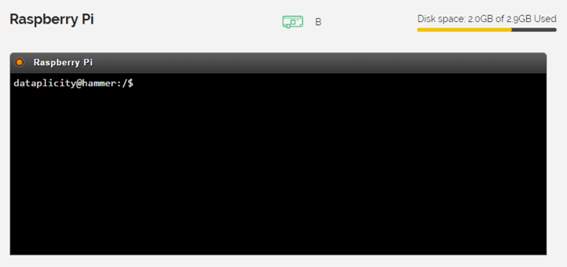
- In the Device list click on the link to your Pi. This takes you to your Dataplicity Terminal.
3.4 Host a website from Pi using dataplicity
Dataplicity Wormhole allows you to host a website from your Raspberry Pi, regardless of where it is installed, at a specific address (https://
Steps to host a website from Pi using Dataplicity wormhole:
- Connect RPi to internet.
- Operating system should be installed on RPi.
- Install Dataplicity on RPi.
- Install webserver on RPi.
- Enable wormhole by logging into Dataplicity account.
- Click on “Active Wormhole”.
- When pressed, link to device website is shown.
- When clicked on the link a device website is shown.
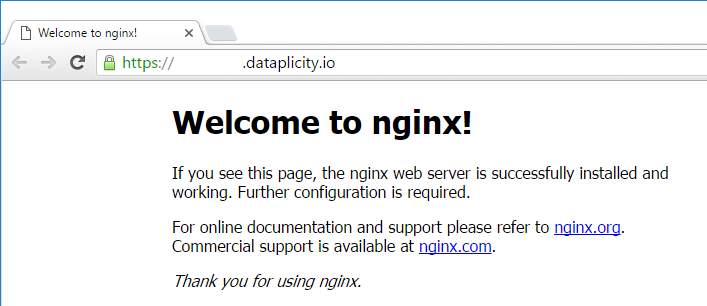
Thus, a website above is actually running on Pi. The files for it, and the code for it, are all in the Pi. The given website is published on internet therefore it can be accessed anywhere in the world.
3.5 Security Consideration using Dataplicity
While enabling wormhole, webservice hosted on RPi is directly placed on the wider internet. Therefore, special care to be considered on what to put online. In this case, NGINX is running on port 80 directly from RPi. Wormhole listens only on localhost, so don’t need to have port 80 open directly from RPi to the wider world – even though this is not inherently insecure. Just to avoid confusion it’s sensible to close the device port by installing a firewall. Depending on the application, enable HTTP basic-authentication from the NGINX configuration, and require a password for website access.
3.6 Dataplicity for Mass Production
Dataplicity installation is very easy to set up, but to assemble Pi devices for commercial use for mass production, manually setting up Dataplicity in each Pi is very time consuming and tiresome. Therefore, there are two solutions for mass production, as follows:
- Boot the master image and install Dataplicity, delete the device registration keys, then clone the image, and re-register each device as part of a first-time boot script.
- Install Dataplicity as part of a first-time boot script.
Thus, a custom system image is prepared that will install Dataplicity when the system is first booted. This will be very useful for mass production since it would save lot of time to install Dataplicity individually in each RPi.
3.7 Compare Dataplicity with Port Forwarding [7]
| Dataplicity | Port forwarding |
| Dataplicity is a one-line installation which is always the same regardless of the number of devices you have or their configuration. | Port forwarding, however, requires a working knowledge of IP addressing, TCP port numbering, firewalls and Network Address Translation (NAT). Making it even partially portable typically requires the use of third party Dynamic DNS services which also requires some knowledge of DNS. |
| Dataplicity requires only a standard internet connection (Ethernet or WiFi for example). | In addition to an internet connection, port forwarding typically requires the following:
|
| Port management is not required. | When using port forwarding to access devices on your local network, each will require a separate inbound TCP port through your router. You’ll need to keep track of these to remember which port corresponds to which device and to delete old ports no longer required. |
| Dataplicity uses standard outbound secure web traffic (HTTPS) so it’s very unlikely you’d need to make any changes to allow Dataplicity traffic through. | For port forwarding, you will need to add a firewall exception to your router to allow inbound traffic to each of the redirected ports (minimum one per forwarded device). |
| If you can access normal websites from your Pi you’re already ready to use Dataplicity. | For port forwarding, however, the upstream network setup is required. |
| Dataplicity is more secure than port forwarding since it does not require to open a port from the internet to your device. | Port forwarding may put a device at risk from attack since forwarding an inbound port directly from the internet puts your device on the internet. |
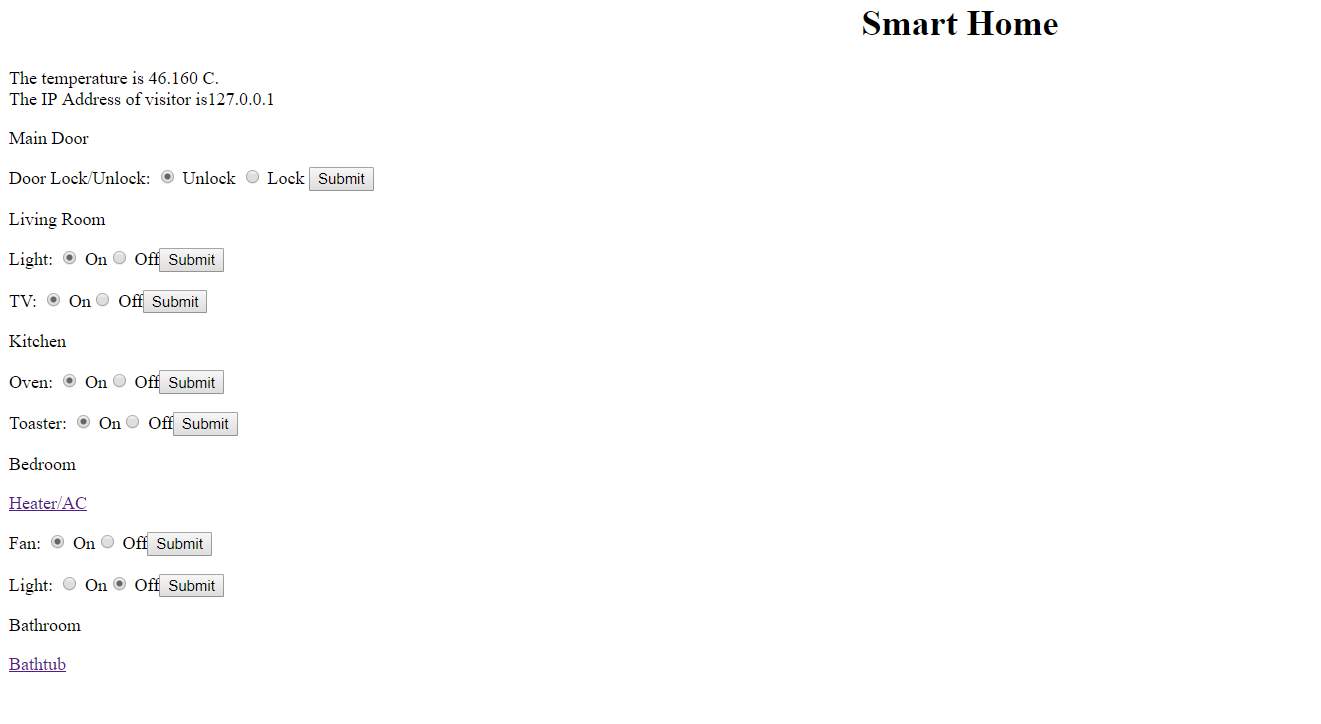
3.8 System Features
- Control and monitor lighting, heating, ventilation, air conditioning, appliances like oven, toaster over the internet with home automation.
- Remotely Lock and Unlock door.
- Monitor Locking and Unlocking door via Email.
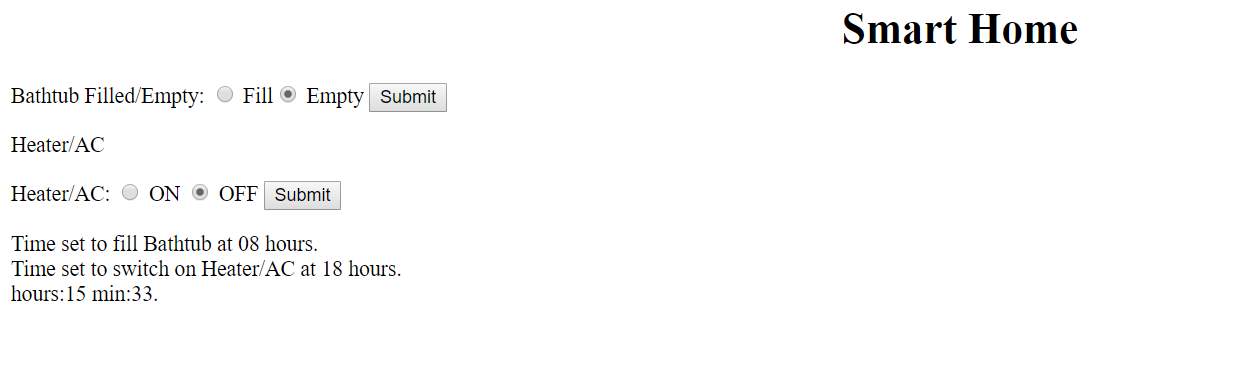
- Trigger “Things” based on time.
- Monitor Raspberry Pi Temperature.
- Monitor the IP Address of visitor.
- See the Time on Webpage.
3.9 Code
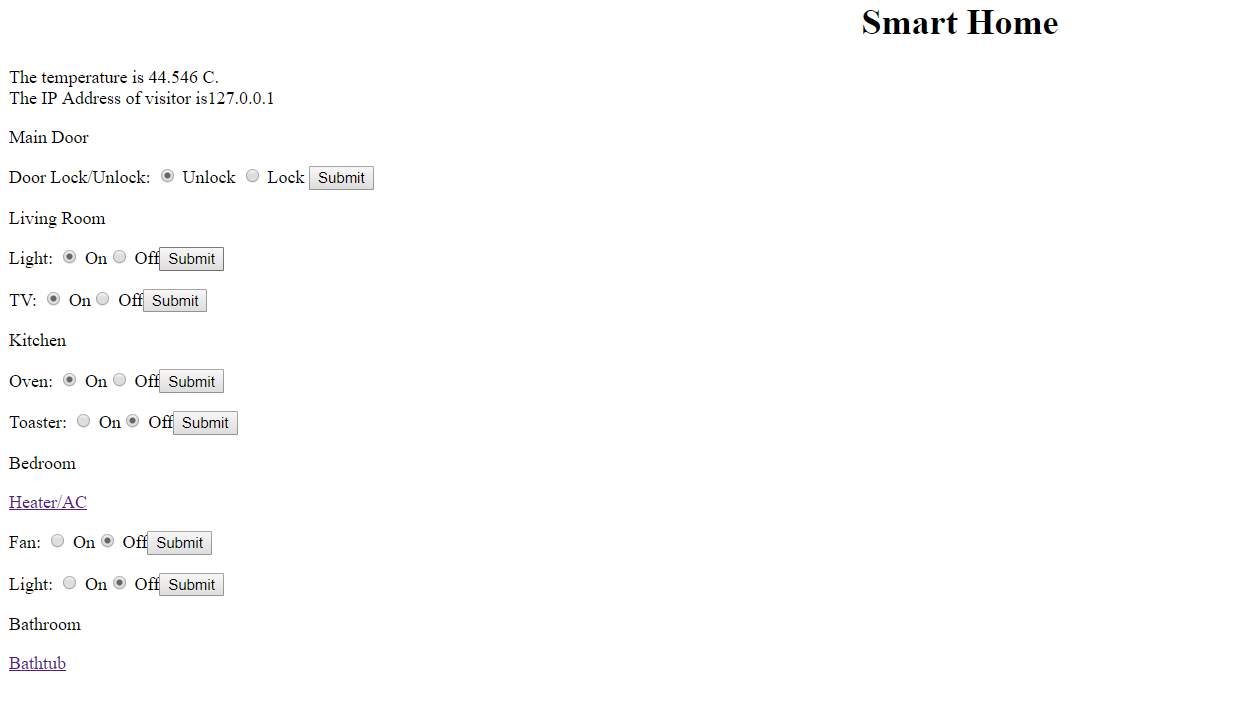
There are two webpages for Smart Home. The first webpage doesn’t refresh until external command is given and second webpage refreshes every 60 seconds since appliances are triggered with the set time. Since the appliances need to be triggered at a set time, the RPi checks every 60 seconds if time matches with the set time. Therefore, to check whether the time matches with the set time, the webpage needs to be refreshed every 60 seconds to update the time. Two different webpages are made to avoid receiving unnecessary email every 60 seconds.
First webpage [8][9]:
//File: IOT. //Name: Mihir Modi //Date: 3/14/2018 //Course: EE 590: Embedded & Real time system //Description: Control and monitor appliances,Remotely lock and unlock door, monitor lock and unlock door via Email, // Monitor RPi temperature, Monitor the IP address of visitor, see time on webpage //Header files #include#include #include // for the getenv call #include// for the system uptime call #include// the cgicc headers #include#include #include #include #include //define GPIO PINS #define LED_GPIO 5 #define LED_GPIO2 6 #define LED_GPIO3 13 #define LED_GPIO4 19 #define LED_GPIO5 26 #define LED_GPIO6 21 #define LED_GPIO7 20 //declare namespace using namespace std; using namespace cgicc; //main function int main(int argc, char *argv[]) { // Email char cmmd[100]; // to hold the command. char cmmd1[100]; // to hold the command. char to[] = “mihirmodi295@gmail.com”; // email id of the recepient. char body[] = “Door UnLock”; // email body. char body1[] = “Door Lock”; // email body. char tempFile[100]; // name of tempfile. char tempFile1[100]; // name of tempfile. strcpy(tempFile, tempnam(“/tmp”, “sendmail”)); // generate temp file name. strcpy(tempFile1, tempnam(“/tmp”, “sendmail”));// generate temp file name. FILE *fp = fopen(tempFile, “w”); // open it for writing. fprintf(fp, “%s ”, body); // write body to it. fclose(fp); // close it. FILE *fp1 = fopen(tempFile1, “w”); // open it for writing. fprintf(fp, “%s ”, body1); // write body to it. fclose(fp); // close it. // Temperature FILE *temperatureFile; double T; temperatureFile = fopen(“/sys/class/thermal/thermal_zone0/temp”, “r”); if (temperatureFile == NULL); //print some error message fscanf(temperatureFile, “%lf”, &T); T /= 1000; fclose(temperatureFile); Cgicc form; // the CGI form object wiringPiSetupGpio(); // uses wiringPi – see Chp.6. pinMode(LED_GPIO, OUTPUT); // led door lock/unlock pinMode (18, PWM_OUTPUT) ; // servo door lock/unlock pinMode (LED_GPIO2, OUTPUT) ; //led for Living room light pinMode (LED_GPIO3, OUTPUT) ; //led for Living room TV pinMode (LED_GPIO4, OUTPUT) ; //led for Kitchen oven pinMode (LED_GPIO5, OUTPUT) ; //led for Kitchen toaster pinMode (LED_GPIO6, OUTPUT) ; //led for Bedroom fan pinMode (LED_GPIO7, OUTPUT) ; //led for Bedroom Light //Set LED command string cmd; //Command for door lock/unlock string cmd2; //Command for Living room light string cmd3; //Command for Living room TV string cmd4; //Command for Kitchen oven string cmd5; //Command for Kitchen toaster string cmd6; //Command for Bedroom fan string cmd7; //Command for Bedroom Light //Command for door lock/unlock { bool isStatus = form.queryCheckbox(“status”); form_iterator it = form.getElement(“cmd”); // the radio command if (it == form.getElements().end() || it->getValue() == “”) { cmd = “off”; // if it is invalid use “off” } else { cmd = it->getValue(); } // otherwise use submitted value } //Command for Living room light { bool isStatus2 = form.queryCheckbox(“status2”); form_iterator it2 = form.getElement(“cmd2”); // the radio command if (it2 == form.getElements().end() || it2->getValue() == “”) { cmd2 = “off2”; // if it is invalid use “off” } else { cmd2 = it2->getValue(); // otherwise use submitted value } } //Command for Living room TV { bool isStatus3 = form.queryCheckbox(“status3”); form_iterator it3 = form.getElement(“cmd3”); // the radio command if (it3 == form.getElements().end() || it3->getValue() == “”) { cmd3 = “off3”; // if it is invalid use “off” } else { cmd3 = it3->getValue(); // otherwise use submitted value } } //Command for Kitchen oven { bool isStatus4 = form.queryCheckbox(“status4”); form_iterator it4 = form.getElement(“cmd4”); // the radio command if (it4 == form.getElements().end() || it4->getValue() == “”) { cmd4 = “off4”; // if it is invalid use “off” } else { cmd4 = it4->getValue(); // otherwise use submitted value } } //Command for Kitchen toaster { bool isStatus5 = form.queryCheckbox(“status5”); form_iterator it5 = form.getElement(“cmd5”); // the radio command if (it5 == form.getElements().end() || it5->getValue() == “”) { cmd5 = “off5”; // if it is invalid use “off” } else { cmd5 = it5->getValue(); // otherwise use submitted value } } //Command for Bedroom fan { bool isStatus6 = form.queryCheckbox(“status6”); form_iterator it6 = form.getElement(“cmd6”); // the radio command if (it6 == form.getElements().end() || it6->getValue() == “”) { cmd6 = “off6”; // if it is invalid use “off” } else { cmd6 = it6->getValue(); // otherwise use submitted value } } //Command for Bedroom Light { bool isStatus7 = form.queryCheckbox(“status7”); form_iterator it7 = form.getElement(“cmd7”); // the radio command if (it7 == form.getElements().end() || it7->getValue() == “”) { cmd7 = “off7”; // if it is invalid use “off” } else { cmd7 = it7->getValue(); // otherwise use submitted value } } //Get IP address char *value = getenv(“REMOTE_ADDR”); // The remote IP address //HTML webpage printf(“Content-type: text/html ”); printf(“ ”); printf(“ ”); printf(“ ”); printf(“ ”); printf(“”); printf(“ ”); printf(“Smart Home ”); printf((“ The temperature is %6.3f C. “), T); printf((“ The IP Address of visitor is%s “), value); printf(“ Main Door”); printf(“
”); //Servo for door lock/unlock and LED for door lock/unlock pwmSetMode (PWM_MODE_MS); pwmSetRange (2000); pwmSetClock (192); { if (cmd == “on”) { pwmWrite(18, 225); digitalWrite(LED_GPIO, HIGH); // turn on sprintf(cmmd, “sendmail %s Bathtub ”); printf(“”); printf(“ ”); return 0; }
Second webpage [6]:
//File: Bathtub.c //Name: Mihir Modi //Date: 3/14/2018 //Course: EE 590: Embedded & Real time system //Description: Trigger things based on time.This webpage refresh every 60 seconds. //Header files #include#include #include // for the getenv call #include// for the system uptime call #include// the cgicc headers #include#include #include #include #include //define GPIO PINS #define LED_GPIO6 16 #define LED_GPIO7 12 //declare namespace using namespace std; using namespace cgicc; //main function int main(int argc, char *argv[]) { Cgicc form; // the CGI form object wiringPiSetupGpio(); pinMode (LED_GPIO6, OUTPUT) ; pinMode (LED_GPIO7, OUTPUT) ; //Set led commands string cmd; string cmd2; //Command for bathtub { bool isStatus = form.queryCheckbox(“status”); form_iterator it = form.getElement(“cmd”); // the radio command if (it == form.getElements().end() || it->getValue() == “”) { cmd = “off”; // if it is invalid use “off” } else { cmd = it->getValue(); } // otherwise use submitted value } //command for heater/AC { bool isStatus2 = form.queryCheckbox(“status2”); form_iterator it2 = form.getElement(“cmd2”); // the radio command if (it2 == form.getElements().end() || it2->getValue() == “”) { cmd2 = “off2”; // if it is invalid use “off” } else { cmd2 = it2->getValue(); // otherwise use submitted value } } //HTML webpage printf(“Content-type: text/html ”); printf(“ ”); printf(“ ”); printf(“ ”); printf(“ ”); printf(“”); printf(“ ”); printf(“Smart Home ”); printf(“
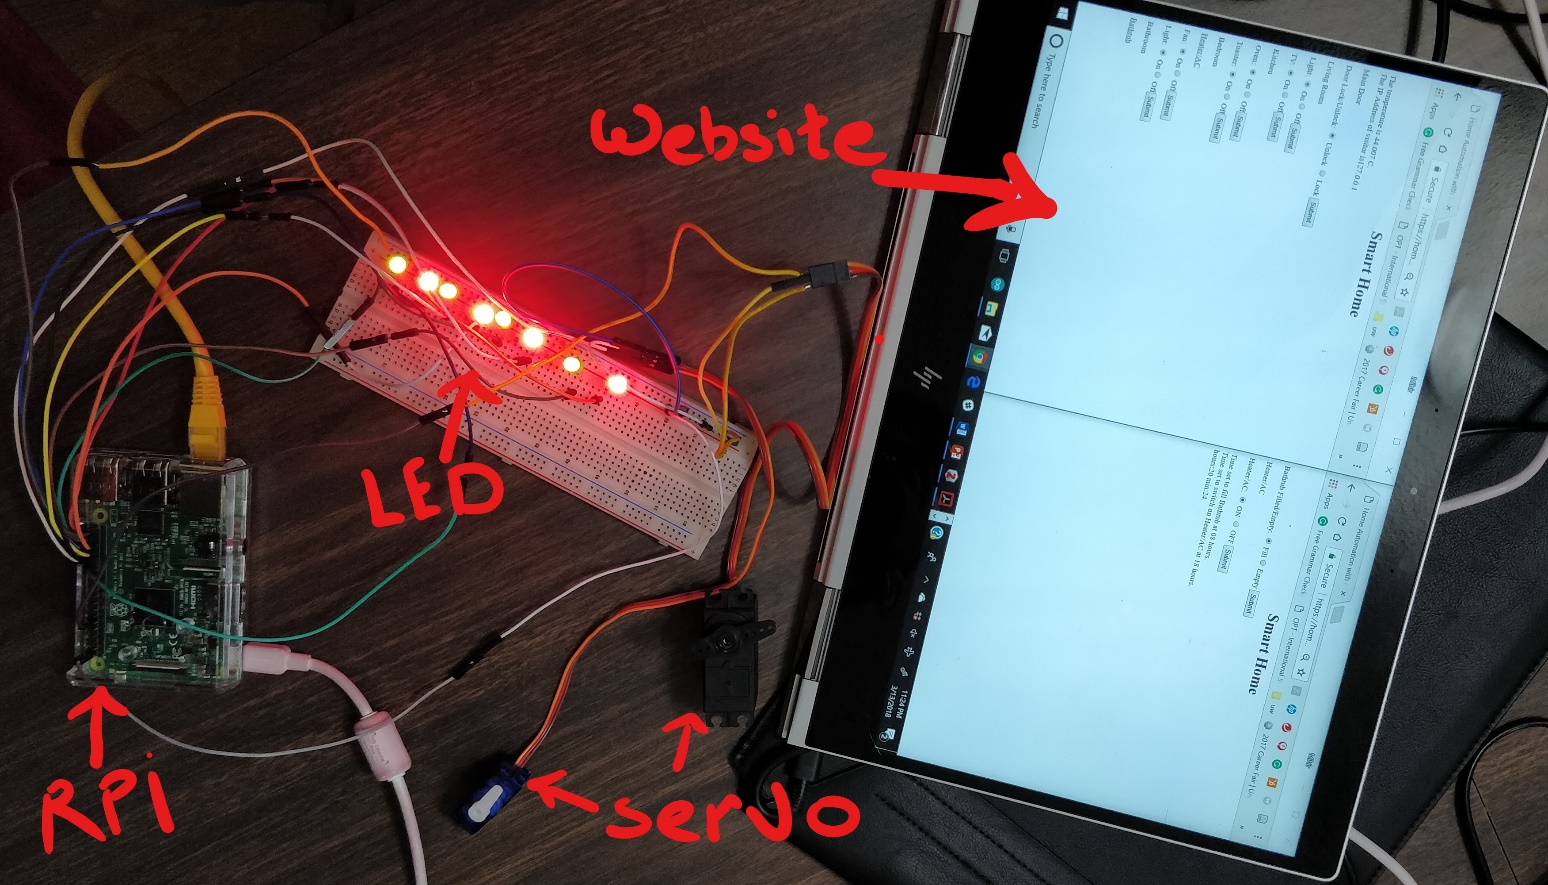
3.10 Servo
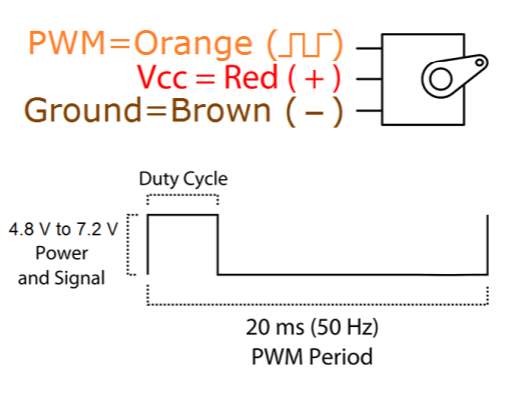
Servo Motor is used to Lock and Unlock door and to Turn on/off heater/AC.
The servo can rotate approximately 120 degrees (60 in each direction). PWM signal is used to rotate the signal. PWM period is 20 ms and its duty cycle varies from 1 ms to 2 ms.
There is only one PWM pinout in RPi and two servos is needed in Smart Home system. Therefore, one servo is run using PWM pin and another servo is run by switching pin on and off.
Code for servo [10]:
pwmSetMode (PWM_MODE_MS);

pwmSetRange (2000);

pwmSetClock (192);

{

if (cmd == “on”)

{

pwmWrite(18, 225);

digitalWrite(LED_GPIO, HIGH); // turn on

sprintf(cmmd, “sendmail %s
- pwmSetRange (unsigned int range) [11] ;
This sets the range register in the PWM generator. The default is 1024.
- pwmSetClock (int divisor) [11] ;
This sets the divisor for the PWM clock.
In this code if “on” command is received, the door will be locked and email will be sent indicating door lock, else if “off” command is received, the door will be unlocked and email will be sent indicating door unlock.
3.11 Appliances in form of LED
Here appliances like light, TV, oven, toaster, fan, bathtub etc. are represented in form of LED. LED’s are blinked on/off indicating that these appliances are turned on/off.
Code to blink LED on/off:
{

if (cmd7 == “on7”)

{

digitalWrite(LED_GPIO7, HIGH);          // turn on

}

else if (cmd7 == “off7”)

{

digitalWrite(LED_GPIO7, LOW);     // turn off

}

else printf(“

Invalid command!

”);         // not possible

}
In this code if “on” command is received, appliances will be turned on, else if “off” command is received, appliances will be turned off.
3.12 Trigger appliances based on time
Here, time will be displayed on webpage. Hours and minutes are displayed on second webpage. The webpage is refreshed every 60 seconds and hours and minutes are updated. This time is then compared with the set time to trigger the appliances.
Code to get time and display on webpage:
time_t now;

struct tm *now_tm;

int hour;

int minute;

now = time(NULL);

now_tm = localtime(&now);

hour = now_tm->tm_hour;

minute = now_tm->tm_min;

printf(“

Time set to fill Bathtub at 08 hours. ”);

printf(“

Time set to switch on Heater/AC at 18 hours. ”);

printf(“

hours:%d min:%d. ”, hour, minute);

Code to refresh the webpage every 60 second:

printf(“”);
Code to set time to trigger appliances:
{ if (cmd == “on” || (hour == 12 && (minute == 00 || minute == 01 || minute == 02 || minute == 03 || minute == 04 || minute == 15)))

{

digitalWrite(LED_GPIO6, HIGH);          // turn on

}

else if (cmd == “off” || (hour == 12 && minute == 16))

{

digitalWrite(LED_GPIO6, LOW);     // turn off

}

}
In this code if “on” command is received or if time matches with set time, appliances will be turned on, else if “off” command is received if time matches with set time, appliances will be turned off.
3.13 Email
Here, email will be sent indicating that door is either open or closed.
Code for email [12]:
char cmmd[100];                                // to hold the command.

char cmmd1[100];                               // to hold the command.

char to[] = “mihirmodi295@gmail.com”;          // email id of the recepient.

char body[] = “Door UnLock”;                   // email body.

char body1[] = “Door Lock”;                    // email body.

char tempFile[100];                            // name of tempfile.

char tempFile1[100];                           // name of tempfile.

strcpy(tempFile, tempnam(“/tmp”, “sendmail”)); // generate temp file name.

strcpy(tempFile1, tempnam(“/tmp”, “sendmail”));// generate temp file name.

FILE *fp = fopen(tempFile, “w”);               // open it for writing.

fprintf(fp, “%s ”, body);                     // write body to it.

fclose(fp);                                    // close it.

FILE *fp1 = fopen(tempFile1, “w”);             // open it for writing.

fprintf(fp, “%s ”, body1);                    // write body to it.

fclose(fp);              // close it.
In this code temporary file is created to store the body of email.
3.14 IP address
Code:
char *value = getenv(“REMOTE_ADDR”);    // The remote IP address

‘REMOTE_ADDR’: The IP address from which the user is viewing the current page.
3.15 Temperature
Here temperature of RPi is monitored so that it doesn’t exceed the specific temperature if all the appliances (LED’s) are turned on together.
Code [13]:
FILE *temperatureFile;

double T;

temperatureFile = fopen(“/sys/class/thermal/thermal_zone0/temp”, “r”);

if (temperatureFile == NULL); //print some error message

fscanf(temperatureFile, “%lf”, &T);

T /= 1000;

fclose(temperatureFile);
4 Results and discussion
4.1 Experiment procedure
The webpage is accessed with a URL specified by Dataplicity. This webpage is used to control all the appliances at home. All the appliances can be controlled remotely from anywhere in the world.
4.2 Results
The two webpages to control the appliances are shown below:
4.3 Discussion
Important characterization for smart home system:
- Temperature increases drastically with switching on each LED.
- There is approximately 1-degree Celsius rise in Temperature with switching on single LED.
- There is approximately 5 degrees rise in temperature when servo motor is working.
- There is 1 second delay in pressing the button on webpage and turning LED on.
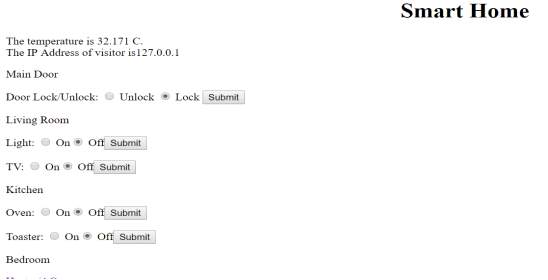
Temperature if no LED is on is 32.171-degree Celsius.
Temperature if all LED’s is on is 47.774-degree Celsius.
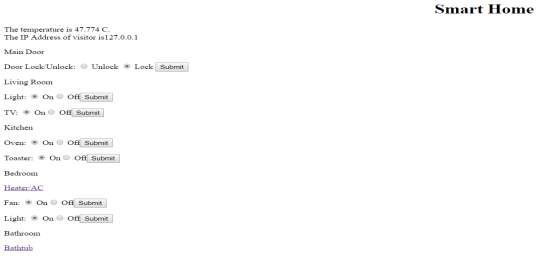
Therefore, there is 15 degrees rise in temperature from 0 LED on to 6 LED on.
Challenges facing smart home:
- Security: Since the appliances are exposed on internet, there should be high security on internet like user authentication and firewall.
- Compatibility and Longevity: Each appliance should be compatible to send and receive data from internet.
- Standards: Specific IOT standards need to be established.
- Server Maintenance: Server should be properly maintained if number of users are accessing a webpage at a specific time.
- Mass Production: Each server need to have a specific IP address, but due to increasing number of appliances and limited number of IP address, it is very difficult to assign each appliance with an IP address.
Solutions to the challenges:
- Security: Strong authentication methods, encrypted data and platform that can track irregularities on a network [14].
- Compatibility: Increase interoperability through open-source development.
- Standards: Set standards and regulations to ensure that data is not misused.
- Scalability: Peer to peer communication, IPv4 to IPv6.
- Mass Production: Install Dataplicity image in every RPi.
5 Future Work
- User Authentication to control appliances.
- Access to multiple user.
- Better User Interface.
- Mass Production.
- Make it portable.
- Install more security features like video surveillance
6 Conclusion
The impact of Internet of Things is very huge with anticipation of as many as 100 billion connected IOT devices and global economy impact of more than $11 trillion by 2025.By allowing control of home appliances, Smart Home with internet access provides flexibility, security and manageability.
7 Works Cited
[1] R. Robles and T. Kim, “Applications, Systems and Methods in Smart Home Technology: A Review,” vol. 15, Jan. 2010.
[2] “IoT based smart security and home automation system – IEEE Conference Publication.” [Online]. Available: http://ieeexplore.ieee.org.offcampus.lib.washington.edu/document/7813916/. [Accessed: 12-Mar-2018].
[3] “Home automation,” Wikipedia. 01-Mar-2018.
[4] “Internet of things,” Wikipedia. 14-Mar-2018.
[5] admin, “About the Book,” Exploring Raspberry Pi. .
[6] “CGI using C++ on the BeagleBone (Ggicc) | derekmolloy.ie.” [Online]. Available: http://derekmolloy.ie/beaglebone-cgicc/. [Accessed: 15-Mar-2018].
[7] “Port forwarding.” [Online]. Available: https://docs.dataplicity.com/docs/port-forwarding-compared. [Accessed: 14-Mar-2018].
[8] “Get PI’s temperature using C – Raspberry Pi Stack Exchange.” [Online]. Available: https://raspberrypi.stackexchange.com/questions/6978/get-pis-temperature-using-c. [Accessed: 15-Mar-2018].
[9] “email – How can I send e-mail in C? – Stack Overflow.” [Online]. Available: https://stackoverflow.com/questions/2362989/how-can-i-send-e-mail-in-c. [Accessed: 15-Mar-2018].
[10] “Raspberry Pi | WiringPi | Functions | Gordons Projects.” .
[11] “Raspberry Pi | WiringPi | Functions | Gordons Projects.” .
[12] “email – How can I send e-mail in C? – Stack Overflow.” [Online]. Available: https://stackoverflow.com/questions/2362989/how-can-i-send-e-mail-in-c. [Accessed: 15-Mar-2018].
[13] “Get PI’s temperature using C – Raspberry Pi Stack Exchange.” [Online]. Available: https://raspberrypi.stackexchange.com/questions/6978/get-pis-temperature-using-c. [Accessed: 15-Mar-2018].
[14] Nishant Kayal, “Internet of Things (IoT) – Seminar ppt,” 06:41:36 UTC.
Cite This Work
To export a reference to this article please select a referencing stye below:
Related Services
View all


Related Content
All TagsContent relating to: "Internet of Things"
Internet of Things (IoT) is a term used to describe a network of objects connected via the internet. The objects within this network have the ability to share data with each other without the need for human input.
Related Articles

DMCA / Removal Request
If you are the original writer of this dissertation and no longer wish to have your work published on the UKDiss.com website then please: