Android Powered Autonomous GPS Robot
Info: 10469 words (42 pages) Dissertation
Published: 10th Dec 2019
Tagged: Technology
Abstract
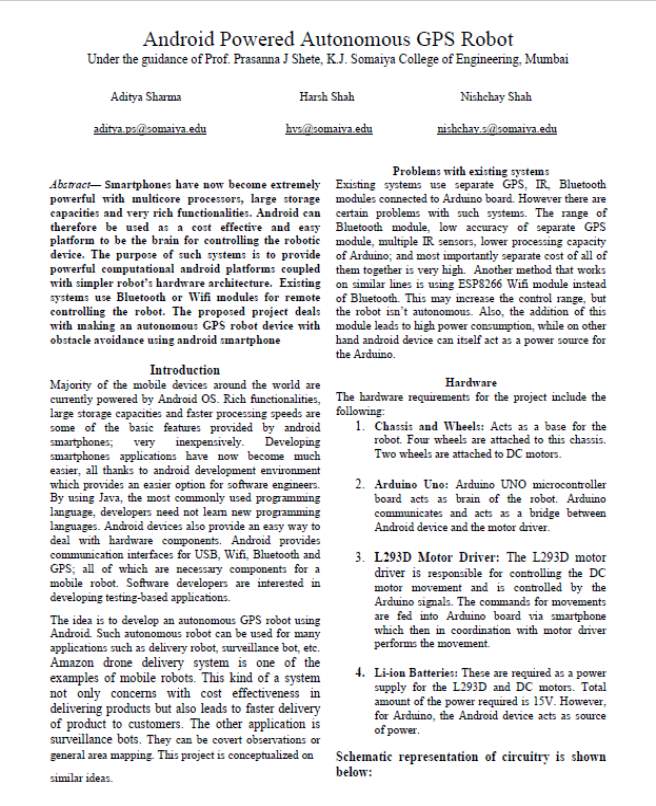
Smartphones have now become extremely powerful with multicore processors, large storage capacities and very rich functionalities. Android can therefore be used as a cost effective and easy platform to be the brain for controlling the robotic device. The purpose of such systems is to provide powerful computational android platforms coupled with simpler robot’s hardware architecture. Existing systems use Bluetooth or Wifi modules for remote controlling the robot. The proposed project deals with making an autonomous GPS robot device with obstacle avoidance using android smartphone.
CONTENTS
| Chapter No. | Chapter Name | Page No. |
| 1 | Introduction
1.4 Organization of the report |
1
1 1 2 2 |
| 2 | Literature Review
|
5 |
| 3 | Project Management Plan
3.1 Feasibility Analysis
3.3 Project Cost and Time Estimation 3.4 Resource Plan 3.5 Task & Responsibility Assignment Matrix 3.6 Project Timeline Chart |
7
7 8 9 10 11 11 |
| 4 | Project Analysis and Design
4.1 Software Architecture diagram 4.2 Architectural style and justification 4.3 Software Requirements Specification Document 4.4 Software Design Document |
13
13 14 14 20 |
| 5 | Project Implementation
5.1 System Architecture 5.2 Programming Languages used for Implementation 5.3 Tools used 5.4 Deployment diagram |
24
24 30 30 30 |
| 6 | Integration and Testing
6.1 Testing Approach 6.2 Testing Plan 6.3 Unit and Integrated System Test Cases |
31
31 31 33 |
| 7 | Conclusion and Future Work | 35 |
| 8 | References | 36 |
| APPENDIX | 37 |
vi
List of Tables
3.3 Project Cost
3.4 Time Estimation
3.5 Assignment and Responsibility Matrix
3.6 Resource Plan
6.4 Unit and Integrated System Test Cases
vii
List of Figures
3.2 Lifecycle Model
3.7 Project Timeline Chart
4.1 Software Architecture Diagram
4.3.9.1 Class Diagram
4.3.9.2 Use Case Diagram
4.3.9.3 Data Flow Diagram
4.4.1.1 Phone Mirror Application
4.4.1.2 OnRobot Application
4.4.1.3 GPS Path Generation
4.4.1.4 Real time GPS Tracking Activity
4.4.1.5 Canny Edge Detection Activity
5.1 System Architecture
5.1.1 Haversine Formula
5.1.2 Bearing Formula
5.1.3 Noise Reduction
5.1.4 Intensity Gradient of the image
5.1.5 Non-maximum suppression
5.1.6 Canny Edge Detection
5.1.7.1 Side fill Module
5.1.7.2 Erode module
viii
5.1.7.3 Smooth Hull module
5.1.7.4 Point Location
5.4 Deployment Diagram
ix
Chapter 1: Introduction
1.1 Background
Android powers hundreds of millions of mobile devices in more than 190 countries around the world. Large storage capacities, richer functions and faster processing speeds are some of the features provided by android smartphone, that too almost inexpensively. Communication between android smartphones have now become much easier, all thanks to android development environment which provides an easier option for software engineers, by using Java and not needing to learn new programming languages. Android devices also provide an easy way to deal with hardware components. As a matter of interest for robotics, android provides communication interfaces for Bluetooth, Wi-Fi, USB and GPS. As software developers we are interested in developing applications through test based development. This project proposed developing an autonomous GPS robot using Android. This autonomous robot can be used for many applications such as delivery robot, surveillance bot, etc. A delivery system to safely deliver packages within 30 minutes using drones is under development by Amazon which will soon be provided to customers by April, 2017. This not only concerns with cost effectiveness in delivering products but also leads to faster delivery of product to customers. Surveillance also known as closed observation can be implemented in remote areas where there is a need for security. It deals with close observation on particular entity without putting anyone on the risk. This project is conceptualized on similar ideas.
1.2 Problem Definition
Existing systems use separate GPS, IR, and Bluetooth modules connected to Arduino board. However there are certain problems with such systems. The range of Bluetooth module, low accuracy of separate GPS module, multiple IR sensors, lower processing capacity of Arduino; and most importantly separate cost of all of them together is very high. Another method that works on similar lines is using ESP8266 Wifi module instead of Bluetooth. This may increase the control range, but the robot isn’t autonomous. Also, the addition of this module leads to high power consumption, while on other hand android device can itself act as a power source for the
Arduino.
Our system proposes controlling a robot with android mobile devices using GPS and Wi-Fi. The GPS coordinates fed to the robot and robot/vehicle tracks its path. Wifi will be used for close control. The system involves 2 Android devices and they communicate with each other using Wifi Direct Communication. The robot will have obstacle detection as well as track its own path in accordance with the GPS coordinates fed into it. The commands will be given to the robot using Arduino board. There will smart phone-Arduino communication using USB OTG cable.
1
1.3 Scope
The project presents a mechanism of controlling a robot with android mobile devices using GPS and Wi-Fi. Using Global Positioning System (GPS), the coordinates can be fed to the robot, i.e. starting and final positions can be given as an instruction to the robot device. Wi-Fi will be used for sending commands to the robot, in case of close control. Using GPS, the robot can also measure the travelled distance. Overall system consists of 2 Android operating system based mobile phones and a robot. We can create an application that can run under Android operating system and control a mobile robot with Android device fixed on it. The two android devices communicate with each other using Wi-Fi direct. Wi-Fi Direct allows you to connect two devices over wireless without an access point. It is similar to Bluetooth with a much extended range and performance. The mobile robot should be able to move in internal as well as external environment without collision with obstacles. Other types of movements are identified using an agglomerative clustering technique. Android Smart phone fixed on the drone communicates with the Arduino by using USB OTG cable.
1.4 Organization of the Report
The following chapters have been included in the report:
- Introduction: The chapter justifies and highlights the problem posed, defines the topic and explains the aim along with the scope of the work presented.
- Literature Review: A critical appraisal of previous works published in the topic of interest has been presented. Various features required in the project studied from various range of papers previously published.
- Project Management Plan: The section portrays how the project development process was planned and managed.
2
- Feasibility analysis: The analysis of feasible of the project in terms of cost, technicality, software and hardware aspects.
- Life cycle model: The Iterative Lifecycle model decided to be most suitable.
- Project cost and time estimation: The cost of the hardware required and other utilities decided and an estimation of time allocation done for implementing features.
- Resource plan: A general review of resources required and a plan for their usage presented in the topic.
- Task and Responsibility Assignment: A the topic consists of a table that depicts how tasks and responsibilities were assigned to each member of the group.
- Project Analysis and Design: This section gives an overview of the designing phase of the application.
- Software Architecture diagram: The diagram of software architecture discussed here.
- Architectural style and justification: The topic presents a justification of the architectural style used and modules included in the architecture diagram.
- Software Requirements Specification Document: The document containing functional and non-functional requirements, resource requirements, hardware and software requirements, etc. has been attached here. Various use case diagrams like Class diagram, use case diagram, State diagram, DFDs have been explained here.
- Software design document: Contains the User Interface design and component diagram explaining the software design of the project.
- Project Implementation: This section gives an idea of how the application was developed and executed.
3
- Approach / Main Algorithm: A description of the ‘Pothole detection algorithm’ and ‘Obstacle detection algorithm’ given in this topic.
- Programming Languages used for Implementation: A list of programming languages used for various purposes has been presented in this topic.
- Tools used: A list of various tools and hardware components used during the implementation of the project presented here.
- Deployment diagram: The deployment diagram used by the project team has been portrayed here.
6. Integration and Testing: Once the application has been developed, it needs to betested for errors and bugs. This section describes the testing approached followed during the testing process.
6.1 Testing Approach: The methodology used for testing each module is discussed in this section.
6.2 Test Plan: This gives an idea about the testing procedure carried out and tasks involved in this project.
6.3 Unit Test Cases: The outputs of various modules on testing individuallyhave been discussed.
6.4 Integrated System Test Cases: The output of the entire system as a wholewith all modules functioning have been discussed.
7. Conclusion and Future work: Provide the possible future features and works thatcan been implemented on the existing system.
- References: This section provides references to all the websites, books, and journals, papers referred during the analysis, planning and implementation phases of the project.
4
Chapter 2: Literature Review
GPS location based path generation:
The paper discusses the use of Haversine- Bearing formula to guide robot once we get the set of latitude and longitude to be covered in the path. Haversine Formula calculates geographic distance on earth. Using two latitude-longitude values, we can easily calculate the spherical distance between the points by Haversine formula. Haversine formula is used to break path into straight lines.
Bearing can be defined as direction or an angle, between the north-south line of earth or meridian and the line connecting the target and the reference point. While Heading is an angle or direction where you are currently navigating in. Bearing value is the angle from the heading value we need to take to align the robot in the right direction align the path from point A to B. It is measured from the North direction.
Obstacle Detection and Avoidance:
The paper discusses the use of Canny Edge detection algorithm for detecting the obstacles/objects. Canny Edge algorithm, developed by J.F. Canny, is one of most popular edge detection algorithm. It involves real time image processing with stages like Noise reduction, calculation of the intensity gradient of the image, non-maximum suppression and Hysteresis.
The result of all these stages is subjected to side fill, smooth Hull and erode operations to get a target point to which the robot should move avoiding all the objects/obstacles in between. The use of ultrasonic sensors is also advised since computer vision algorithms using smartphones camera will not be able to detect transparent obstacles.
24-hour GPS tracking in Android Operating System:
The paper discusses the need of real time GPS tracking of the Android device because of many reasons such as security and controlling the activities of the user in a certain area. Real time tracking is possible by the usage of overlay class and set of geo-points. The use of GPS tracking will be helpful in this project in case of robot breakdown; where in the user/controller will be notified about the current location of the robot via SMS.
5
5
Application mentioned in the paper will always be in running state at the background once it is started. It is built on top of SMS, so that once application is installed on mobile, all SMS related activities are by default performed by application. The user will be notified by the devices current location along with an associated timestamp.
6
Chapter 3: Project Management Plan
3.1 Feasibility Analysis
The proposed system consists of two smartphones, one L293D motor driver connected to Arduino and a chassis which acts as base frame. The frequency of motors required for motion is 60 RPM which requires approximately 18V of battery power which after amplification by L293D is used by motors to perform the motion. Arduino and chassis are readily available in market at affordable rates which makes system economically and technically feasible.
In today’s world everyone is assumed to have smartphone. Hence from user’s point of view the cost of project is almost zero (considering they have smartphone). From developers, point of view the cost of project is approximately 1000 rupees (not considering the cost of smartphone placed on robotic car). These factors make project economically feasible.
The existing systems use separate GPS, IR, and Bluetooth modules connected to Arduino board. However there are certain problems with such systems. The range of Bluetooth module, low accuracy of separate GPS module, multiple IR sensors, lower processing capacity of Arduino; and most importantly separate cost of all of them together is very high. Another method that works on similar lines is using ESP8266 Wifi module instead of Bluetooth. This may increase the control range, but the robot isn’t autonomous. Also, the addition of this module leads to high power consumption, while on other hand android device can itself act as a power source for the Arduino.
The entire project is implemented in Arduino Uno and Android. Both are open source and thus a lot of updates and improvements can be provided thereby making it optimal and much more feasible in terms of software.
Our system can be easily made using an android phone and is economically feasible, so users can install the application required for controlling the robot. This system can be used for educational purposes, and it can also be scaled into a delivery robot, like that of Amazon; or even a rescue bot in case of natural disasters.
7
3.2 Lifecycle Model
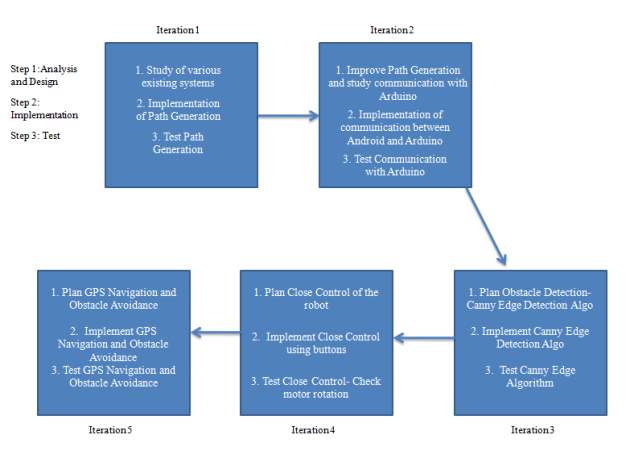
First Iteration:
Analysis & Design: Various methods used in the existing systems are studied and the best option or method is chosen.
Implementation: Path Generation using markers is implemented in Android using Android Studio and Google APIs.
Testing: Path Generation is tested.
Second Iteration:
Analysis & Design: Study for improvement of Path Generation and communication between smartphone and Arduino is planned.
Implementation: Implementation of communication between smartphone and Arduino is implemented.
Testing: Communication between Arduino and Android device is tested.
8
Third Iteration:
Analysis & Design: Study of Obstacle detection using Canny Edge algorithm involving Computer vision. Addition of sensors as modification also studied.
Implementation: Implementation of Obstacle Detection.
Testing: Obstacle detection implementation is tested.
Fourth Iteration:
Analysis & Design: Close control of the robot using Android smartphone is planned.
Implementation: Implementation of close control using Android Studio and Arduino SDK with the usage of buttons.
Testing: Testing whether close control implementation was successful or not.
Fifth Iteration:
Analysis & Design: Plan GPS Navigation and Obstacle Avoidance.
Implementation: Implementation of GPS Navigation and Obstacle Avoidance is done using OpenCV libraries and Arduino SDK.
Testing: Testing GPS Navigation and Obstacle Avoidance.
3.3 Project Cost and Time Estimation
| Particulars | Cost per piece | Cost(in Rupees) |
| Chassis for Bot | 75 | 1*75= 75 |
| Arduino Kit | 400 | 1*400= 400 |
| Wheels | 20 | 4*20= 80 |
| DC Motors | 65 | 2*65= 130 |
| Total Cost | 865 |
9
The following table shows the time required to complete the project:
| Phase | Description | Time |
| Phase 1 | Various methods used in the existing systems are studied and the best option or method is chosen. Components required and designing of project. Path generation using markers in Android Studio and Google APIs is implemented | July(1 Month) |
| Phase 2 | Implementation of communication between smartphone and Arduino is implemented. | August to September mid(1 .5 Months) |
| Phase 3 | Study of Obstacle detection using Canny Edge algorithm involving Computer vision. Addition of sensors as modification also studied. | September mid to October (1.5 Months) |
| Phase 4 | Implementation of close control using Android Studio and Arduino SDK with the usage of buttons. | December(1 month) |
| Phase 5 | Implementation of GPS Navigation and Obstacle Avoidance is done using OpenCV libraries and Arduino SDK. | January to February(2 months) |
| Phase 6 | Testing and final design of user interface | March (1 month) |
- Resource Plan
The following resources are required and used:
| Resources | Detail | Used |
| Financial Resources | Budget of 1500 | used in July 2016 to buy |
| components | ||
| Inventory Resources | Components of project | Used as per requirement |
|
10 |
||
|
|
Developers | From start to end |
| Sales and Production | Mass production and | NA |
| Resources | selling of project | |
- Assignment and Responsibility Matrix
| A-Accountable,
R-Responsible |
Aditya Sharma | Nishchay Shah | Harsh Shah |
| Phone Mirroring | Responsible | Accountable | |
| Haversine-Bearing Formula | Accountable | Responsible | Research |
| Obstacle detection using Canny Edge detection algorithm | Responsible | Responsible | Accountable |
| Arduino Car Connections | Research | Accountable | Responsible |
| Communication between Arduino and Android | Research | Responsible | Accountable |
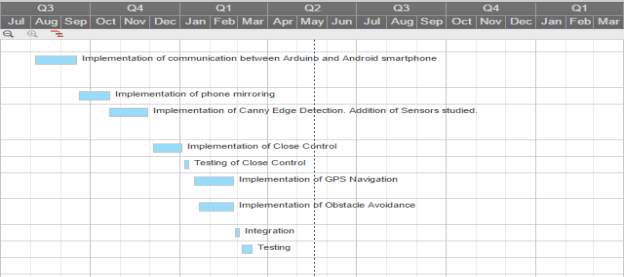
- Project Timeline Chart
11
| Task Name | Start date | End Date | Status |
| Analysis of existing systems | 03/07/16 | 11/07/16 | Completed |
| Determination of resources | 12/07/16 | 19/07/16 | Completed |
| Design of the project | 20/07/16 | 24/07/16 | Completed |
| Implementation of Path Generation | 25/07/16 | 31/07/16 | Completed |
| Implementation of communication between Arduino and Android smartphone | 05/08/16 | 18/09/16 | Completed |
| Implementation of phone mirroring | 19/09/16 | 20/10/16 | Completed |
| Implementation of Canny Edge Detection. Addition of Sensors studied. | 20/10/16 | 28/11/16 | Completed |
| Implementation of Close Control | 04/12/16 | 02/01/17 | Completed |
| Testing of Close Control | 05/01/17 | 09/01/17 | Completed |
| Implementation of GPS Navigation | 15/01/17 | 24/02/17 | Partially Completed |
| Implementation of Obstacle Avoidance | 20/01/17 | 25/02/17 | Partially Completed |
| Integration | 26/02/17 | 02/03/17 | Partially Completed |
| Testing | 05/03/17 | 15/03/17 | Completed |
12
Chapter 4: Project Analysis and Design
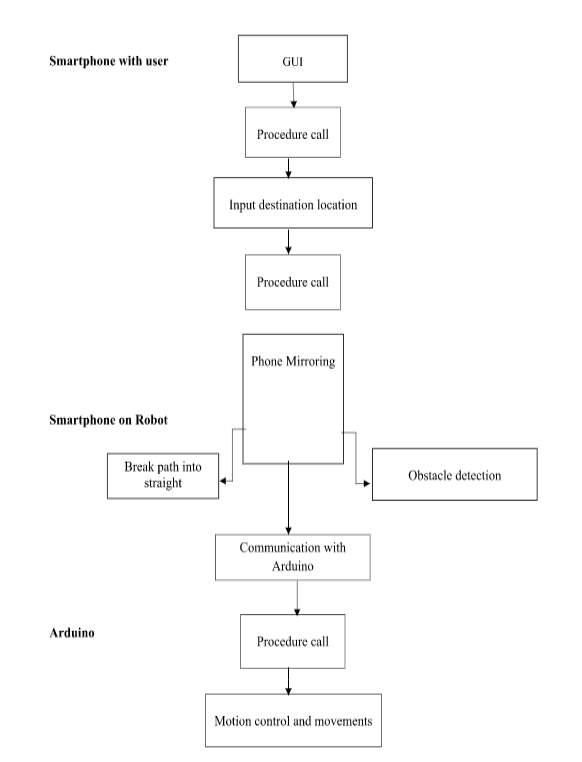
4.1 Software Architecture Diagram

13
4.2 Architectural style and justification
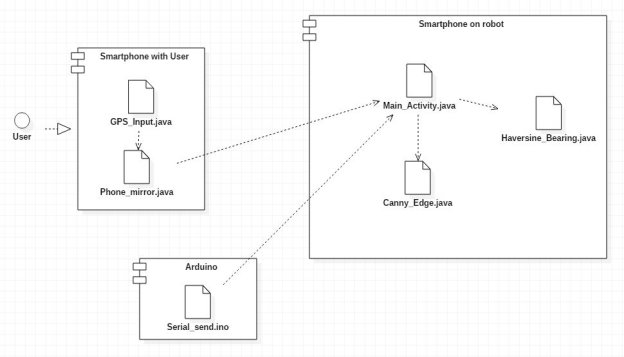
The architecture used is layered style. Three layers are used, Android with user, Android smartphone on robotic car and the Arduino. There are various functions in Android. Based on functions selection, appropriate procedure call is made.
First layer i.e. Android based smartphone in user’s hand which is used to feed destination location and send the coordinates to smartphone residing on robotic car.
Second layer is Android based smartphone installed on robot. This layer is most important layer as it communicates with Arduino board for perform motion. Also, it performs the operation of applying Haversine- Bearing formula which is breaking path into multiple straight line paths and then following the direction of destination. Obstacle detection using Canny Edge algorithm is also performed by this layer.
The third layer consists of Arduino which collects the signals from smartphone on robot to perform movements. These signals are sent to L293D motor driver which amplifies the current accordingly and rotate the motors.
4.3 Software Requirements Specification Document
Introduction:
4.3.1 Product Overview:
The proposed product/system is a robot having smartphone placed on a robotic car which communicates with the Arduino board which in turn assists L293D to control the rotation of motors and thus navigate. The destination coordinates are sent by user from smartphone in his hand to smartphone on robot using phone mirroring.
The user smartphone will be installed with a phone mirroring application using which the user is able to mirror the android device screen installed on the robot and will be able to feed in the destination coordinates, view the camera feed.
These destination coordinates will be processed by the smartphone, a path will be generated. In order to navigate to the destination, commands will be given by the smartphone to Arduino which then will instruct the motor driver accordingly. The robot would also perform obstacle avoidance if there are any objects/obstacles in its path.
14
External Interface Requirements:
4.3.2 User Interface Requirements:
Since the proposed project involves two android smartphones, therefore there are two user interfaces- one for user application and the other for smartphone installed on the robot. The user application is a phone mirroring application and just needs to connect to the smartphone which is installed on the robot.
The smartphone on the robot has “OnRobot” application, which will be mirrored to the user, using which the user can submit the GPS coordinates. The user can also closely control the robot by the arrow control buttons provided in the UI. The UI also has an option of path generation using Google maps which provided a sophisticated visual representation.
4.3.3 Hardware Interface requirements
The hardware requirements for the project include the following:
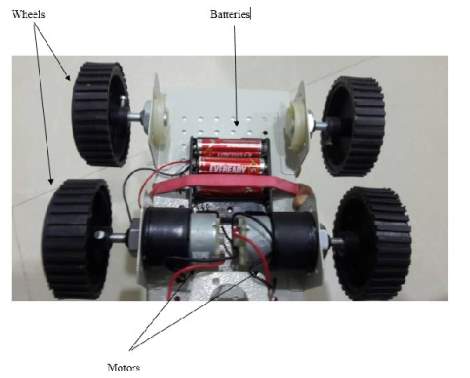
- Chassis and Wheels: Acts as a base for the robot. Four wheels are attached to this chassis. Two wheels are attached to DC motors.
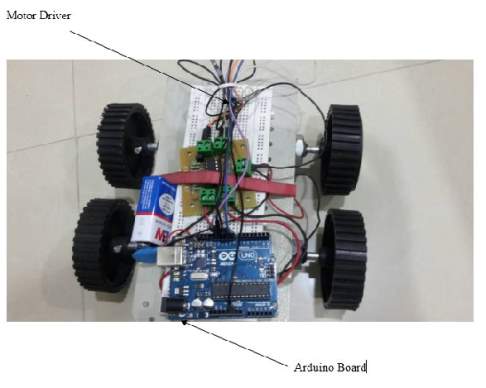
- Arduino Uno: Arduino UNO microcontroller board acts as brain of the robot. Arduino communicates and acts as a bridge between Android device and the motor driver.
- L293D Motor Driver: The L293D motor driver is responsible for controlling the DC motor movement and is controlled by the Arduino signals. The commands for movements are fed into Arduino board via smartphone which then in coordination with motor driver performs the movement.
- Li-ion Batteries: These are required as a power supply for the L293D and DC motors. Total amount of the power required is 15V. However, for Arduino, the Android device acts as source of power.
15
Software Interface Requirements:
4.3.4 Software Product Features
The software is divided into various parts which are as follows:
- Phone mirroring
The user/controller can utilize this application for surveillance purpose, for example, in case of search-bots used during calamities like earthquakes. Hence in our project, a client-server based mirroring is implemented. The user is able to mirror the android device screen installed on the robot and will be able to feed in the destination coordinates, view the camera feed.
- Haversine- Bearing formula
Haversine- Bearing formula is used to guide robot once we get the set of latitude and longitude to be covered in the path.
Haversine Formula- Haversine Formula calculates geographic distance on earth. Using two latitude-longitude values, we can easily calculate the spherical distance between the points by Haversine formula. Haversine formula is used to break path into straight lines.
Bearing Formula- Bearing can be defined as direction or an angle, between the north-south line of earth or meridian and the line connecting the target and the reference point. While Heading is an angle or direction where you are currently navigating in. Bearing value is the angle from the heading value we need to take to align the robot in the right direction align the path from point A to B. It is measured from the North direction.
- Canny Edge Detection
Canny Edge algorithm, developed by J.F. Canny, is one of most popular edge detection algorithm. It involves real time image processing with stages like Noise reduction, calculation of the intensity gradient of the image, non-maximum suppression and Hysteresis. The result of all these stages is subjected to side fill, smooth Hull and erode operations to get a target point to which the robot should move avoiding all the objects/obstacles in between. The use of ultrasonic sensors is also advised since computer vision algorithms using smartphones camera will not be able to detect transparent obstacles. Canny edge detection is implemented in Android using OpenCV (Open-source Computer Vision) library. OpenCV puts all the above in single function
16
Software System Attributes
4.3.5 Reliability
System is reliable as communication between smartphones is through phone mirroring which implies only those device can be connected to robot which have the IP address of the smartphone on robot.
4.3.6 Availability
The software is available as required and provides correct information to person. There is no database required.
4.3.7 Portability
The proposed system is portable as it a small robotic car built on chassis of approximately 25 centimeter in length. Any updates to be required in hardware or software can be done with ease.
4.3.8 Performance
The overall performance has passed most test cases. Only one user can operate at a time. There is no pressure of peak workload condition unless minimum requirements RAM and memory are not met.
17
4.3.9 UML Diagrams:
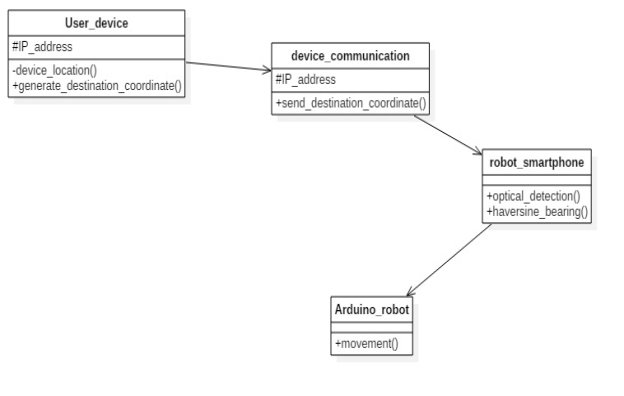
- Class Diagram
- Use Case Diagram
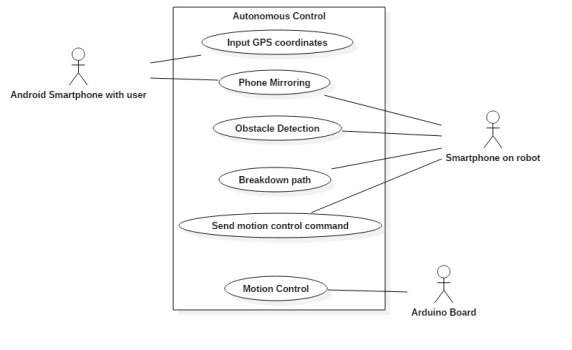
18
18
- Data Flow Diagram
- Data Flow Diagram for Motor Control:
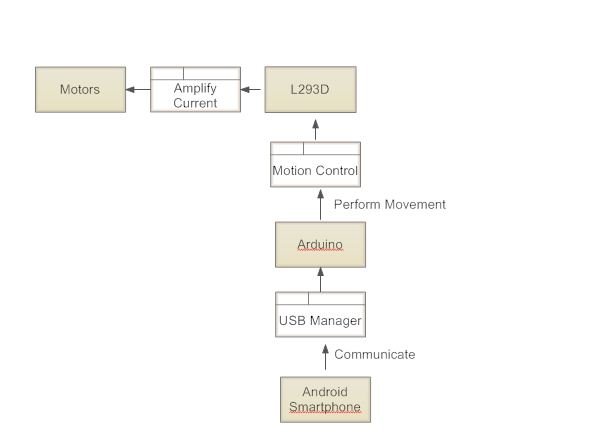
II. Data Flow Diagram for Obstacle Detection and Path Generation:
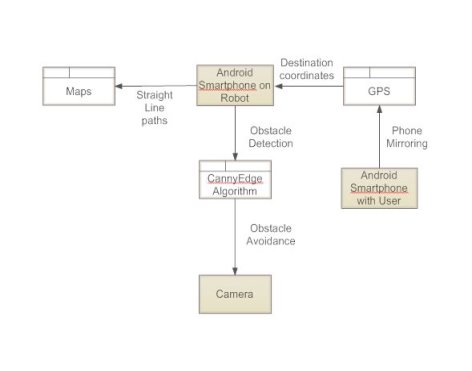
19
4.4 Software Design Document
4.4.1 UI Design
There are two android based applications used in this project, one is the phone mirroring application which is Wifi based and other is the OnRobot application for communication with the Arduino board.
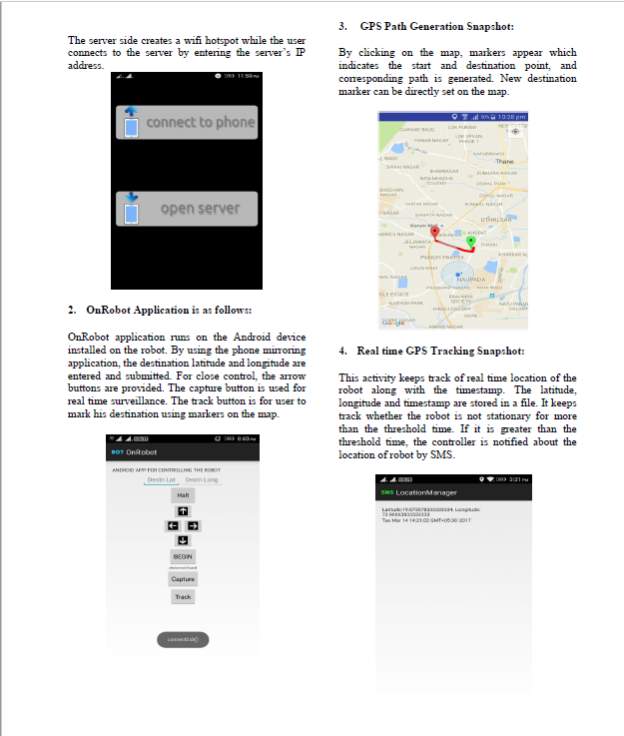
- Phone Mirror Application: The server side creates a wifi hotspot while the user connects to the server by entering the server’s IP address.
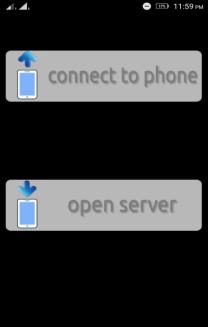
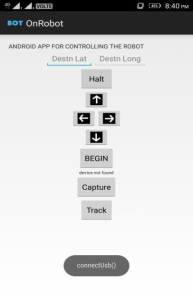
- OnRobot Application: OnRobot application runs on the Android device installed on the robot. By using the phone mirroring application, the destination latitude and longitude are entered and submitted. For close control, the arrow buttons are provided. The capture button is used for real time surveillance. The track button is for user to mark his destination using markers on the map.
20
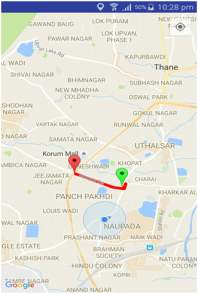
- GPS Path Generation Activity: By clicking on the map, markers appear which indicates the start and destination point, and corresponding path is generated. New destination marker can be directly set on the map.
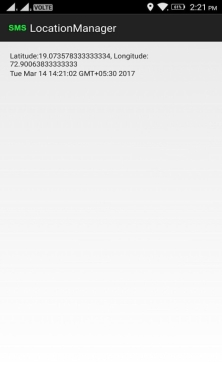
- Real time GPS Tracking Activity: This activity keeps track of real time location of the robot along with the timestamp. The latitude, longitude and timestamp are stored in a file. It keeps track whether the robot is not stationary for more than the threshold time. If it is greater than the threshold time, the controller is notified about the location of robot by SMS.
21
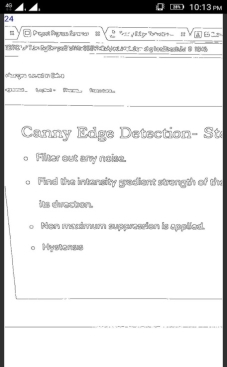
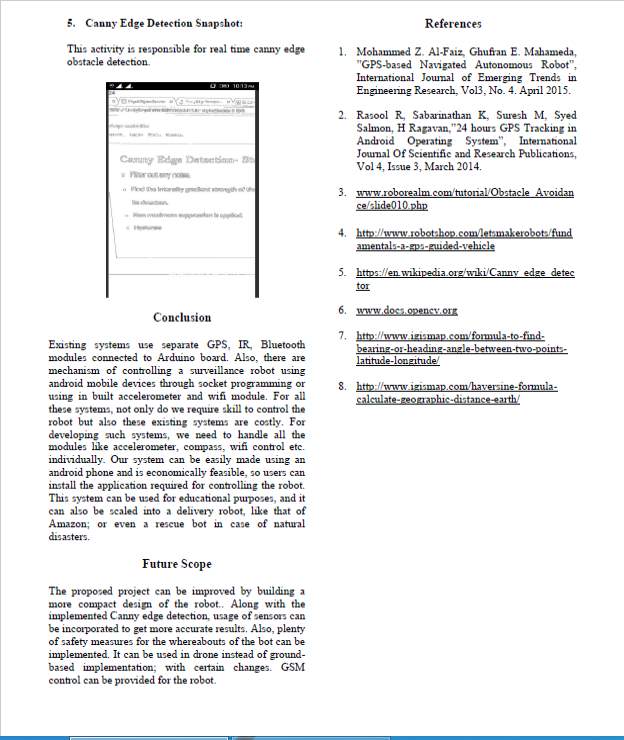
- Canny Edge Detection: This activity is responsible for real time canny edge obstacle detection.
22
4.4.2 Component Diagram
23
Chapter 5: Project Implementation
5.1 System Architecture
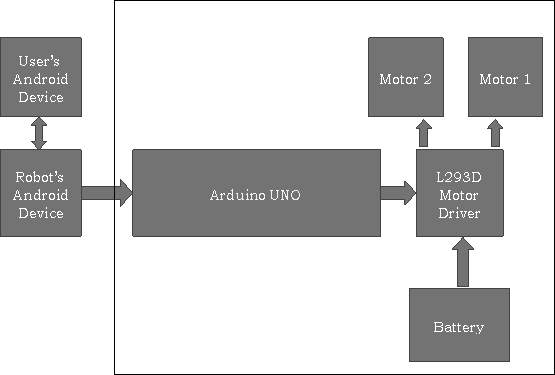
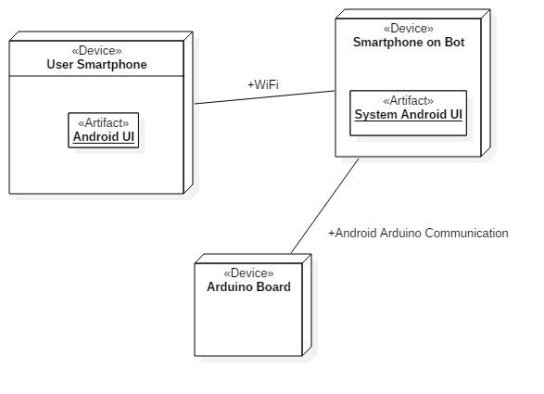
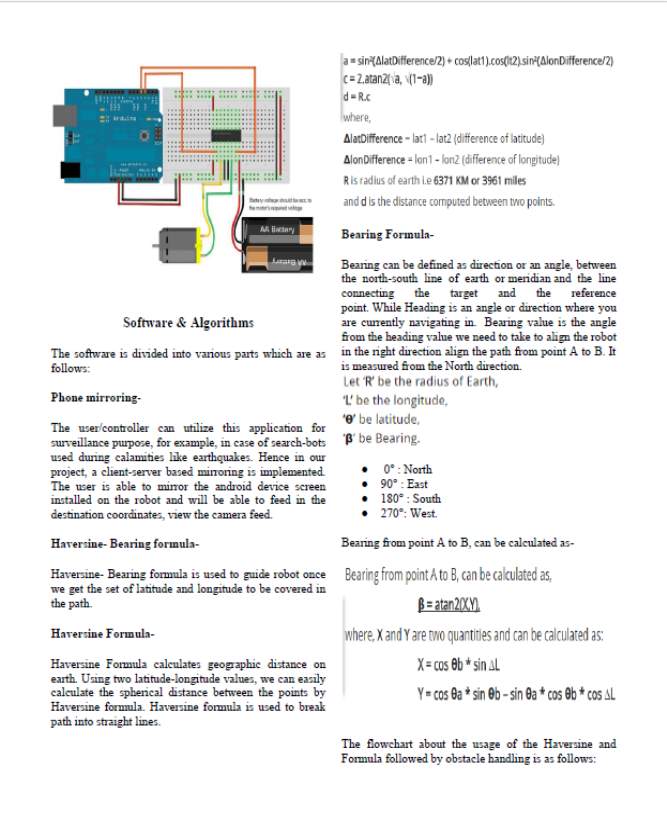
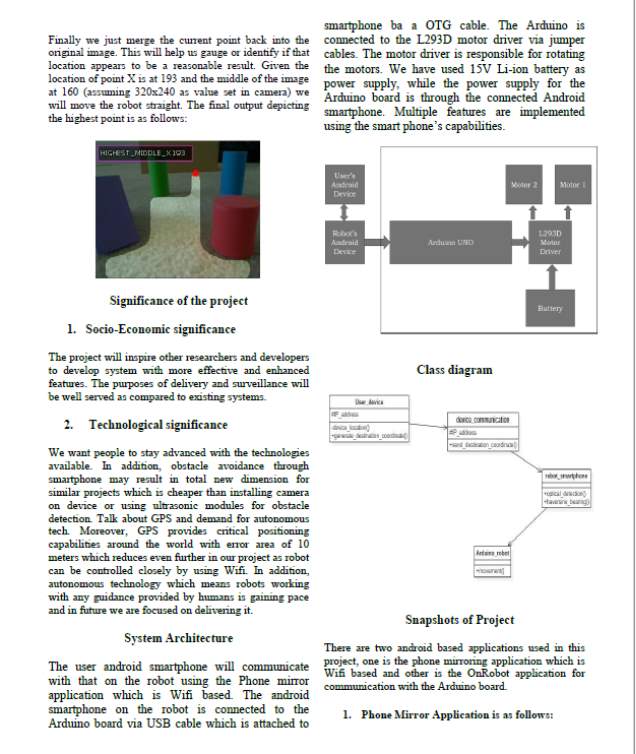
The user android smartphone will communicate with that on the robot using the Phone mirror application which is Wifi based. The android smartphone on the robot is connected to the Arduino board via USB cable which is attached to smartphone via OTG cable. The Arduino is connected to the L293D motor driver via jumper cables. The motor driver is responsible for rotating the motors. We have used 15V Li-ion battery as power supply, while the power supply for the Arduino board is through the connected Android smartphone. Multiple features are implemented using the Smartphone’s capabilities.
Robot
Phone Mirror App
Algorithms Used:
Haversine- Bearing formula:
Haversine- Bearing formula is used to guide robot once we get the set of latitude and longitude to be covered in the path.
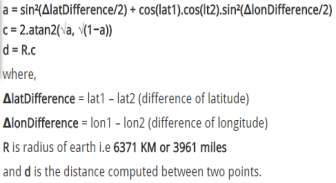
Haversine Formula-
Haversine Formula calculates geographic distance on earth. Using two latitude-longitude values, we can easily calculate the spherical distance between the points by Haversine formula. Haversine formula is used to break path into straight lines.
24
Bearing Formula-
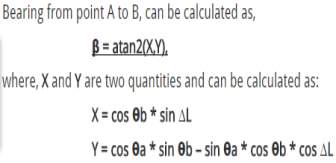
Bearing can be defined as direction or an angle, between the north-south line of earth or meridian and the line connecting the target and the reference point. While Heading is an angle or direction where you are currently navigating in. Bearing value is the angle from the heading value we need to take to align the robot in the right direction align the path from point A to B. It is measured from the North direction.

- 0°: North
- 90° : East
- 180° : South
- 270°: West.
Bearing from point A to B, can be calculated as-
25
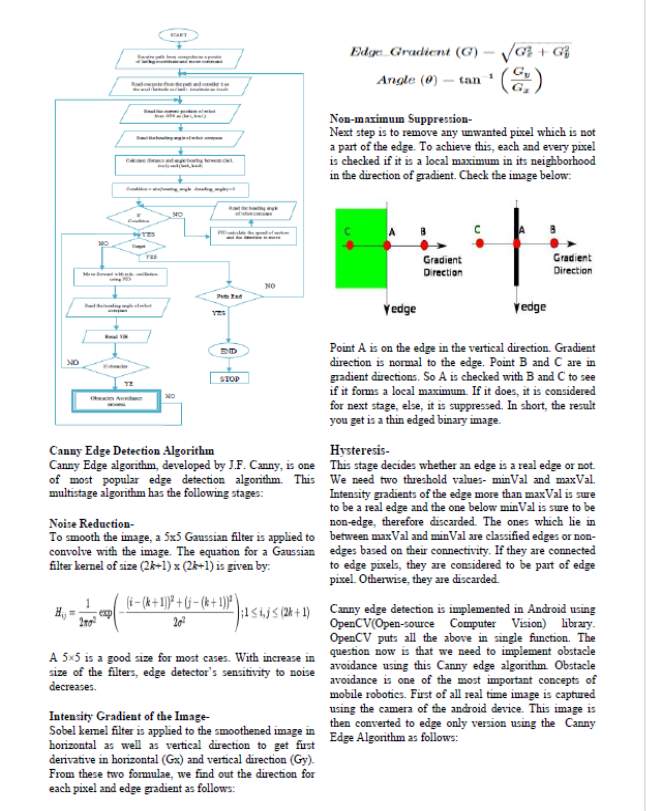
Canny Edge Detection Algorithm:
Canny Edge algorithm, developed by J.F. Canny, is one of most popular edge detection algorithm. This multistage algorithm has the following stages:
Noise Reduction-
To smooth the image, a 5×5 Gaussian filter is applied to convolve with the image. The equation for a Gaussian filter kernel of size (2k+1) x (2k+1) is given by:

A 5×5 is a good size for most cases. With increase in size of the filters, edge detector’s sensitivity to noise decreases.
Intensity Gradient of the Image-
Sobel kernel filter is applied to the smoothened image in horizontal as well as vertical direction to get first derivative in horizontal (Gx) and vertical direction (Gy). From these two formulae, we find out the direction for each pixel and edge gradient as follows:

Non-maximum Suppression-
Next step is to remove any unwanted pixel which is not a part of the edge. To achieve this, each and every pixel is checked if it is a local maximum in its neighborhood in the direction of gradient. Check the image below:
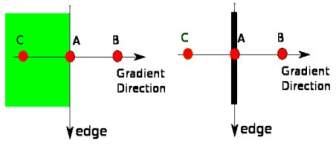
Point A is on the edge in the vertical direction. Gradient direction is normal to the edge. Point B and C are in gradient directions. So A is checked with B and C to see if it forms a local maximum. If it does, it is considered for next stage, else, it is suppressed. In short, the result you get is a thin edged binary image.
26
Hysteresis-
This stage decides whether an edge is a real edge or not. We need two threshold values- minVal and maxVal. Intensity gradients of the edge more than maxVal is sure to be a real edge and the one below minVal is sure to be non-edge, therefore discarded. The ones which lie in between maxVal and minVal are classified edges or non-edges based on their connectivity. If they are connected to edge pixels, they are considered to be part of edge pixel. Otherwise, they are discarded.
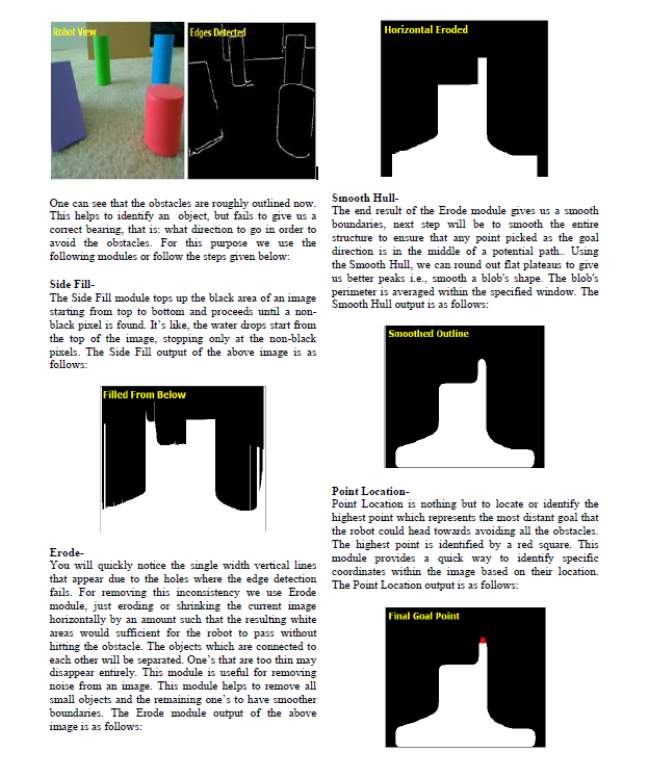
Canny edge detection is implemented in Android using OpenCV(Open-source Computer Vision) library. OpenCV puts all the above in single function. The question now is that we need to implement obstacle avoidance using this Canny edge algorithm. Obstacle avoidance is one of the most important concepts of mobile robotics. First of all real time image is captured using the camera of the android device. This image is then converted to edge only version using the Canny Edge Algorithm as follows:
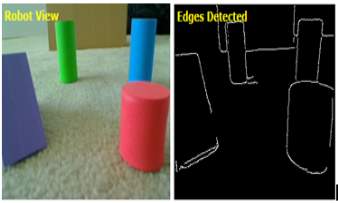
One can see that the obstacles are roughly outlined now. This helps to identify an object, but fails to give us a correct bearing, that is: what direction to go in order to avoid the obstacles. For this purpose we use the following modules or follow the steps given below:
Side Fill
The Side Fill module tops up the black area of an image starting from top to bottom and proceeds until a non-black pixel is found. It’s like, the water drops start from the top of the image, stopping only at the non-black pixels. The Side Fill output of the above image is as follows:
27
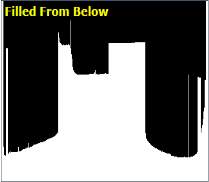
Erode
You will quickly notice the single width vertical lines that appear due to the holes where the edge detection fails. For removing this inconsistency we use Erode module, just eroding or shrinking the current image horizontally by an amount such that the resulting white areas would sufficient for the robot to pass without hitting the obstacle. The objects which are connected to each other will be separated. One’s that are too thin may disappear entirely. This module is useful for removing noise from an image. This module helps to remove all small objects and the remaining one’s to have smoother boundaries. The Erode module output of the above image is as follows:
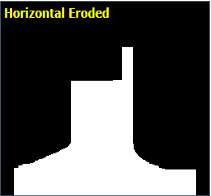
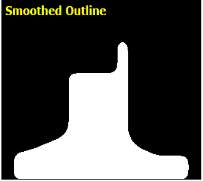
Smooth Hull
The end result of the Erode module gives us a smooth boundaries, next step will be to smooth the entire structure to ensure that any point picked as the goal direction is in the middle of a potential path.. Using the Smooth Hull, we can round out flat plateaus to give us better peaks i.e., smooth a blob’s shape. The blob’s perimeter is averaged within the specified window. The Smooth Hull output is as follows:
28
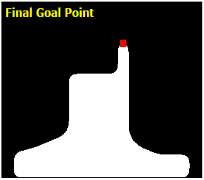
Point Location
Point Location is nothing but to locate or identify the highest point which represents the most distant goal that the robot could head towards avoiding all the obstacles. The highest point is identified by a red square. This module provides a quick way to identify specific coordinates within the image based on their location. The Point Location output is as follows:
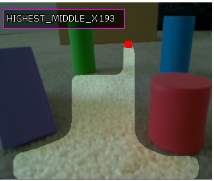
Finally we just merge the current point back into the original image. This will help us gauge or identify if that location appears to be a reasonable result. Given the location of point X is at 193 and the middle of the image at 160 (assuming 320×240 as value set in camera) we will move the robot straight. The final output depicting the highest point is as follows:
29
- Programming Language used for Implementation
- Instructions for L293D motor driver by the Arduino Uno is implemented in C language using Arduino SDK.
- Android application implemented in Java using the Android SDK.
- Tools used for Implementation
- Arduino IDE used for programming Arduino.
- Android application developed using Android Studio.
- Google maps API used for implementing the path generation feature in Android .
- Arduino interfaced with android using USB.
- Object oriented methodology used for coding every module. (Java)
- Visual paradigm software used for UML diagrams.
- Deployment Diagram
30
Chapter 6: Integration and Testing
6.1 Testing Approach
Reactive testing technique used as the modules were tested after they were coded and compiled successfully. As in Reactive testing technique, the testing is not started until after the designing and coding of modules is completed. Various modules implemented are as follows:
- Phone Mirroring
- Communication between Arduino and Android using USB and OTG cable.
- Obstacle Detection
- GPS Path Generation
- Real time Location tracking
- GPS Navigation
- Obstacle Avoidance
Each module was tested in a reactive testing approach wherein the module was first designed, coded and then tested for various test cases. Every module was tested independently after its completion after which bugs were corrected and updates were made until the test results were as desired. After successful completion of testing, next module was designed and coded.
6.2 Testing Plan
Introduction:
Every important module of the project was individually coded and tested following the reactive approach. Test conditions and input values for desired outputs were detailed and the actual outputs were compared with the estimated outputs. Every module was tested and updated till the actual outputs were almost close to desired values.
Test Items and features:
- USB connection between Arduino and Android smartphone.
- GPS path generation and navigation.
- Phone Mirroring between two Android based phones.
- Canny edge detection and avoidance.
- Real Time Location tracking.
31
- Rotation of motors in different situations.
Approach:
- USB Connection between Arduino and Android smartphone:
- The android smartphone on the robot is connected to the Arduino board via USB cable which is attached to smartphone via OTG cable.
- Pressing the buttons for close control on the application will send designated commands to the Arduino.
- Real Time Location tracking:
- Ensuring that GPS is kept “ON”, then moving the smartphone from one location to other.
- Tracking whether the location is changing and corresponding timestamp is displayed.
- GPS Path Generation:
- By clicking on the map, markers appear which indicates the start and destination point, and corresponding path is generated.
- New destination marker can be directly set on the map.
- Rotation of Motors:
- The L293D motor driver is responsible for controlling the DC motor movement and is controlled by the Arduino signals.
- The commands for movements are fed into Arduino board via smartphone which then in coordination with motor driver performs the movement.
- Obstacle Avoidance:
- Different objects are kept in the path of the robot.
- Robot needs to avoid these obstacles and reach the destination.
- GPS Navigation
- The robot needs to navigate to the destination autonomously and simultaneously avoid obstacles in between.
- The robot should dynamically generate the path towards the destination.
32
- Phone Mirroring
- The user is able to mirror the android device screen installed on the robot and will be able to feed in the destination coordinates, view the camera feed.
- The server starts the hotspot and user/client connects to this hotspot, and the client/user will be able to see the server smart phone’s screen on his mobile.
Risks:
Various risks identified during testing period:
- Proper connections and handling of equipment necessary for accurate results.
- Net connectivity required for navigation purposes.
- Cautious power supply mechanism.
6.3 Unit and Integrated System Test Cases
| Test Case | Expected Result | Observed result | Result |
| Communication between Arduino and Android smartphone | Proper Feedback from Arduino in terms of blinking of LEDs | Blinking of LEDs observed and proper feedback given. | Accurate |
| Detection of opaque obstacles | Detected | Detected | Accurate |
| Detection of transparent obstacles | Detected | Detected | Accurate |
| GPS path Generation by clicking on specified location on the map | Path generated indicating markers at both ends | Path generated indicating markers at both ends | Accurate |
| Phone Mirroring between smartphones | Screen should be mirrored on client smartphone | Screen should be mirrored on client smartphone | Accurate |
| Autonomous GPS Navigation | Path should be autonomously be decided
33 |
Error is shown | Inaccurate |
| Obstacle Avoidance using Computer vision | Appropriate rotation of motors when obstacle is encountered. | Obstacles not avoided | Inaccurate |
| Obstacle Avoidance using sensor | Appropriate rotation of motors when obstacle is encountered. | Proper rotation of motor is observed | Accurate |
34
Chapter 7: Conclusion and Future Work
Existing systems use separate GPS, IR, and Bluetooth modules connected to Arduino board. Also, there are mechanism of controlling a surveillance robot using android mobile devices through socket programming or using in built accelerometer and wifi module. For all these systems, not only do we require skill to control the robot but also these existing systems are costly. For developing such systems, we need to handle all the modules like accelerometer, compass, wifi control etc. individually.
Our system can be easily made using an android phone and is economically feasible, so users can install the application required for controlling the robot. This system can be used for educational purposes, and it can also be scaled into a delivery robot, like that of Amazon; or even a rescue bot in case of natural disasters.
The proposed project can be improved by building a more compact design of the robot.. Along with the implemented Canny edge detection, usage of sensors can be incorporated to get more accurate results. Also, plenty of safety measures for the whereabouts of the bot can be implemented. It can be used in drone instead of ground-based implementation; with certain changes. GSM control can be provided for the robot.
35
Chapter 8: References
- Mohammed Z. Al-Faiz, Ghufran E. Mahameda, ”GPS-based Navigated Autonomous Robot”, International Journal of Emerging Trends in Engineering Research, Vol3, No. 4. April 2015.
- Rasool R, Sabarinathan K, Suresh M, Syed Salmon, H Ragavan,”24 hours GPS Tracking in Android Operating System”, International Journal Of Scientific and Research Publications, Vol 4, Issue 3, March 2014.
- W. Rong, Z. Li, W. Zhang and L. Sun, “An improved Canny edge detection algorithm,” 2014 IEEE International Conference on Mechatronics and Automation, Tianjin, 2014, pp.577-582. doi: 10.1109/ICMA.2014.6885761
- Obstacle Avoidance Approach: www.roborealm.com/tutorial/Obstacle_Avoidance/slide010.php
- Open CV Libraries: www.docs.opencv.org
- Haversine and Bearing Formula: http://www.igismap.com/formula-to-find-bearing-or-heading-angle-between-two-points-latitude-longitude
- Ed Burnette’s, Hello, Android: Introducing Google’s Mobile Development Platform (Pragmatic Programmers) Third Edition.
36
Appendix
I. Minimum System Requirement:
- Hardware Requirements:
- Two Android based smartphones with Android KitKat or above.
- Arduino Uno microcontroller.
- L293D Motor Controller.
- Two DC Motors.
- Intel Dual Core Processor or advanced version.
- Minimum 2GB RAM
- 3GB memory space for installing Android Studio.
- Software Requirements:
- Android Studio/Eclipse.
- Arduino IDE.
- Java Virtual Machine- JRE and JDK 7 or above.
- User’s Manual:
37
- Papers Published
46
47
48
49
50
51
52
- Plagiarism report
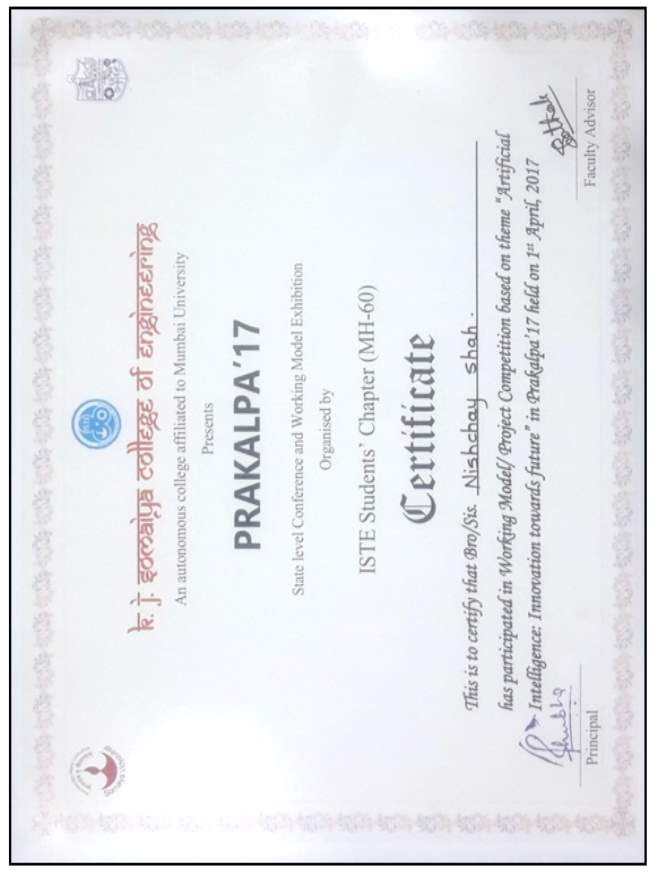
- Project Presentation Certificates
53
45

54

55
56
Cite This Work
To export a reference to this article please select a referencing stye below:
Related Services
View allRelated Content
All TagsContent relating to: "Technology"
Technology can be described as the use of scientific and advanced knowledge to meet the requirements of humans. Technology is continuously developing, and is used in almost all aspects of life.
Related Articles
DMCA / Removal Request
If you are the original writer of this dissertation and no longer wish to have your work published on the UKDiss.com website then please:

 Human Resources


