Basic Cloud Computing and Load Balancing: Internship Report
Info: 10990 words (44 pages) Dissertation
Published: 18th Feb 2022
Tagged: TechnologyComputing
Abstract
Computers have turned into a vital piece of life. We require computers everywhere, be it for work, research or in any such field. As the utilization of computers in our everyday life expands, the computing resources that we need also go up. For companies like Google and Microsoft,
Cloud computing is a paradigm shift in which computing is moved away from personal computers and even the individual enterprise application server to a ‘cloud’ of computers. Which can give the distinctive registering assets of their customers? Clients of this framework require just be worried about the computing resources administration being requested. The fundamental points of interest of how it is accomplished are avoided the client. The data and the services provided reside in massively scalable data centers and can be ubiquitously accessed from any connected device all over the world. Google, Microsoft, and Amazon, Alibaba Rackspace has started providing cloud computing services. Amazon is the pioneer in this field.
Table of Contents
Click to expand Table of Contents
CHAPTER 1: INTRODUCTION
1.1 Introduction
1.2 Motivation
1.3 Internship Objectives
1.4 Introduction to the Company
1.5 Report Layout
CHAPTER 2: ORGANIZATON
2.1 Introduction
2.2 Product and Market Situation
2.3 Target Group
2.4 SWOT Analysis
2.5 Organizational Structure
CHAPTER 3: TASK PROJECTS AND ACTIVITIES
3.1 Daily Task and Activities
3.2 Events and Activities
3.3 Project Task and Activities
3.3.1 Architecture of cloud service UML diagrams
3.3.2 Elastic Compute Cloud (EC2)
3.3.3 Simple Storage Service (S3)
3.3.4 Relational Database Service (RDS)
3.3.5 Virtual Private Cloud (VPC)
3.3.6 Identity and Access Management (IAM)
3.3.7 Simple Notification Service (Amazon SNS)
3.3.8 Cloud Watch
3.3.9 Elastic Load Balancing
3.3.10 Auto Scaling
3.3.11 Amazon Route 53
3.3.12 Load Balancing
3.4 Challenges
CHAPTER 4: COMPETENCIES AND SMART PLAN
4.1 Competencies Earned
4.2 Smart Plan
4.3 Reflections
CHAPTER 5: CONCLUSION AND FUTURE CAREER
5.1 Discussion and Conclusion
5.2 Scope for Further Career
References
LIST OF FIGURES
Figure 2.5: Organizational Structure of Preview Technologies Limited
Figure 3.3.1: UML diagram of my system
Figure 3.3.1: How EC2 works
Figure 3.3.2: Launch (EC2)
Figure 3.3.2: Select Amazon Machine Image (AMI)
Figure 3.3.2: EC2 Details
Figure 3.3.3: How S3 works
Figure 3.3.3: Create S3 bucket
Figure 3.3.3: S3 bucket popup window
Figure 3.3.4: How RDS works
Figure 3.3.4: Create DB Subnet Group
Figure 3.3.4: Create SQLdatabase 1
Figure 3.3.4: Create SQLdatabase 2
Figure 3.3.4: Connect MySQL Through Workbench
Figure 3.3.4: Connect MySQL Through Workbench 2
Figure 3.3.5: Virtual Private Cloud
Figure 3.3.6: How Multifactor Authentication or 2MFA works
Figure 3.3.6: Multifactor Authentication or 2MFA QR Code
Figure 3.3.6: How user policies works
Figure 3.3.6: How Group policies works
Figure 3.3.6: How Role works
Figure 3.3.7: How SNS works
Figure 3.3.8: How CloudWatch works
Figure 3.3.8: CloudWatch status
Figure 3.3.9: How ELB works
Figure 3.3.9: Classic LoadBalancer
Figure 3.3.9: ELB health check
Figure 3.3.9: ELB working method
Figure 3.3.10: How auto-scaling works
Figure 3.3.10: Launce Configuration of auto scaling
Figure 3.3.10: Create Auto Scaling Group
Figure 3.3.10: Increase of auto scaling group
Figure 3.3.10: Decrease auto scaling group
Figure 3.3.10: Configure notification of auto scaling
Figure 3.3.10: Auto-scaling working methods
Figure 3.3.11: Route 53 Hosted zones
Figure 3.3.11: Add domain name
Figure 3.3.11: Set A record
Figure 3.3.11: Route 53 DNS records
Figure 3.3.11: Namecheap DNS configure
Figure 3.3.11: Site Live
Figure 3.3.12: How Nginx Load Balancer working
Figure 3.3.12: Site 1 output
Figure 3.3.12: Site 2 output
CHAPTER 1: INTRODUCTION
1.1 Introduction
Cloud computing is a growing technology which could change traditional IT systems. Cloud computing makes it feasible for an organization IT to be more flexible, save costs and process information and data faster than with traditional IT. The problem though lies in the riskiness of this new technology.
Cloud computing has recently emerged as a new paradigm for hosting and delivering services over the Internet Cloud computing is attractive to business owners as it eliminates the requirement for users to plan ahead for provisioning, and allows enterprises to start from the small and increase resources only when there is a rise in service demand. However, despite the fact that cloud computing offers huge opportunities to the IT industry, the development of cloud computing technology is currently in its infancy, with many issues still to be addressed.
Cloud computing has gained a lot of publicity in the current world of IT. Cloud computing is said to be the next big thing in the computer world after the internet. Cloud computing is the use of the Internet for the tasks performed on the computer and it is visualized as the next generation architecture of IT [1].
1.2 Motivation
I was highly motivated science I got my fist class on cloud computing at BITM. Course coordinator was an expert cloud professional. He gave us a good overview and told us the future of cloud computing. The most important things are:
Scalability – Cloud computing is highly scalable. Use scalability we can scale up and down our cloud resources. A cloud-based IT infrastructure is more versatile – notably in terms of scalability – that is local, intranet-based infrastructure.
Reliability – Cloud computing service providers provide stable and reliable resources. They provide up to 99.99 % uptime. They make multiple copies of our resources and our data and spread them multiple regions.
Virtualization – Because cloud-based IT infrastructure can be virtualized and geographically dislocated, startups are freed from having to consider the physical location of its IT infrastructure and data centers in business operations decisions.
Affordability – Under traditional infrastructures, startups may not receive – or have the financial wherewithal to purchase – certain features that are often offered to cloud computing customers at substantial discounts. How do these benefits pass on to startups and other small companies? Because the marginal cost to the cloud computing provider of many features (such as enhanced security) may be very low (or even negligible), otherwise unaffordable services may be offered for free to startups using cloud computing options.
1.3 Internship Objectives
The main objective of this internship is getting basic knowledge about cloud computing and load balancing. But the main part is designing a highly available, cost effective, fault tolerant, scalable system. That’s why we need to Understand and use:
- core services of Amazon Web Services (AWS)
- Identity & Access Management (IAM)
- Virtual Private Cloud (VPC)
- Simple Storage Service (S3)
- Elastic Cloud Compute (EC2)
- RDS/DynamoDB (databases)
- Simple Notification Service (SNS)
- CloudWatch (monitoring)
- Elastic Load Balancing (distributing traffic)
- Scaling (scalable & elastic architecture)
- Route 53 (domains & DNS)
1.4 Introduction to the Company
Preview Technologies Limited is a software development company with most of the modern technology services including Cloud Computing, Mobile Application Development, Web Application Development, Web Development and Digital Marketing. Most of the client of this company are outside of Bangladesh. Preview Technologies Limited do project based work [2].
1.5 Report Layout
Chapter - 1 described of introduction, motivation, objectives and expected the outcome of the internship.
Chapter - 2 covered the methodology of my internship and company enterprise.
Chapter - 3 showed a UML diagram and practical work of various cloud services and my daily task, activities events etc. How load balancing work, load balancing configuration and output of real life work.
Chapter - 4 Skills that I developed. Which skills are more important and which was more fun to me is explained.
Chapter - 5 Discussion and Conclusion added in this section. What is my future plan and what is about career is explained.
CHAPTER 2: ORGANIZATION
2.1 Introduction
I have taken my internship at Preview Technologies Limited. This is a software development company with most of the modern technology services including Cloud Computing, Mobile Application Development, Web Application Development, Web Development and Digital Marketing. [2]
This is a sister concern privately held entity of Preview Holdings Limited. Preview Technologies is running its business since 2012. From the beginning, it was doing businesses under the name of Preview ICT. Preview Technologies is running its business since 2012. From the beginning, it was doing businesses under the name of Preview ICT and now Preview ICT has become Preview Technologies from 2016. The business is being operated from its two location. Our head office is located in Bangladesh and from US office it’s conducting its international businesses [2].
2.2 Product and Market Situation
Web Solutions
- Domain Registration
- Web Hosting
- Website Design
- WordPress Solutions
Software Development
- Web Application
- API Development
- CRM Application
- Business Automation
- Batch Processing Tasks
- Monitoring & Security
- Big data Analysis
Cloud Computing
- Server Deployment
- Monitoring & Reporting
- Load Balancing & Scale
- CDN Solution
- DevOps
- Cloud VPN
- Cloud DNS
- BigData Processing
- Data Warehouse
Mobile Application Development
- Android Apps
- iOS Apps
Bangladesh is a populated developing country and setting its Goals to be Digital within 2021. So, every sector and every organization of our country need to be Digitalized. So, a huge number of IT expert and IT professionals are required during the next few years. So Preview Technologies Limited Playing a very important role in the job market by providing various services like:
- Web Solutions
- Cloud Computing
- Software Development
- Mobile Application Development
2.3 Target Group
Preview Technologies is a rising software development company but they also provide another IT services. Preview Technologies have many well-known customers worldwide. Mitek Robotics, Westgate resorts, and qrobot are some of them. They are well established and well-known brand. Our company provides on-demand services for those company. Most importantly with API. Our company is Enterprise customer of Google And premier Customer of Amazon Web Service, RackSpace [3].
2.4 SWOT Analysis
SWOT analysis is very important for every IT based company. It is not very difficult to find. The main objective of SWOT analysis is to develop own business quickly. SWOT analysis assists to find out the Strengths, Weaknesses, Opportunities, and Threats of the company. So a company can change their business policies and not only reduce weakness and the threats but also increase the strengths and opportunities [3].
Strength
- Strong creative leadership
- Secure Infrastructure
- Quality Processes
Weakness
- Dependent on Amazon and Google.
- Mega Projects ate very complexly
- Lack of metadata
Opportunities
- Huge opportunities in the field of Cloud Computing
- High growth industry
- Cost development
- Service extensions
Threats
- Loss of Internet due to various problem
- Computer issues
- Lower cost competitors
2.5 Organizational Structure
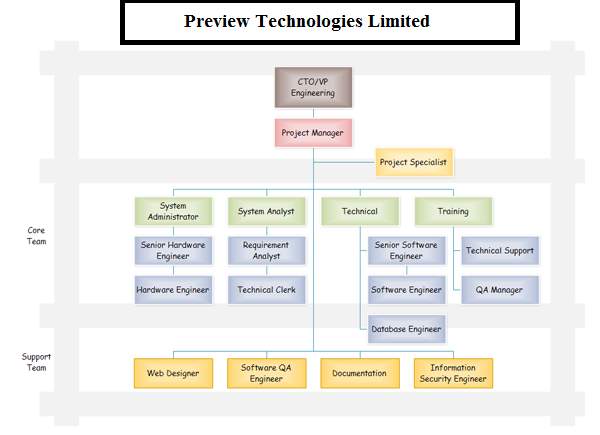
Figure 2.5: Organizational Structure of Preview Technologies Limited
Figure 2.5 showing the organizational structure of Preview Technologies Limited.
CHAPTER 3: TASK PROJECTS AND ACTIVITIES
3.1 Daily Task and Activities
- Regularly Monitoring and capturing system log files.
- Regularly Monitoring and capturing data of server CPU, memory usage
- Regularly monitoring Filesystems space.
- Regularly monitoring capturing Network usage.
- Taking backup of Important filesystems
- Maintaining documentation.
- updating with new technologies.
3.2 Events and Activities
No big events were organized by our company since I joined Preview Technologies. But sometimes our DevOps team members was very active because of our client gave some additional work which was not part of our project.
3.3 Project Task and Activities
In this section, I am going to explain my working experience. How I made a highly available, cost effective, fault tolerant, scalable cloud system. Which is very much efficient for any type of organization. Work largest organization is now going to cloud and use their infrastructure and build their own system.
3.3.1 Architecture of cloud service UML diagram
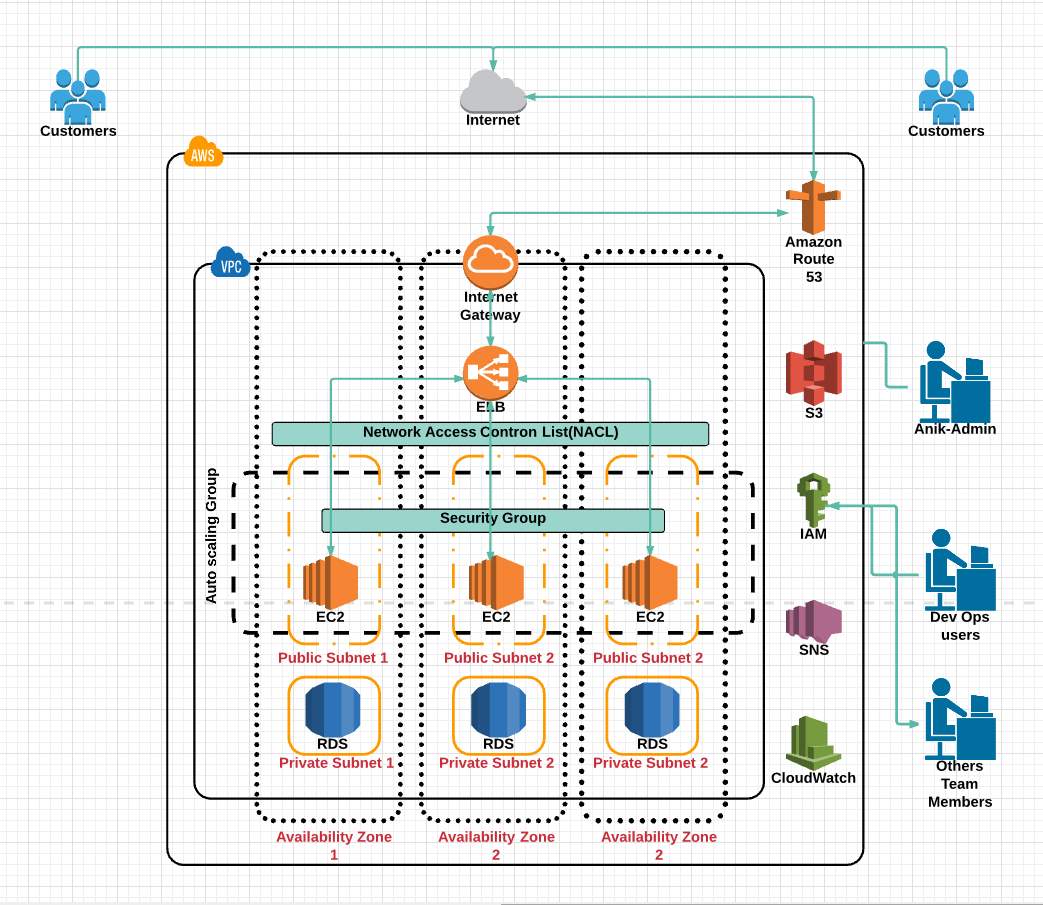
Figure 3.3.1: UML diagram of my system
This is the main part of my internship work. I created a highly available, cost effective, fault tolerant, scalable cloud system shown at figure 3.3.1. Which is very efficient, cost-effective and user-friendly. I well describe briefly how I build this system and how it works.
3.3.2 Elastic Compute Cloud (EC2)
Overview
EC2 stands for Elastic Compute Cloud. EC2 is a virtual machine. Where we can create and develop our own web server/web applications. We can create our instance by choosing specific Availability Zone [4]. Figure 3.3.2 showing how ec2 works.
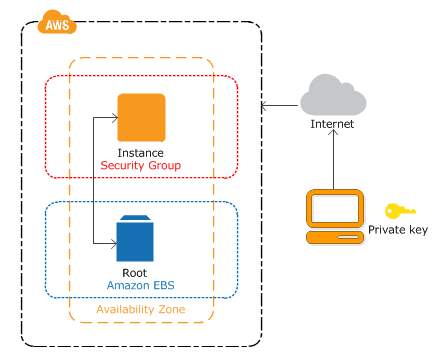
Figure 3.3.2.: How EC2 works
Launch an Instance
Step1: At first, we have to go to https://console.AWS.amazon.com/ec2/. Here we will see EC2 dashboard with details about EC2.
Step2: Select Launce Instance. Process shown at figure 3.3.2

Figure 3.3.2: Launch (EC2)
Step3: After that, we have to select an Amazon Machine Image (AMI). Where we can select Either Linux or Ubuntu or Windows operating system. But for our own purpose, I select Ubuntu 16.04 shown at 3.3.2.
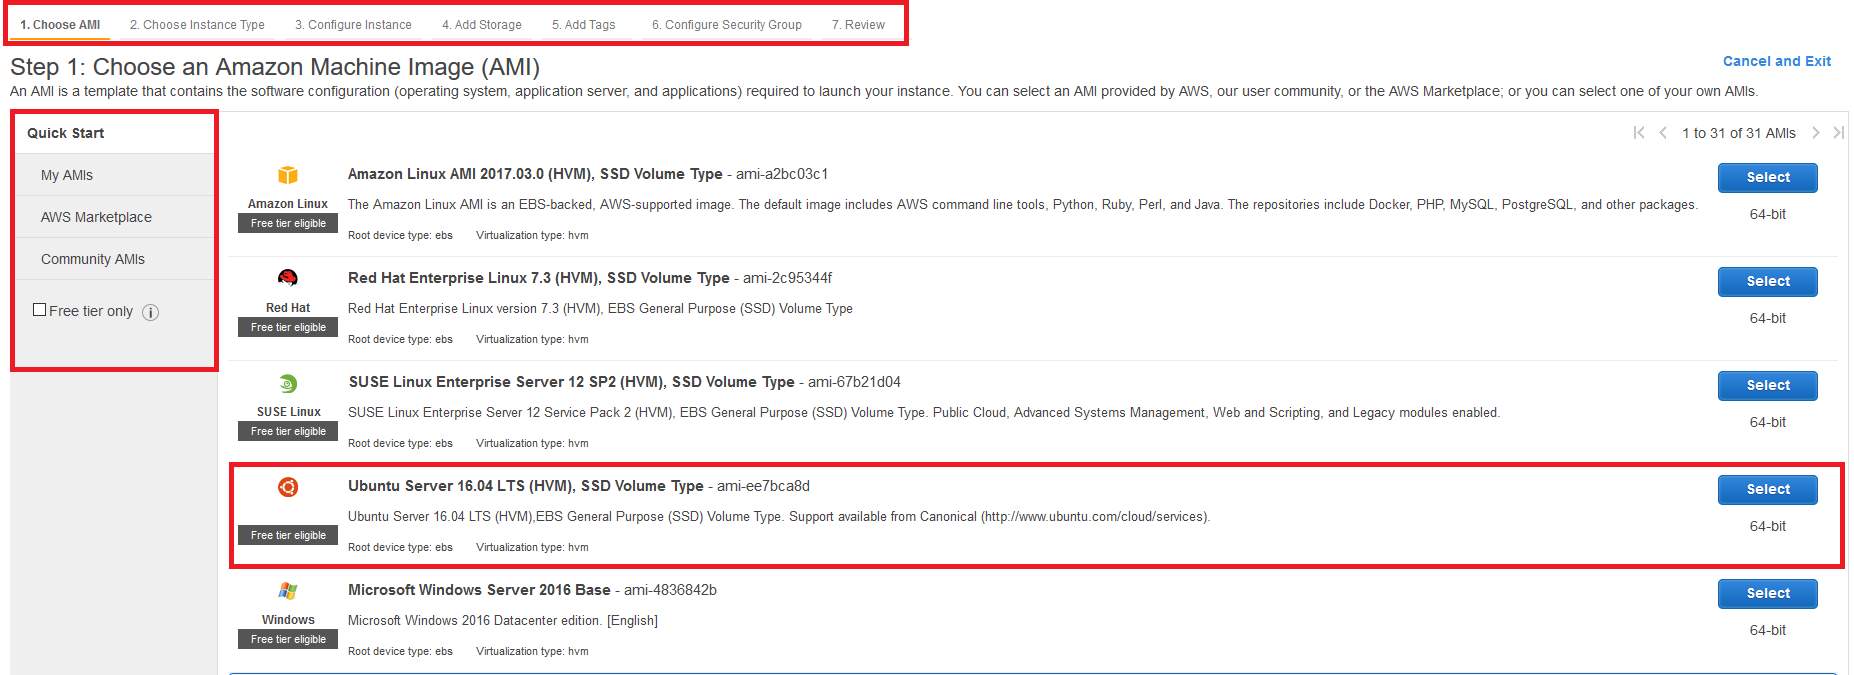
Figure 3.3.2: Select Amazon Machine Image (AMI)
Step 4: After that, we have to select Instance Type. I am using AWS free account that’s why I have some limitation. I choose t2.micro instance which consists 1 vCPU, 1 GB Memory(EBS Elastic Block Storage) and 1 network card. Then select Configure instance.
Step 5: Now we will set a number of instances we need, set Virtual Private Cloud(VPC), subnet. Public IP, IAM role. Then select add storage.
Step 6: Here we set how many root volume we need. Here we will set 8 GB of General Purpose Storage. Then select Add Tag.
Step 7: In this section, we will add tag name “DaffodilEC2_1”. Then select Security Group.
Step 8: Here we have to create a security group for our EC2 machine named “DaffodilSG”. We will add HTTP and https rules and which rules we want for our instance. Then click a Review and Launch. After checking all is ok we launch the instance then AWS tell us to create a private key, AWS will save the public key. When we will log into our instance this key will be needed? Otherwise, we won’t able to log in. So this key very Important. After that, we will Launch the Instance. Now we can see our instance in the Instance section. By selecting an instance we can the details overview of that instance, process shown at figure 3.3.2.
After that, we have to log in our instance through Putty. We need to fill out Public IP, username and our Private key that we saved while we were launching our instance.
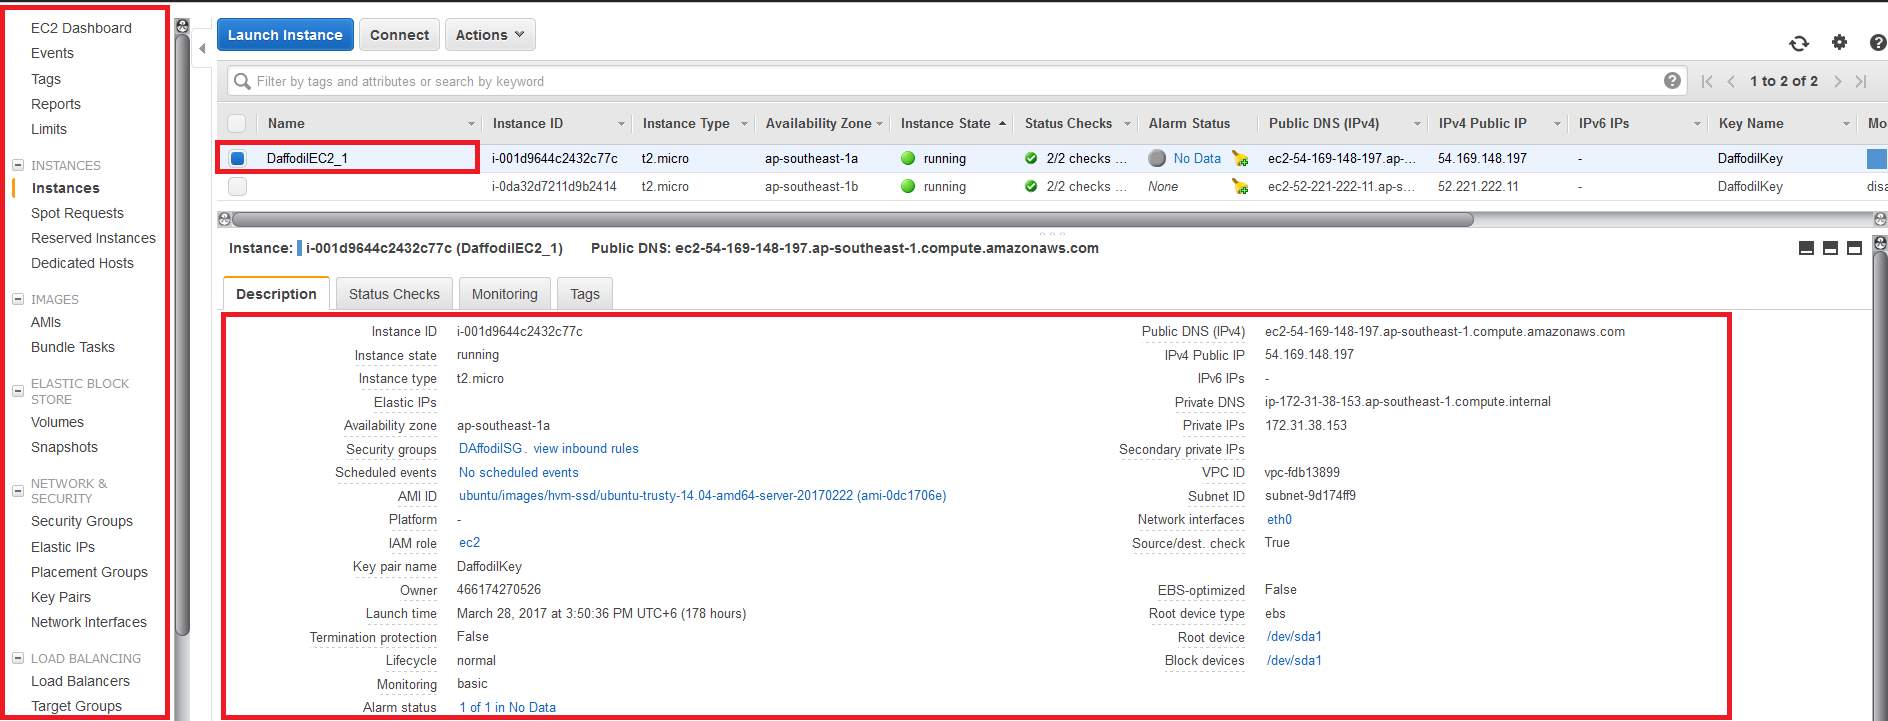
Figure 3.3.2: EC2 Details
Pricing
Purchasing options:
On-demand
Reserved
Spot instance
Instance Type:
General Purpose
Compute-optimized
GPU optimized
Memory optimized
EBS Type
AMI Type:
Linux
Windows
Data Transfer
Region
3.3.3 Simple Storage Service (S3)
S3 Stands for Simple Storage Service. S3 in an online, bulk storage service that you can access from almost any device. We can store and retrieve our data anytime from anywhere using S3 services. Figure 3.3.3 showing how s3 works [5].
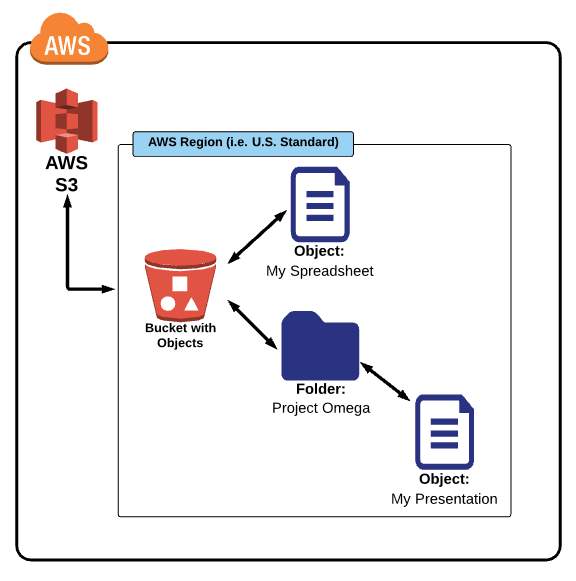
Figure 3.3.3: How S3 works
Create S3 Bucket
Step 1: At first, we have to go to https://AWS.amazon.com/s3/. Here we will see S3 dashboard with details.
Step: 2. Select create a bucket. A popup window will show in front of us. See figure 3.3.3 for details overview.
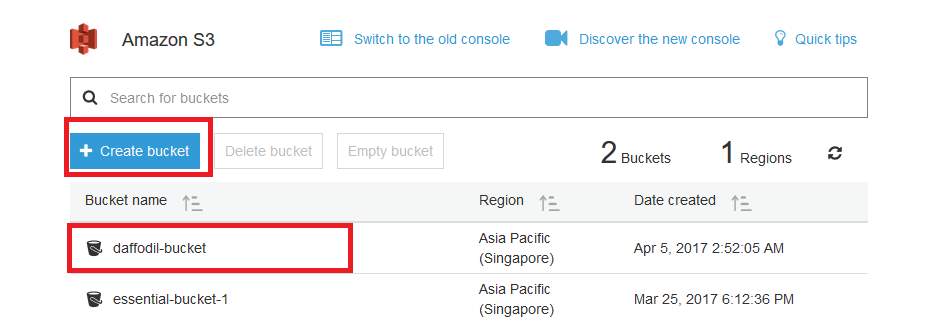
Figure 3.3.3: Create S3 bucket
Step 2: Give a bucket name “daffodil-bucket”. After that, we have to select a region “Singapore”. Select next.
Step 3: now we have to enable/disable some S3 properties such as Versioning, Logging, Tag etc. Select next.
Step 4: In this section, we will set some permissions. Process shown at figure 3.3.3. Manage user sections we can set permission which user can do what or what can’t do. We also can set the public permission. Read/write.
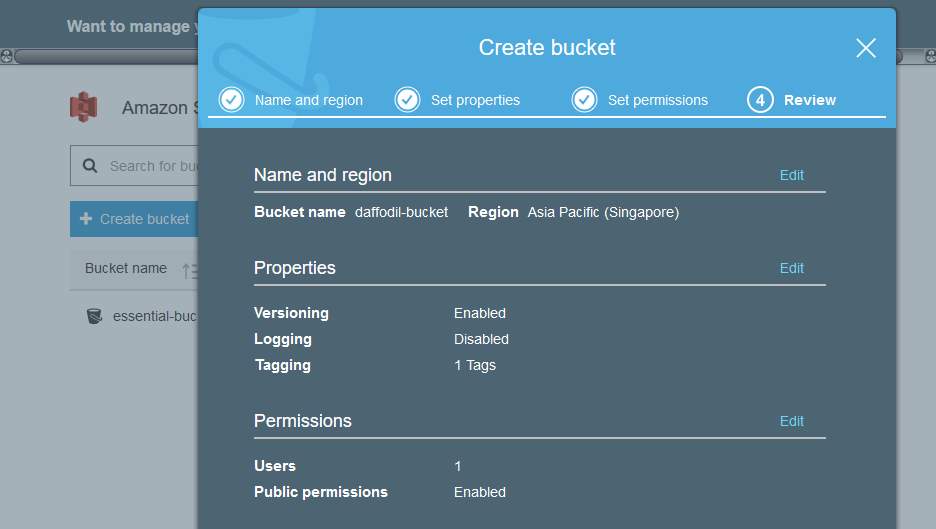
Figure 3.3.3: S3 bucket popup window
Step5: Now we can upload what we want into our S3 bucket by uploading files/folders.
Pricing
Storage Cost:
Applies to data at rest in S3
Charged per Gb used
Price per GB varies based on region and storage class
Request Pricing:
- PUT
- COPY
- POST
- GET
- Data archive
- Data Restore
3.3.4 Relational Database Service (RDS)
RDS stands for Relational Database Service. RDS is a SQL database service that provides a wide range of SQL database options to select form.
SQL options include:
- Amazon Aurora
- MySQL
- MariaDB
- PostgreSQL
- Oracle
- Microsoft SQLServer
There are two main types of databases in the world:
- Relational Databases known as SQL
- Non-Relational Databases known as NoSQL
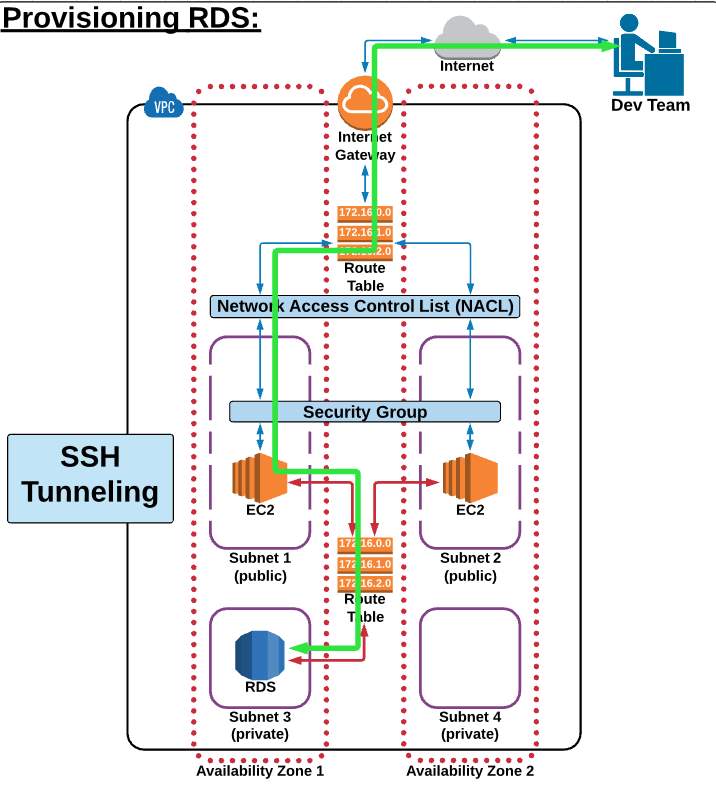
Figure 3.3.4: How RDS works
In this section, we will see how to create an RDS database and access that database through our EC2. Figure 3.3.4 showing everthing. At first, we will create a SQL RDS database then connect.
Create RDS
Step 1: At first, we need to go to https://console.AWS.amazon.com/rds/. Then we have to create a subnet group “Daffodilsubgrooup” for our database. In this section, we will set DB Subnet Group name, Description, VPC ID, Available Zone, Subnet ID. Then create, figure 3.3.4 showing processes .
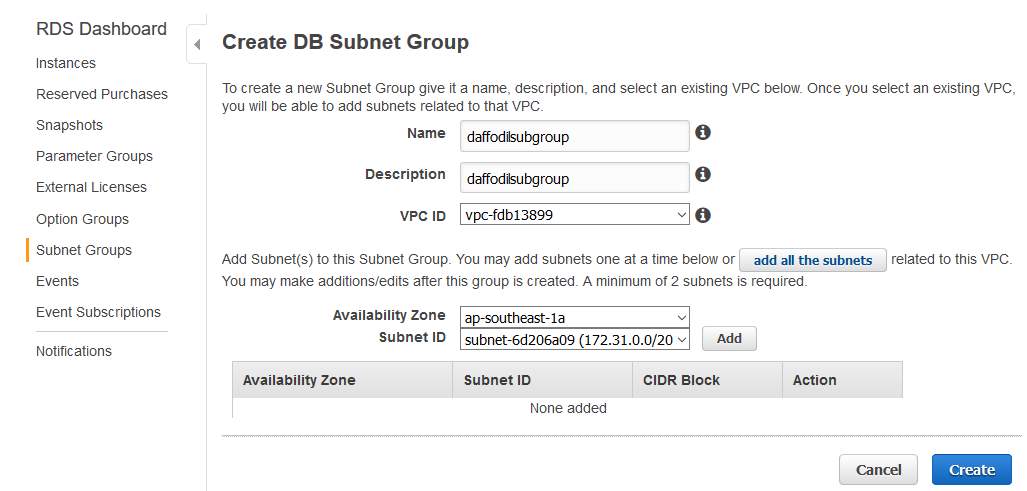
Figure 3.3.4: Create DB Subnet Group
Step 2: Now we have to go back to our RDS Dashboard instance. Then Launched DB instance. A new section will appear in front of us. Then we can choose either Amazon Aurora or MySQL or MariaDB or PostSQL or Oracle database. After that, we have to select Dev/Test MySQL. Now we have to set some configuration such as DB name “MySQL”, version, DB Instance Class “t2.micro”, storage type, storage size, DB instance Identifier, Master Username, Master Password etc , processes at figure 3.3.4.
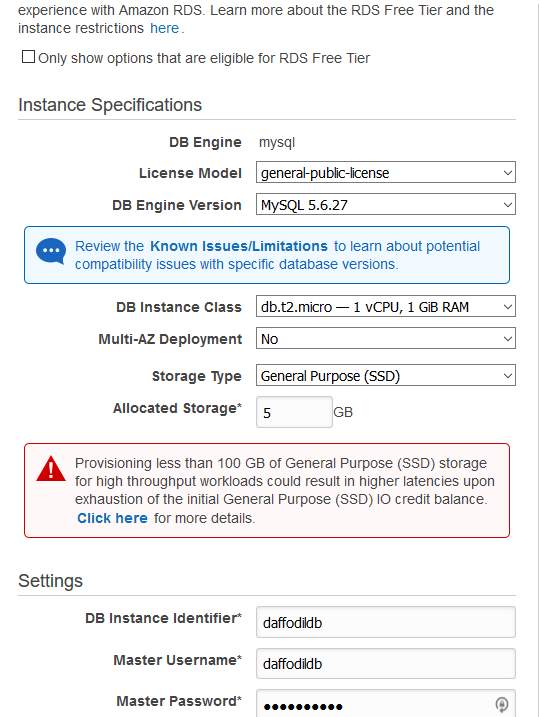
Figure 3.3.4: Create SQLdatabase 1
Step 3: In this section, we have to set VPC, subnet, Availability zone, VPC Security Group for our RDS instance. This database is not publicly accessible. After that, we have to set Database Name “daffodilldb”, Database port number “3306”, DB parameter Group. Others settings will be the default. Then click Launch Db instance, shown at figure 3.3.4.
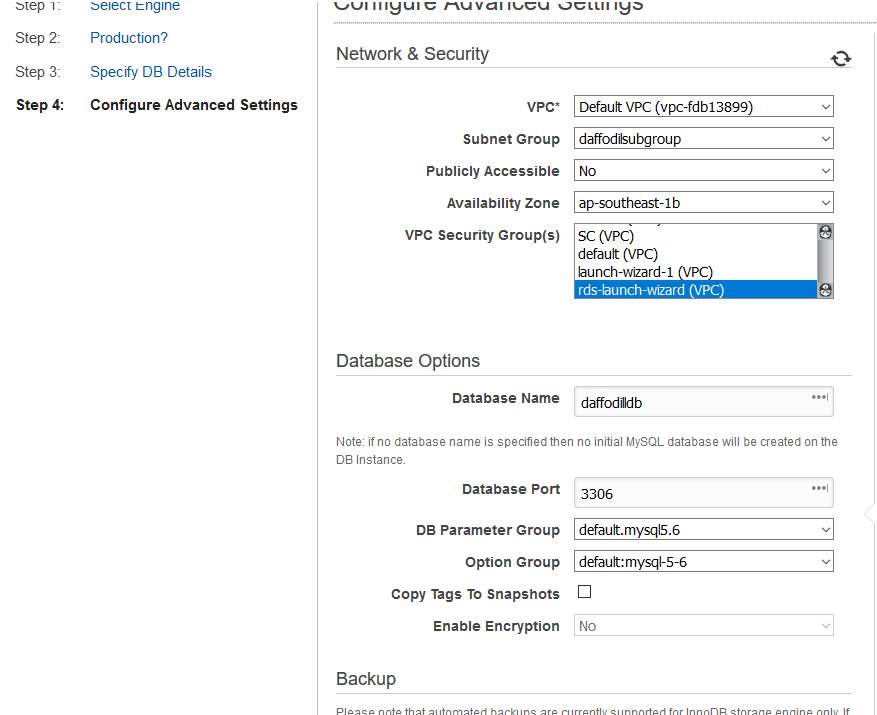
Figure 3.3.4: Create SQLdatabase 2
Step 4: Now it’s time to connect our database using MySQL workbench through EC2 server. Download, install and open MySQL workbench. After that click (+) sign set a connection name. At connection method section select Standard TCP/IP over SSH. After that past EC2 public IP into SSH hostname section, ubuntu as SSH Username, show EC2 private key into SSH key file section. Now it’s time to set Database section. IN the field of MySQL hostname just paste the MySQL end point address “daffodildb.cyghnya3jtez.ap-southeast-1.rds.amazonAWS.com:3306” shown at figure 3.3.4.
Now it’s time to test our connection. If everything ok then the test will be successful otherwise not. At last click ok,
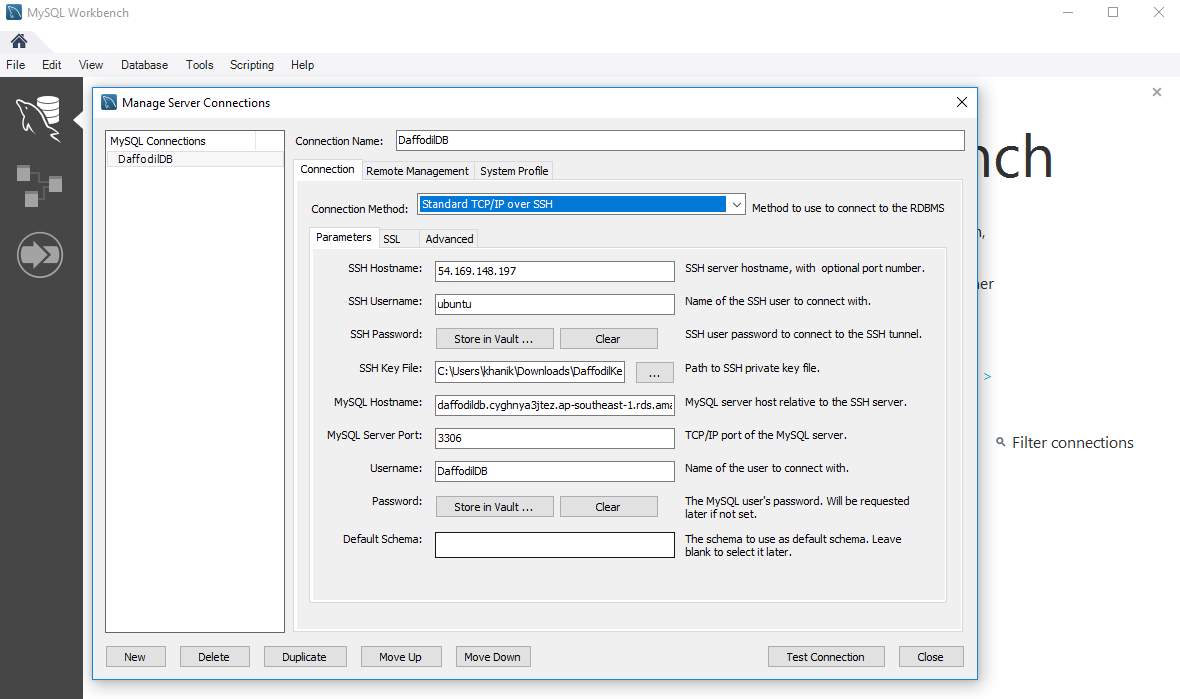
Figure 3.3.4: Connect MySQL Through Workbench
After everything is ok, we can create our own MySQL database. Figure 3.3.4 showing the dashboard of MySQL workbench, where we can do that.
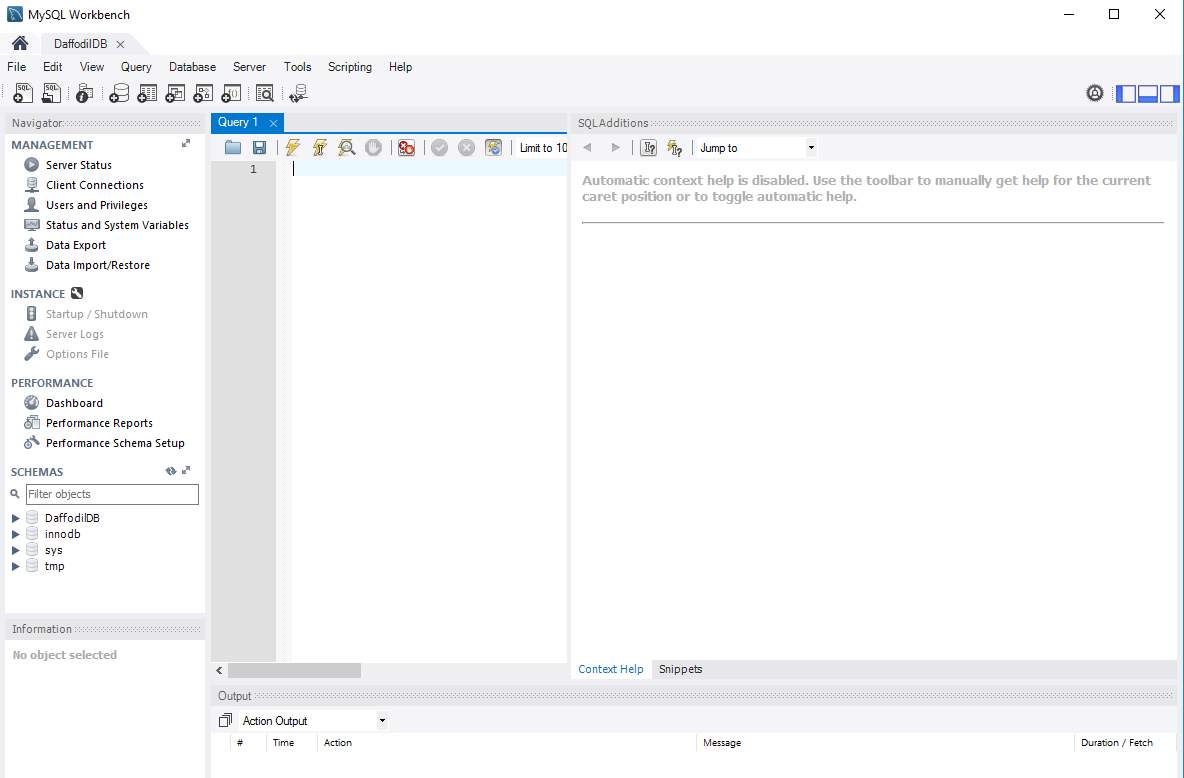
Figure 3.3.4: Connect MySQL Through Workbench 2
Pricing
- On-Demand Instance
- Reserved Instance
- Database Storage and IOs
- Backup Storage
- Data Transfer
3.3.5 Virtual Private Cloud (VPC)
VPC stands for Virtual Private Cloud. Where we can create our own virtual network. We can create more than one VPC at a time. In this VPC we can set up web application or database. Amazon AWS has twelve regions and every region has more than three availability zone. VPC is a private sub-section of AWS that we control, in which we can place AWS resources, for example, EC2 instance or database, in figure 3.3.5 we see our VPC with resources. We have full control over who has access to the AWS resources that we place inside our VPC [7].

Figure 3.3.5: Virtual Private Cloud
In VPC Section We Have
- Internet Gateway
- Route Table
- Network Access Control List (NACL)
- Subnet
- Availability Zone
Internet Gateway
IGW or Internet Gateway is a combination of hardware and software provides our private network with a route to the world (meaning the Internet) of the VPC.
To create an IGW steps are:
Step 1: Go to VPC section select Internet Gateway.
Step 2: Create Internet Gateway
Step 3. A pop-up window will appear. Add tag name “DaffodilIGW”.
Note:
1.Only 1 IGw can be attached to a VPC at a time.
2.An IGW cannot be detached from a VPC while there are active AWS resources in the VPC.
Route Table
The route table is set of rules named routes. Where admin determine where network traffic is to go. Ever VPC needs a route table. Without a route table network traffic won’t work properly.
To create a Route table:
Step 1: Step 1: Go to VPC section select Route Tables.
Step 2: Create Route Table
Step 3: A pop-up window will appear. Set a tag name” DaffodilRT”
Step 4: Select a VPC, in which our route table will work. At late yes create
Note:
1.Unlike an IGW, we can have multiple active route tables in a VPC.
2.we cannot delete a route table if it has dependencies.
Network Access Control List (NACL)
In a simple sentence, NACL is a security layer for our VPC, which works like a firewall for control data/packets in or out through our VPC. We can set inbound and outbound rules in NACL. Rules applied based on rule # from lowest to highest [7].
To create an NACL:
Step 1: Go to VPC section select Network ACLs.
Step 2: Create Network ACL.
Step 3: A pop-up window will appear. Set a tag name” DaffodilNACL”.
Step 4: Select a VPC, in which our NACL will work. At late yes create.
Note:
1.Rules are evaluated from lowest to highest based on rule #.
2.Any new NACL we create DENY all traffic by default.
3.A subnet can only be associated with one NACL at a time.
Subnet
A subnet, shorthand for subnetwork, is a sub-section of a network. Generally, a subnet includes all the computers in a specific location. Circling back to the home network analogy we used in the VPC Basic lesson- if we think about our ISP begin a network, then our home network can be considered a Subnet of our ISP’s network. [7]
To create a Subnet:
Step 1: Go to VPC section select Subnets.
Step 2: Create Subnet.
Step 3: A pop-up window will appear. Set a tag name”Public Subnet 1/Private Subnet 1”.
Step 4: Select a VPC, in which our Subnetwork.
Step 5: Select Availability Zone.
Step 6: set an IPv4 CIDR block “172.16.1.0/20”. Al last yes create.
Note:
1.Subnets must be associated with a route table.
2.A public subnet has a route to the internet.
At Last, We need to connect all thing using configuration tab. Every section has own configuration tab. Just select and set as we needed.
3.3.6 Identity and Access Management (IAM)
Identity and Access Management is the most important part of our security. We can deploy our own security policies in here. We can create and control our users.
We have several things to do in IAM section such as:
- Multifactor Authentication or 2MFA
- Create Users & Policies
- Setup Group & Policies
- IAM Roles
Multifactor Authentication or 2MFA
MFA is an abbreviation for Multifactor Authentication. It’s an extra layer of security. That’s how we can protect our root account get hacked. This service provided by a 3rd party company which can be free of paid service. It generates random six-digit code every couple of second when we want to log into our root account. It works via smartphone or tablet or used the app: Google authenticator, process shown at figure 3.3.6,
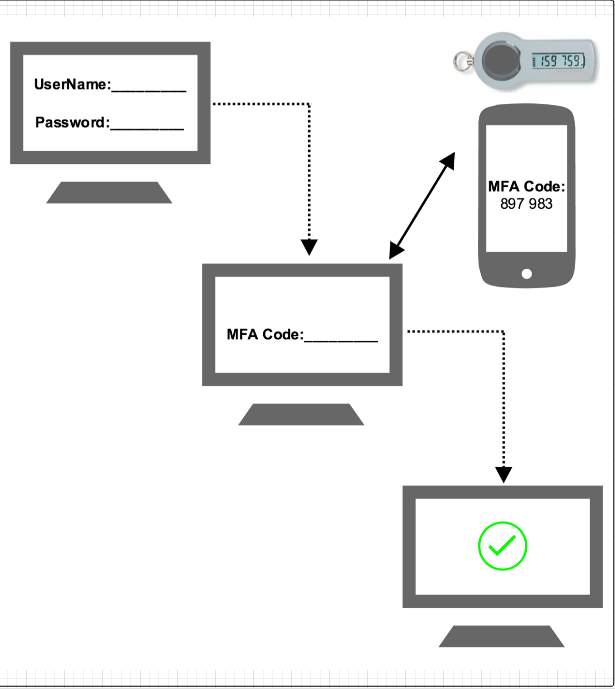
Figure 3.3.6: How Multifactor Authentication or 2MFA works
Setup a Multifactor Authentication
Step 1: Go to IAM section and select Activate MFA on your root account.
Step 2: Select Manage MFA. After that select the type of MFA device to activate. I choose A virtual MFA device. Select next.
Step 3: New pop-up window will appear. It says If you want to active this feature you have to install an application on your smartphone or PC or another device. Select next step
Step 4: Now will see a QR code. We need to scan this QR code by our Smartphone authentication. This time I am using Google authenticator. After that, we will give that six-digit code into authentication code box. Select Active Virtual MFA. A successful message will appear. All done. Select finish, process shown at figure 3.3.6.
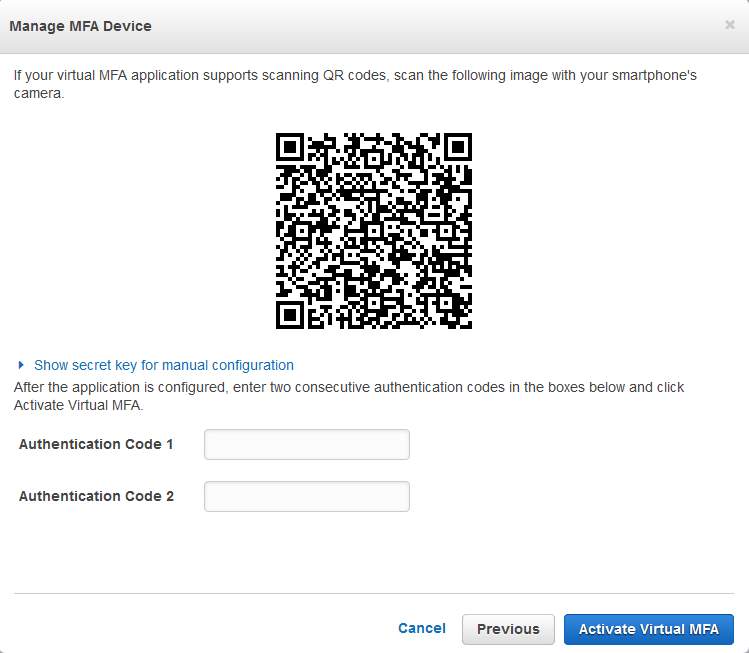
Figure 3.3.6: Multifactor Authentication or 2MFA QR Code
Create Users & Policies
In this section, We will create some user and set permission or policies for those users. Let’s begin:
Step 1: Go to IAM select Users. Select add users top left corner.
Step 2. Set a username. check AWS Management Console Access, check the custom password. Give a password for our user. Select next
Step 3: In this section, you can add this user in a group. And we are going to attach some policies by selecting attach existing policies directly. Now policies are shown, I select some policies for example AmazonEC2FullAccess, Amazons3FullAccess. You can add more or less as your wish. Select next.
Step 4: Here we will see all we have done some time ago just review that everything is ok. And select Create user.
Step 5: Now you have to download a CSV file for that user. Where you can find a link to login to AWS. Close the window. Figure 3.3.6 showing how policies works.
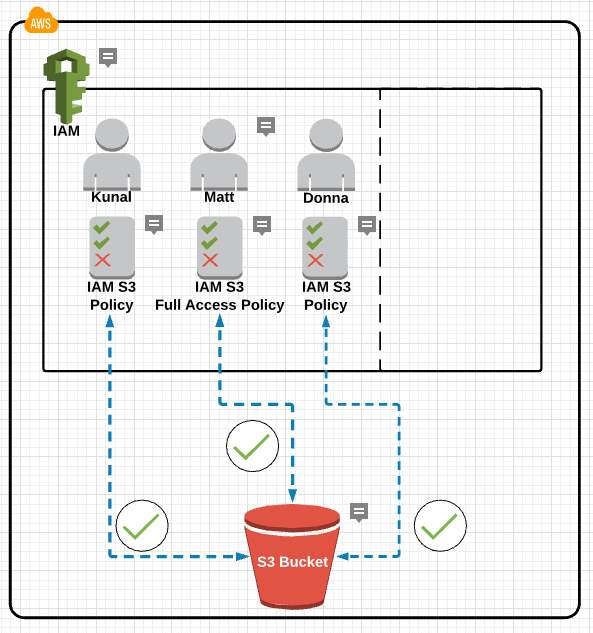
Figure 3.3.6: How user policies works
Setup Group & Policies
In this section, we will add users into a group and set some policies for that group.
Step 1: Go to IAM select Groups. Select create new group top left corner.
Step 2: Set a group name ”DaffodilGroup”. select next.
Step 3: Attach some policies for example AmazonEC2FullAccess, Amazons3FullAccess. You can add more or less as your wish. Select next.
Figure 3.3.6 showing the working method of group policies.
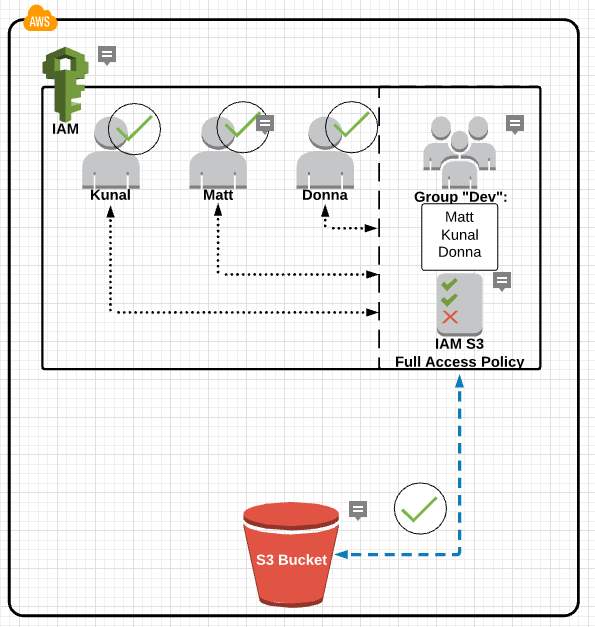
Figure 3.3.6: How Group policies works
Step 4: review and create a group.
IAM Roles
In this section, we are going to attach two AWS service. Where one AWS service can access another service when needed.
Step 1: Go to IAM select Role. Select create new role top left corner.
Step 2: Set a group name ”EC2”. select next.
Step 3: select an AWS service which is going to attach another service.
Step 4: Now select your desired service I choose AmazonS3FullAccess. Select next
Step 5: just review and create a role. New role created.
How role works shown at figure 3.3.6 below.
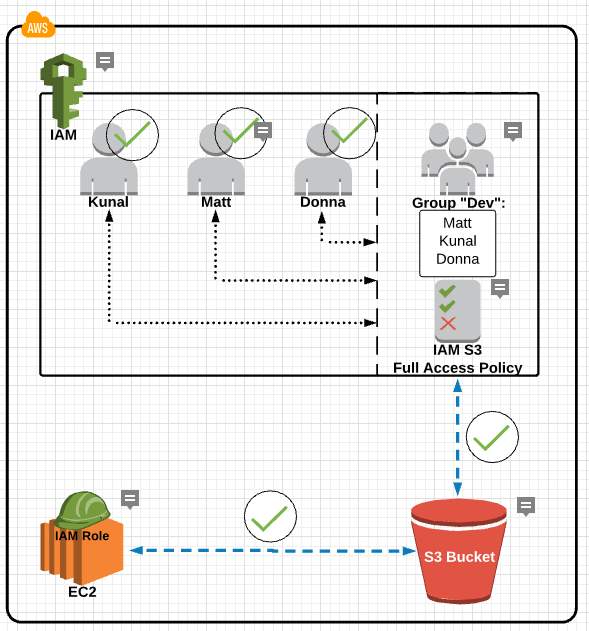
Figure 3.3.6: How Role works
3.3.7 Simple Notification Service (Amazon SNS)
SNS is an AWS service that allows us to automate the sending of email or text message notifications, bases on events that happen in your AWS account. Using SNS service we can track our web application and send push notification through SNS to our email address, process shown at figure 3.3.7 [8].
Create an SNS
Step 1: At first we have to go to Simple Notification Service. Select create topic. Now we are going to create a topic named “Auto scaling”.
Step 2: Now give a topic name “Auto scaling”. And a display name “Auto scale”. Create topic.
Step 3: Now we need to create a subscription. New pop up appear. Change protocol to Email and give a valid email address into endpoint section. Then create a subscription.
Step 4: It’s time to verify the submitted email. AWS sent a mail to our mail address. Just click the link Confirm Subscription. Go back to the SNS and see a subscriber number.
Step 5: Now we have to publish our topic. So click publish topic, add a subject and add some text in the message field. This message will be sent to the subscriber. so be careful about it. Select Publish Message.
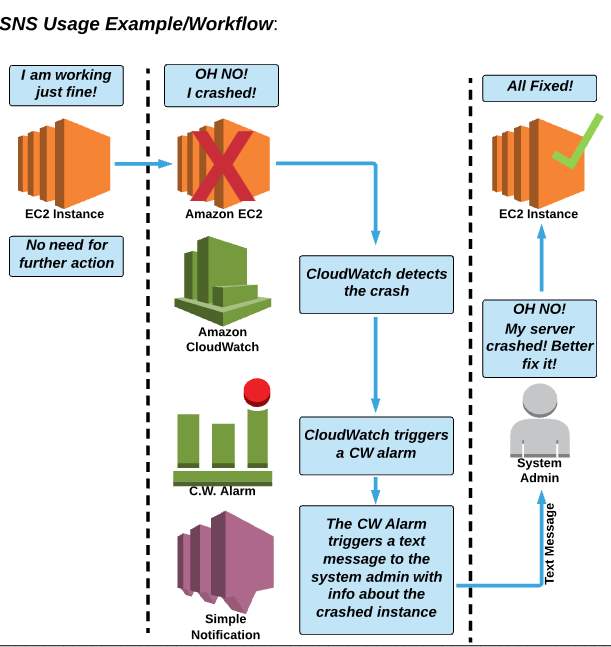
Figure 3.3.7: How SNS works
3.3.8 Cloud Watch
CloudWatch is a service that allows us to monitor various elements of our AWS account. CloudWathch monitors our real-time resources deployed into Amazon AWS. Using CloudWatch matrices we can measure our cloud applications. CloudWatch set alarms and send notifications of the resource that we are monitoring, process shown at figure 3.3.8 below [9].
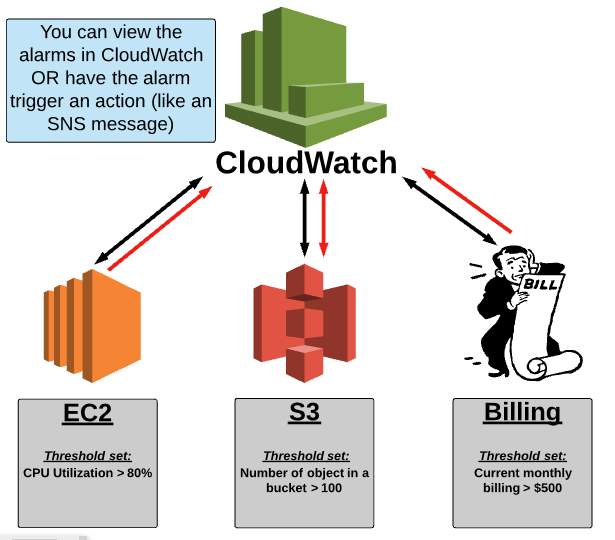
Figure 3.3.8: How CloudWatch works
Create a Dashboard
Step 1: Go to CloudWatch and select Dashboard. Then Create a Dashboard, give it a name” DaffodilDashboard”.Then create a dashboard.
Step 2: After that choose a widget for the dashboard.
Step 3: Explore the available metrics and select metrics that you want.
Step 4: Now create the widget.
Create an Alarm
Step 1: Select a Dashboard and go to alarm section,
Step 2: create alarm, then select a category and next, figure 3.3.8 showing CPU utilization dashboard.
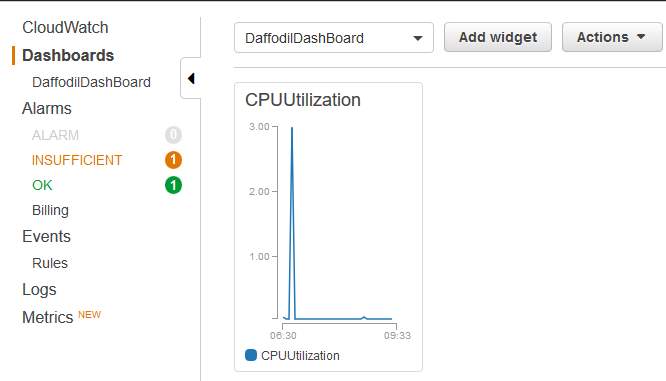
Figure 3.3.8: CloudWatch status
Step 3: Now give a name and description of this alarm. And set some metrics. Such as CPU utilization is>= 30% for 5 consecutive periods. Select whenever this alarm and send a notification to. At last, create alarm.
Pricing
- Amazon CloudWatch Dashboard
- Detailed Monitoring for EC Instance
- Amazon CloudWatch Custom Metrics
- Amazon CloudWatch Alarm
- Amazon CloudWatch Logs
- Amazon CloudWatch Custom Events
3.3.9 Elastic Load Balancing
Elastic Load Balancer evenly distributes web traffic between EC2 instances that are associated with it. ELB equally distribute incoming web traffic to multiple EC2 instances which are located in multiple Availability Zones. Fault tolerance is one of the most vital features of Elastic Load Balancer. When one Ec2 will crash or down then ELB pass web traffic to another EC2 instance, process shown at figure 3.3.9. That’s how our WEB server or application won’t be offline never [10].
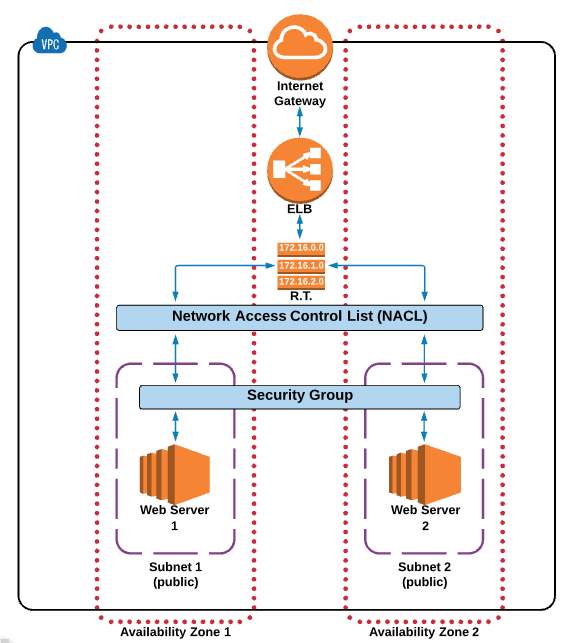
Figure 3.3.9: How ELB works
Create Elastic Load Balancer
Step 1: At first, we have to go to EC2> Load Balancer
Step 2: Create Load Balancer.
Step3: A new popup window will appear. Just select Classic Load Balancer and continue, shown at figure 3.3.9 below.
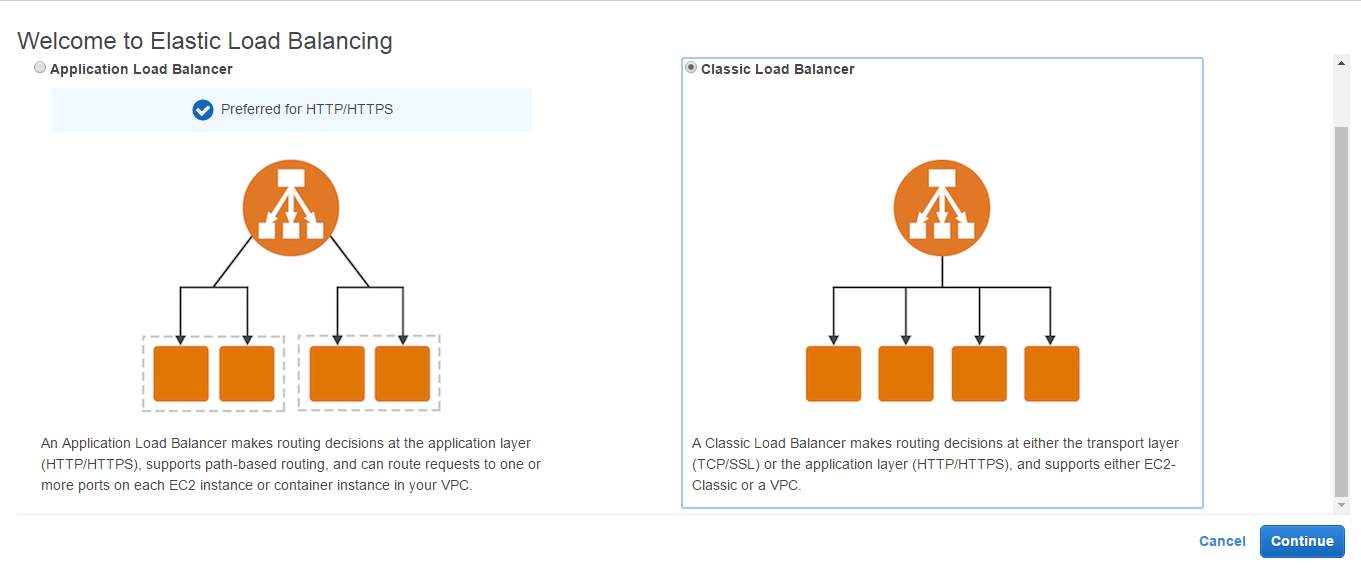
Figure 3.3.9: Classic Load Balancer
Step 4: Give a name, select a VPC for our ELB. Add some protocols. Next.
Step 5: Create of add existing security Group for ELB. Next.
Step 6: Now it’s time to configure health check. we are using TCP protocol and 80 port. Next, process shown at figure 3.3.9 below.
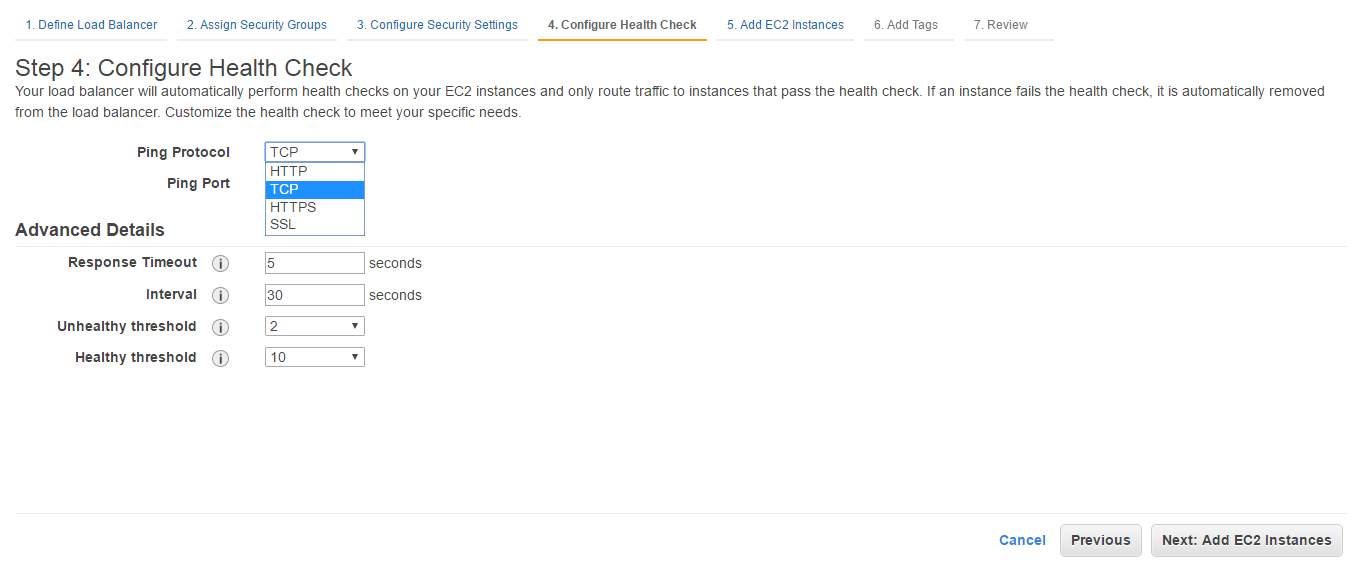
Figure 3.3.9: ELB health check
Step 7: Here we are going to add EC2 instance for ELB. Next
Step 8: here you can add a tag or not. Next
Step 9: Now it’s review time. If everything ok then clicks Create. Figure 3.3.9 showing how our ELB distribute our web traffic to multiple web server.
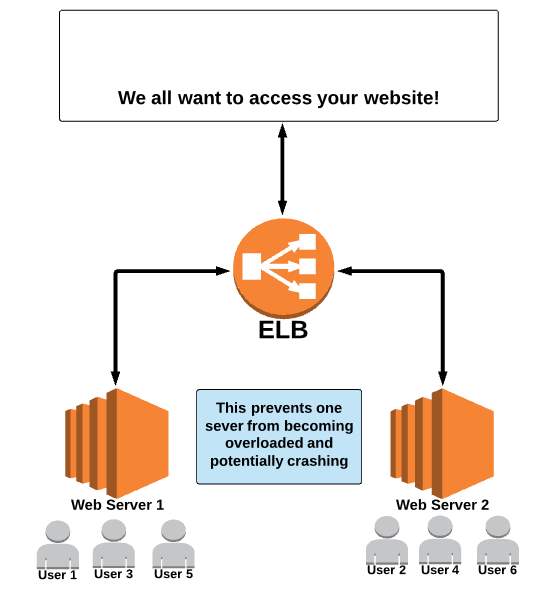
Figure 3.3.9: ELB working method
3.3.10 Auto Scaling
Auto Scaling automates the process of adding or removing EC2 instances based on traffic demand for our application. Auto scaling is one of the best-awarded Innovation of Amazon AWS. Using this service, we can deploy a minimum number of the instance at a time because of our system never goes down. Also, we can deploy a maximum number of the instance when we need those instances will be active shown at figure 3.3.10 below [11].
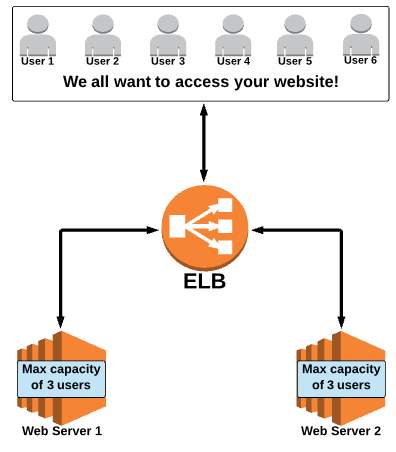
Figure 3.3.10: How auto-scaling works
Create Auto Scaling
Step 1: At first, we have to go to EC2> Launch Configuration.
Step 2: Select an AMI” Ubuntu 16.04”.
Step 3: Select an Instance Type “t2. micro”.
Step 4: Create Launce Configuration. set a name “auto scaling”. Set a public IP for our instance, process shown at figure 3.3.10 below.
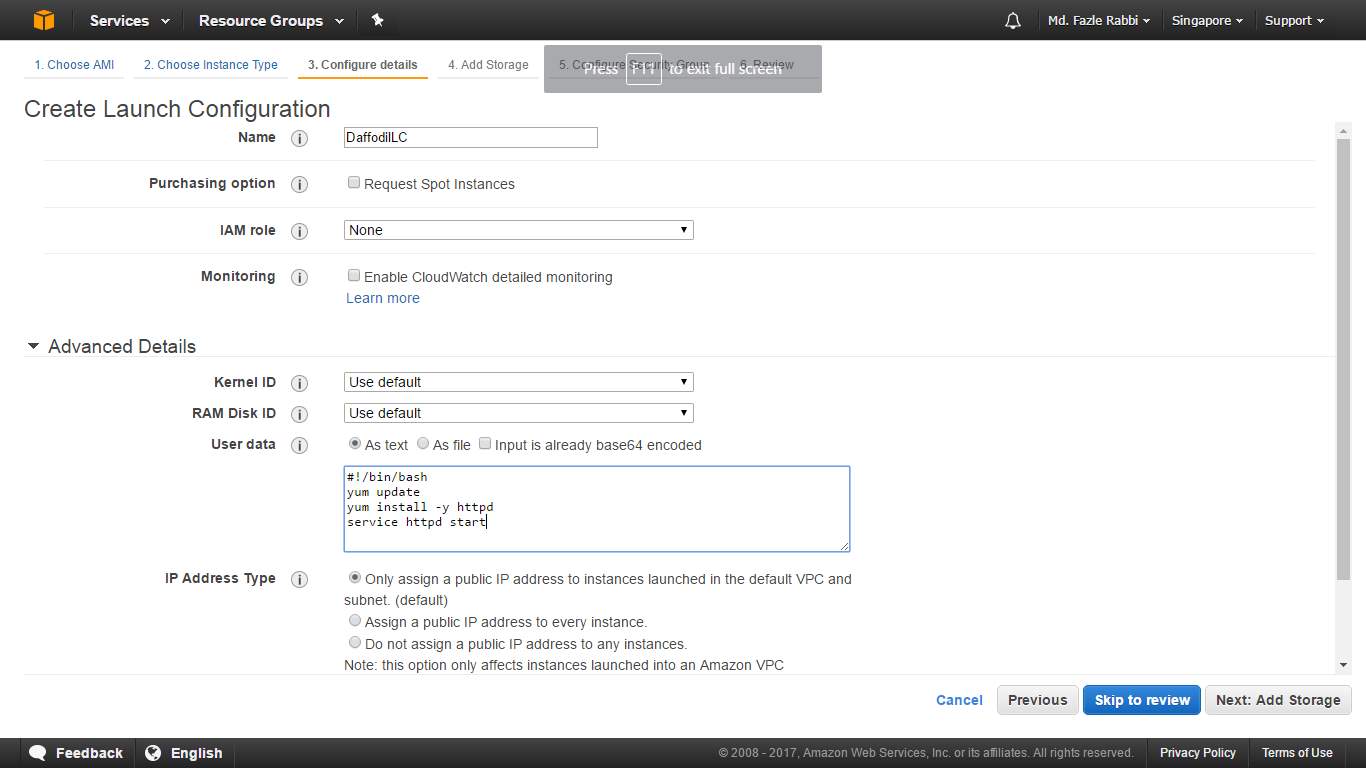
Figure 3.3.10: Launce Configuration of auto scaling
Step 5: Select storage type and add storage if needed.
Step 6: Configure Security Group. I make new one and named “DaffodilSG”, VPC, Subnet, process shown at figure 3.3.10 bellow.
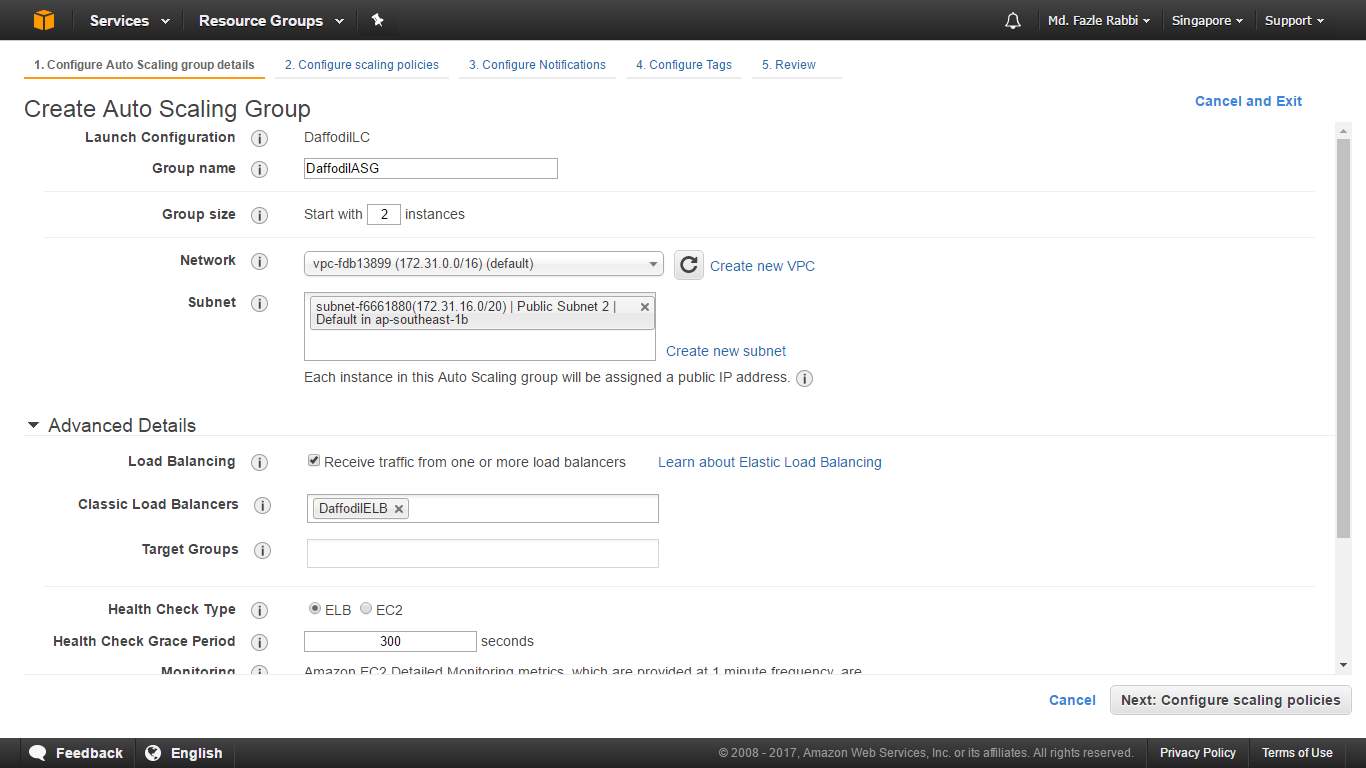
Figure 3.3.10: Create Auto Scaling Group
Step 7: Review your configuration and create.
Step 8: Now we have to create Auto Scaling Group. Give a Group name “DaffodilASG”. Set group size. I set 2. After that, you have to select a VPC for auto scaling group. Also, need to add subnets. IN advanced option we have to set “DaffodilELB” into Classis Load Balancer field. And check ELB in health check section. Next
Step 9: Here we have to set minimum and maximum instance we want for auto scaling. After that click adds a new alarm in Increase Group Size section and set some metrics. Do the same thing for Decrease Group Size. I set some metric that’s why when EC2 CPU utilization goes over 70% it will create one more instance automatically. And when CPU utilization goes below 30% one instance will be terminated automatically, process shown at figure 3.3.10 below.
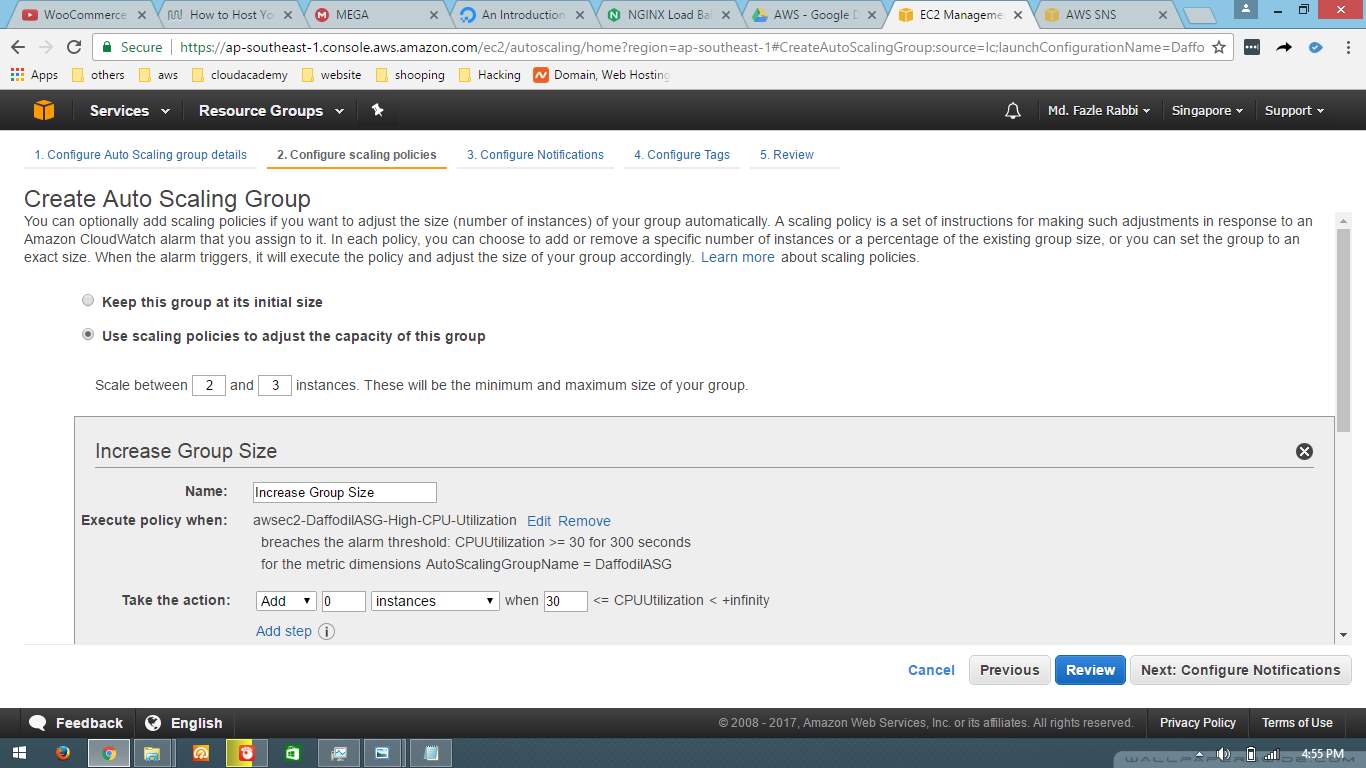
Figure 3.3.10: Increase of auto scaling group
Step 10: After that, we will configure Decrease auto scaling section where I set when CPU utilization down below 30% then our instance will be terminated, process shown at figure 3.3.10 below.
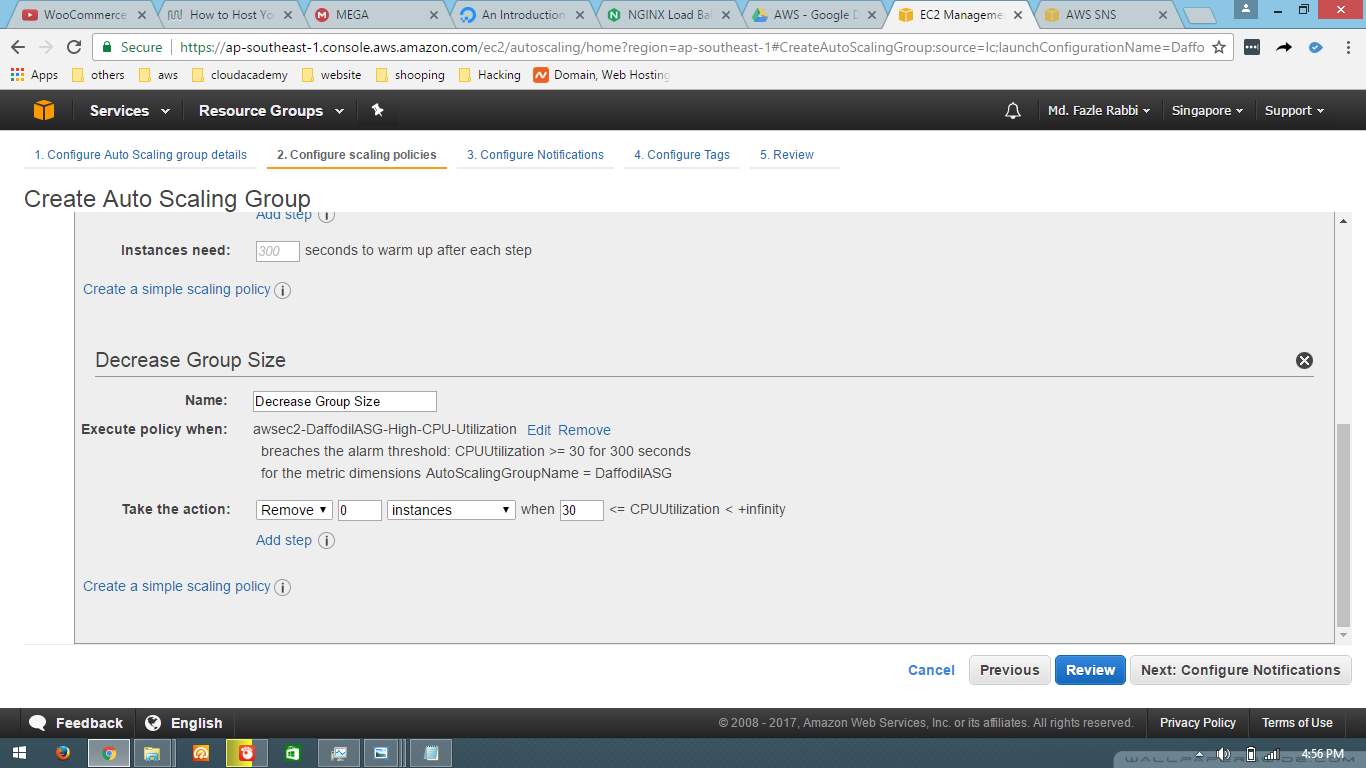
Figure 3.3.10: Decrease auto scaling group
Step 10: Here we will add an SNS topic to send a notification to admin. Then admin will check the instance and will take the necessary steps, process shown at figure 3.3.10 bellow.
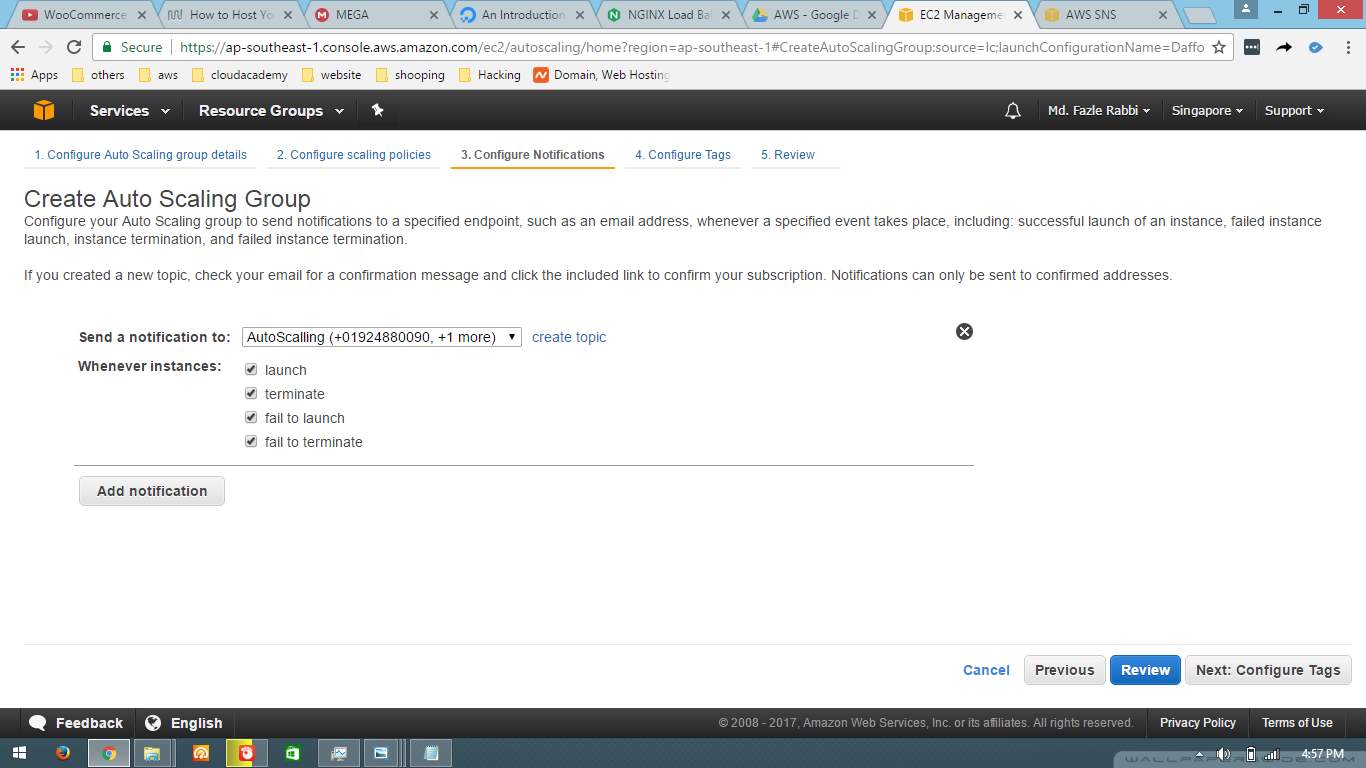
Figure 3.3.10: Configure notification of auto scaling
Step 11: Add a tag name.
Step 12: Review and Launce our instance. Now we will see our new instance is begun start to run into EC2 instance section.
Figure 3.3.10 is showing how our auto-scaling works in reallife.
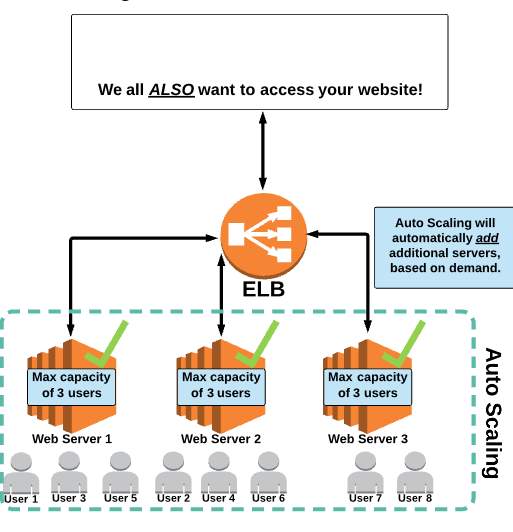
Figure 3.3.10: Auto-scaling working methods
3.3.11 Amazon Route 53
Route 53 is where we configure and manage web domains for websites or applications we host on AWS. In Route 53 we can Register a new domain, use DNS service and also can health check. In this section, we can do traffic management and availability monitoring.
Create Route53
Step 1: At first, we have to go to Route53> Hosted zones , process shown at figure 3.3.11
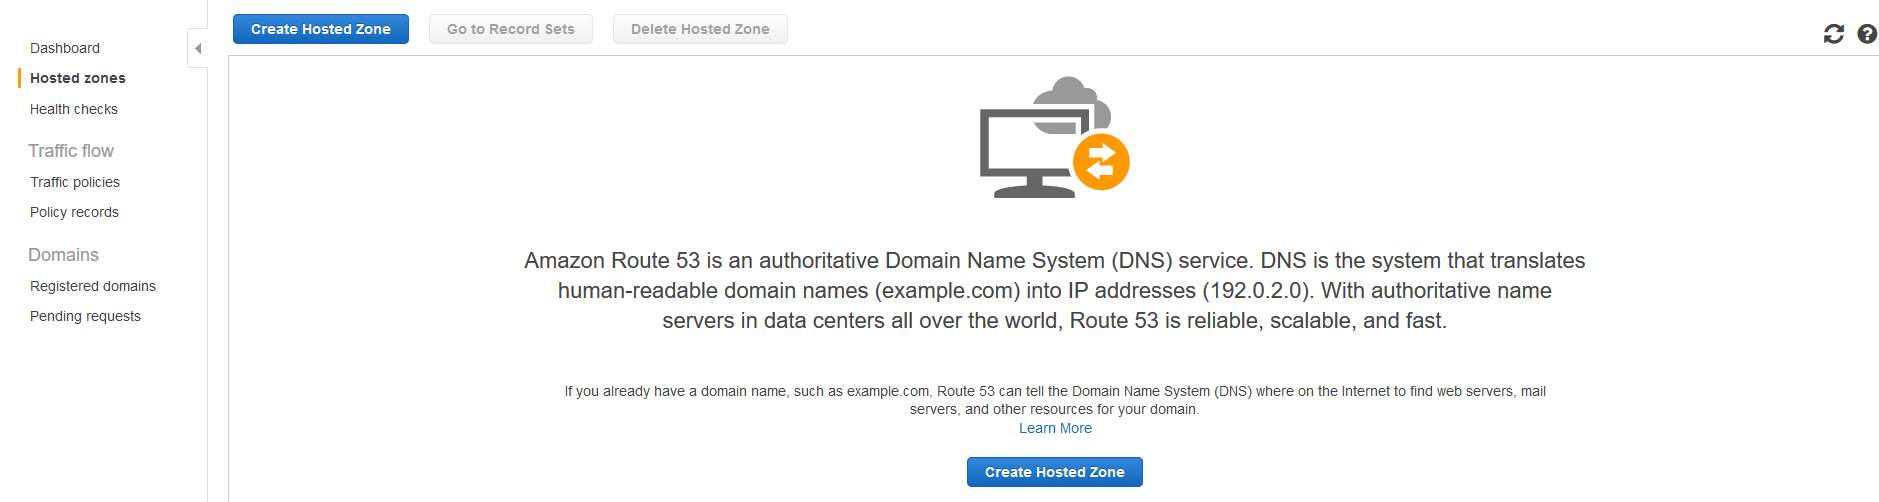
Figure 3.3.11: Route 53 Hosted zones
Step 2: Create Hosted Zone, a new popup will open. Add a domain name “admin-anik.com” and select as Public Hosted Zone from the drop down menu, check right corner of the figure 3.3.11 below.

Figure 3.3.11: Add domain name
Step 3: A hosted zone created. Now we are seeing some NS records and an SOA record. Which are very much important for every site. Now we are going to add some A records.
At first click on Create Record Set, then
Name: www
Type: A – Ipv4 address,
Alias: Yes,
Alias Target: select DaffodilELB
Routing policy: simple
Evaluate Target Heath: no
Then click create. Check figure 3.3.11 below, everything is in it.
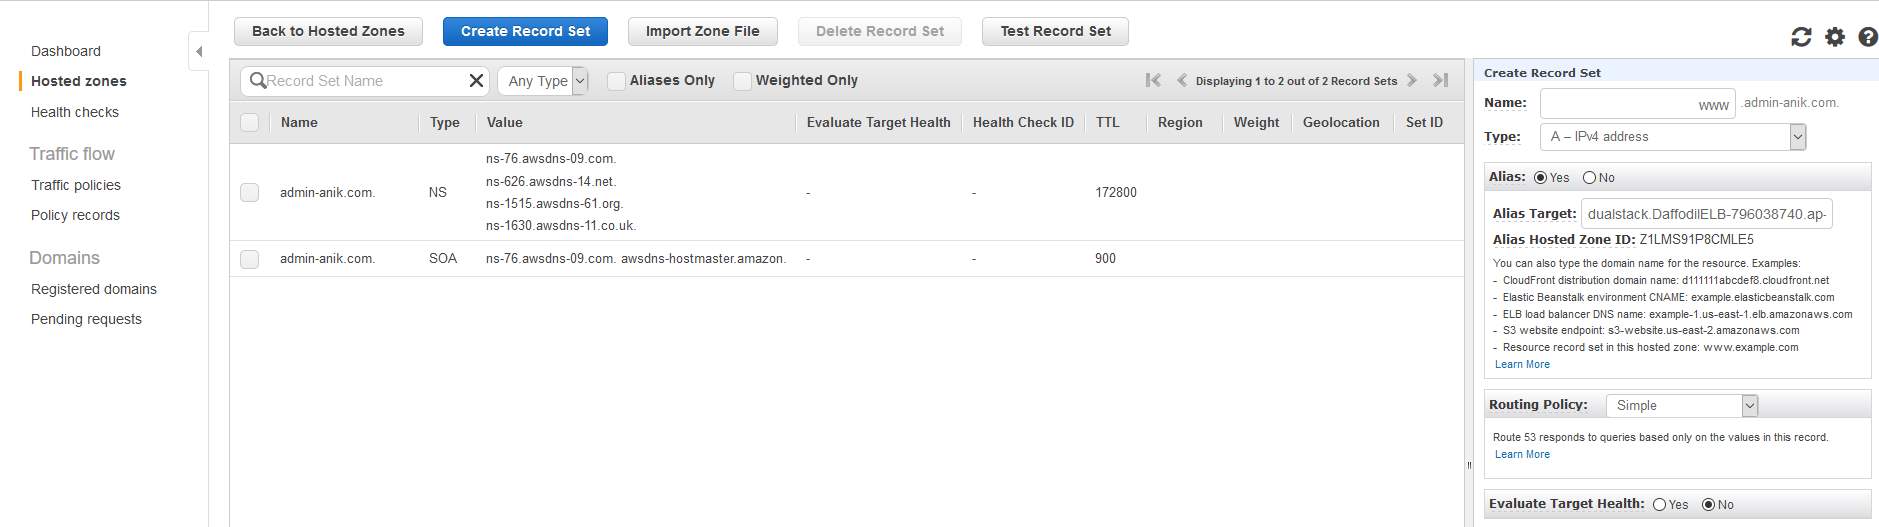
Figure 3.3.11: Set A record
Step 4: Now another A record needs to setup:
The first click on Create Record Set, then
Name:
Type: A – Ipv4 address,
Alias: Yes,
Alias Target: select DaffodilELB
Routing policy: simple
Evaluate Target Heath: no
Then click create. Check figure 3.3.11 bellow.

Figure 3.3.11: Route 53 DNS records
Step 5: Now we have to go to where we bought our Domain. I bought my Domain from Namecheap. Select Domain list then select Domain. Then go to Nameserver select Custom DNS. After that add 4 DNS record which was given by Amazon AWS. Mine was
ns-76.AWSdns-09.com.
ns-626.AWSdns-14.net.
ns-1515.AWSdns-61.org.
ns-1630.AWSdns-11.co.uk.
Figure 3.3.11 showing how to configure namecheap DNS below.
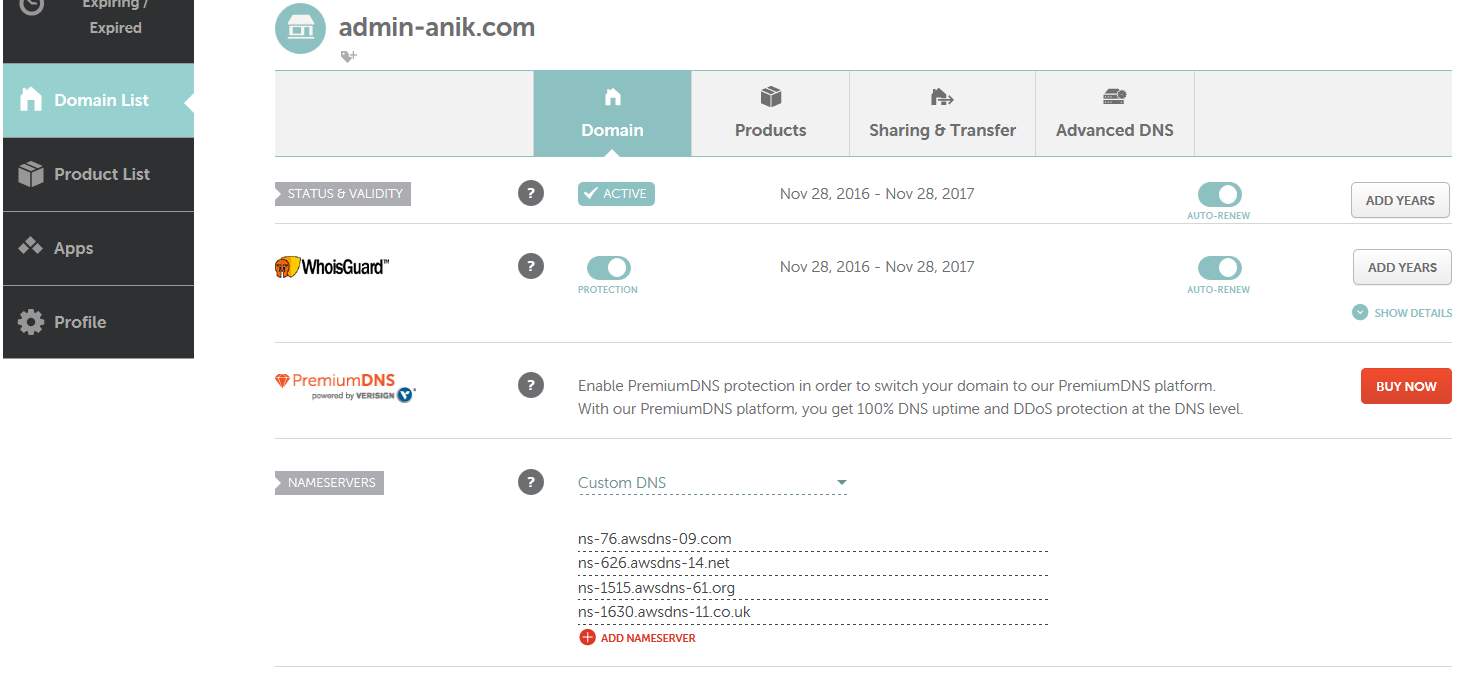
Figure 3.3.11: Namecheap DNS configure
After that click ok. It will take some time to change DNS server of our domain. SO be patient. Then type your domain name into the browser, Yes your site is live now. See figure 3.3.11 below.
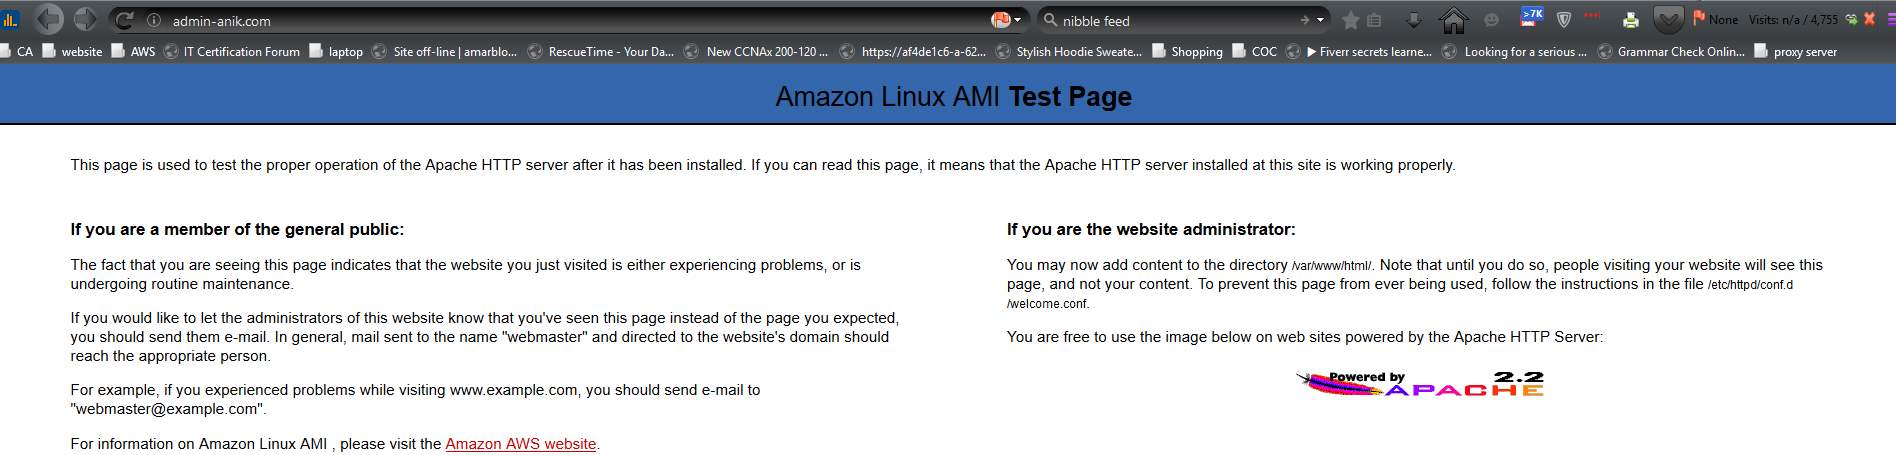
Figure 3.3.11: Site Live
3.3.12 Load Balancing
Load balancer is also known as reverse proxy server where load balancer handles incoming traffic and pass to the backend servers. Big websites such as google, yahoo, Amazon AWS handle hundreds of millions of concurrent requests, they use load balancer to balance their traffic smoothly without server crash [14].
I made a load balancer using Nginx. Because Nginx can handle more web traffic smoothly than others. I have one load balancer and tree backend server. When some hit my website, Nginx passes this traffic to the backend server using some method. And those methods are:
Round-Robin (the default) – Requests are distributed in order across the list of servers.
Least Connections – Each request is sent to the server with the lowest number of active connections, taking into consideration the weights assigned to the servers.
Least Time – Requests are sent to upstream servers with the fastest response times and fewest active connections.
IP Hash – A special case of the generic Hash method, hardwired to use the client IP address [14].
Using Nginx we can optimize our resource utilization, reduce latency and ensure fault tolerant configurations. Here I used Nginx as an HTTP load balancer to improve performance, scalability, and reliability for my website. I used a static web template to test my work. But you can do it with WordPress or Joomla etc [15].
Create Load balancer
At first, we have to make an EC2 machine. I showed in “3.3.2 Elastic Compute Cloud (EC2) “how to make EC2 machine. Now we have to log into our EC2 through the putty terminal. Then run the command I given bellow and configure Nginx to run our project.
- sudo apt-get update // update the list of newest versions of packages
- sudo apt-get upgrade -y // installs newer versions of the packages
- sudo apt-get install nginx // install nginx for web server
- cd /var/www // change directory to www
- sudo mkdir previewtechs // make new directory
- touch index.html // create new file
- sudo nano index.html // config html code
- cd /etc/nginx/site-enabled/ // change directory
- sudo nano default // open default file by nano
- root /var/www/previewtechs; // set the site folder path
- index index.html index.htm // set index file path
- server_name 52.220.138.229 // set server name
- sudo nano /etc/hosts // set host name
- 52.220.138.229
- sudo serivce nginx restart // restart nginx for new configuration
After this go to the browser and type IP address. Then our output will show in the browser.
Nginx configuration
Type into the terminal and create file with .conf extension
- cd /etc/nginx/conf.d/ // change directory
- sudo touch cache_load.conf // create new fiel
- sudo nano cache_load.conf // open file using nano
after that just write those commands:
- proxy_cache_path /Data/nginx/cache levels=1:2 keys_zone=my_cache:10m max_size=1$ // configure cache setting
- upstream myapp1 { // set upstream name
- server 52.74.63.67:80; // 1st backend server
- server 54.169.252.134:80; // 2nd backend server
- server 54.169.148.197:80; // 3rd backend server
- }
- server {
- listen 7060; // nginx listing port number
- location / {
- proxy_pass http://myapp1; // reverse proxy path
- proxy_cache my_cache; // cache pathe
- }
- }
1st website configuration
Now we have to log into our EC2 through the putty terminal. Then run the command I given bellow and configure Nginx for our 1st machine.
- sudo apt-get update // update the list of newest versions of packages
- sudo apt-get upgrade -y // installs newer versions of the packages
- sudo apt-get install nginx // install nginx for web server
- cd /var/www // change directory to www
- sudo mkdir previewtechs1 // make new directory
- touch index.html // create new file
- sudo nano index.html // config html code
- sudo nano index.html // config html code//
-
Previewthechs 1
- cd /etc/nginx/site-enabled/ // change directory
- sudo nano default // open default file using nano
- root /var/www/previewtechs1; // set the site folder path
- index index.html index.htm // set index file path
- server_name 52.74.63.67 // set server name
- sudo nano /etc/hosts // set host name
- 52.74.63.67
- sudo serivce nginx restart // restart nginx for new configuration
After this go to browser and type ip address. Then our output will show in the browser.
2nd website configuration
Now we have to logged into our EC2 through putty terminal. Then run command I given bellow and configure Nginx or our 2nd machine.
- sudo apt-get update // update the list of newest versions of packages
- sudo apt-get upgrade -y // installs newer versions of the packages
- sudo apt-get install nginx // install nginx for web server
- cd /var/www // change directory to www
- sudo mkdir previewtechs2 // make new directory
- touch index.html // create new file
- sudo nano index.html // config html code
- sudo nano index.html // config html code//
-
Previewthechs 2
- cd /etc/nginx/site-enabled/ // change directory
- sudo nano default // open default file using nano
- root /var/www/previewtechs2; // set the site folder path
- index index.html index.htm // set index file path
- server_name 54.169.252.134 // set server name
- sudo nano /etc/hosts // set host name
- 54.169.252.134
- sudo serivce nginx restart // restart nginx for new configuration
After this go to the browser and type IP address. Then our output will show in the browser.
3rd website configuration
Now we have to log into our EC2 through the putty terminal. Then run the command I given bellow and configure Nginx or our 3rd machine.
- sudo apt-get update // update the list of newest versions of packages
- sudo apt-get upgrade -y // installs newer versions of the packages
- sudo apt-get install nginx // install nginx for web server
- cd /var/www // change directory to www
- sudo mkdir previewtechs3 // make new directory
- touch index.html // create new file
- sudo nano index.html // config html code
- sudo nano index.html // config html code//
-
Previewthechs 3
- cd /etc/nginx/site-enabled/ // change directory
- sudo nano default // open default file using nano
- root /var/www/previewtechs3; // set the site folder path
- index index.html index.htm // set index file path
- server_name 54.169.148.197 // set server name
- sudo nano /etc/hosts // set host name
- 54.169.148.197
- sudo serivce nginx restart // restart nginx for new configuration
After this go to the browser and type IP address. Then our output will show in the browser.
How our Load balancer is working
Here I am going to 52.74.63.67:7060 this IP address and reload. I am seeing every new site when I reload this page. Nginx passing all traffic to our three backend server using some methods which I was implemented before. Figure 3.3.12 showing the working process of our Nginx load balancer working process.
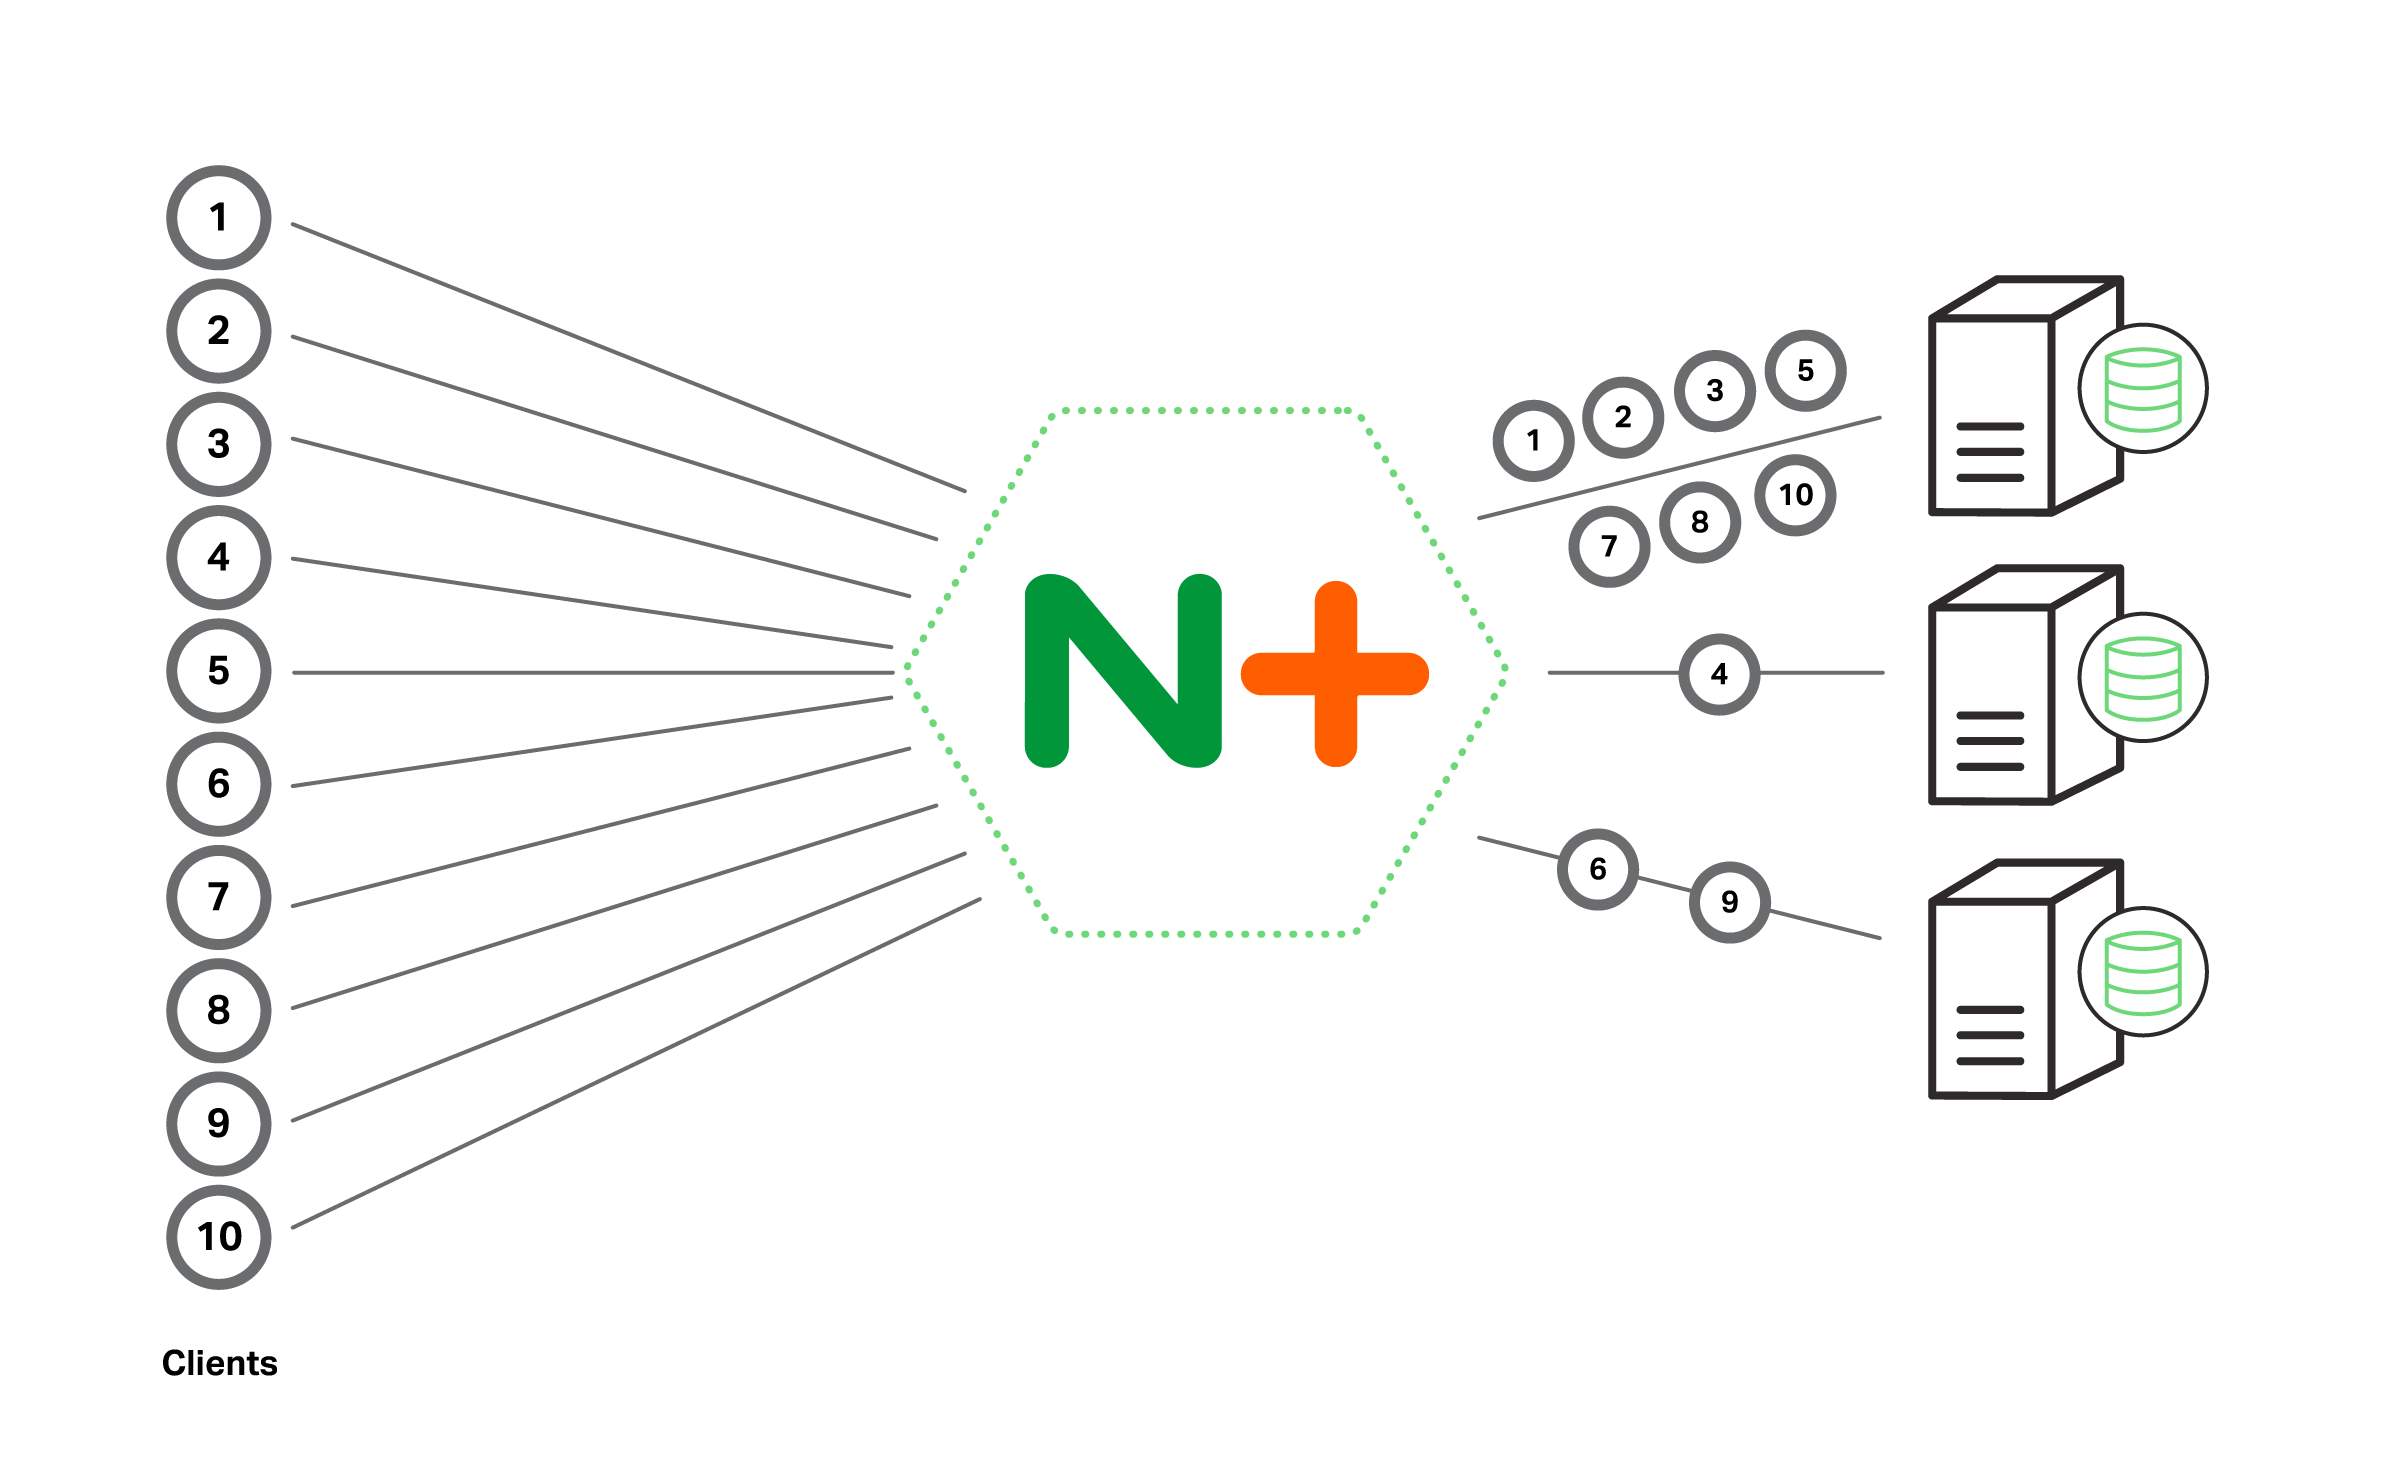
Figure 3.3.12: How Nginx Load Balancer working
When I go to the browser and past 52.74.63.67:7060 then our load balancer take me to the site 1 that we build earlier, shown at figure 3.3.12 below.
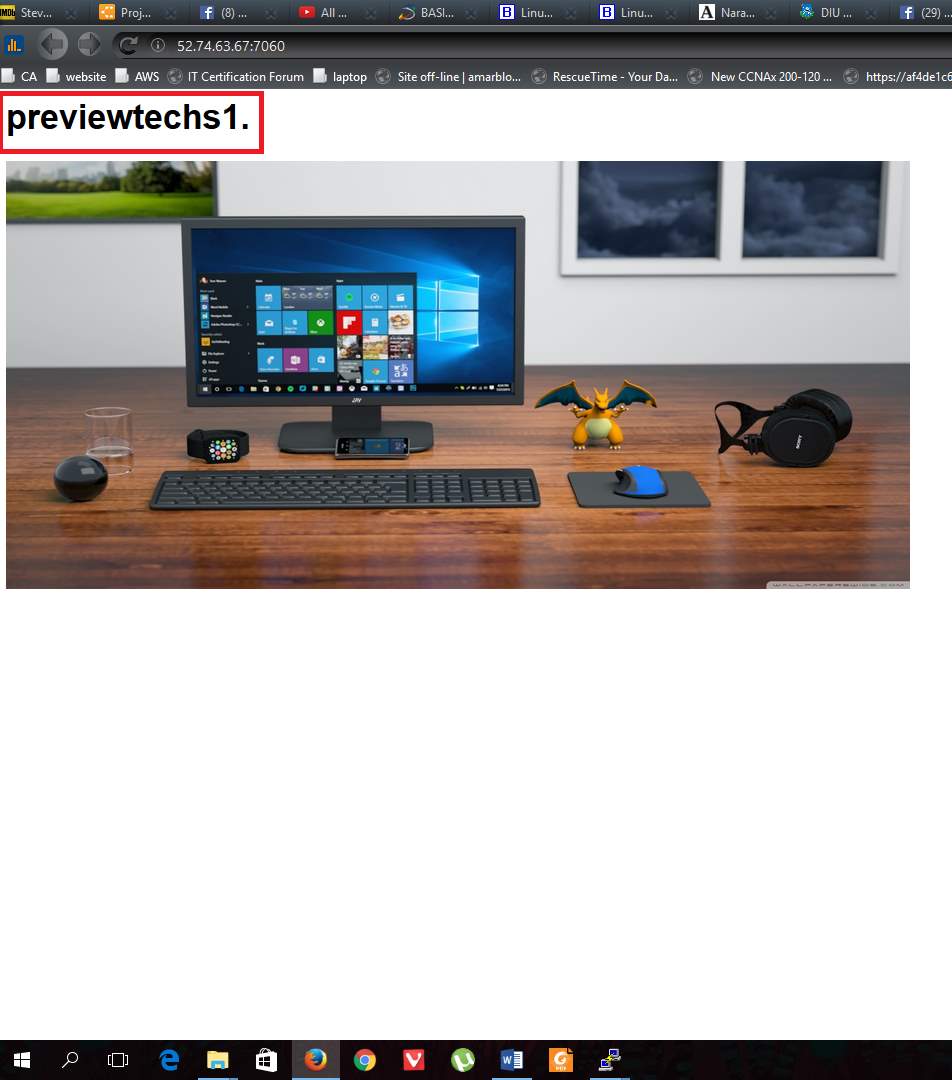
Figure 3.3.12: Site 1 output
After refreshing the page we see a new site “site 2” but we are in same IP address because load balancer passes the 2nd hit to the 2nd site, shown at figure 3.3.12 below.
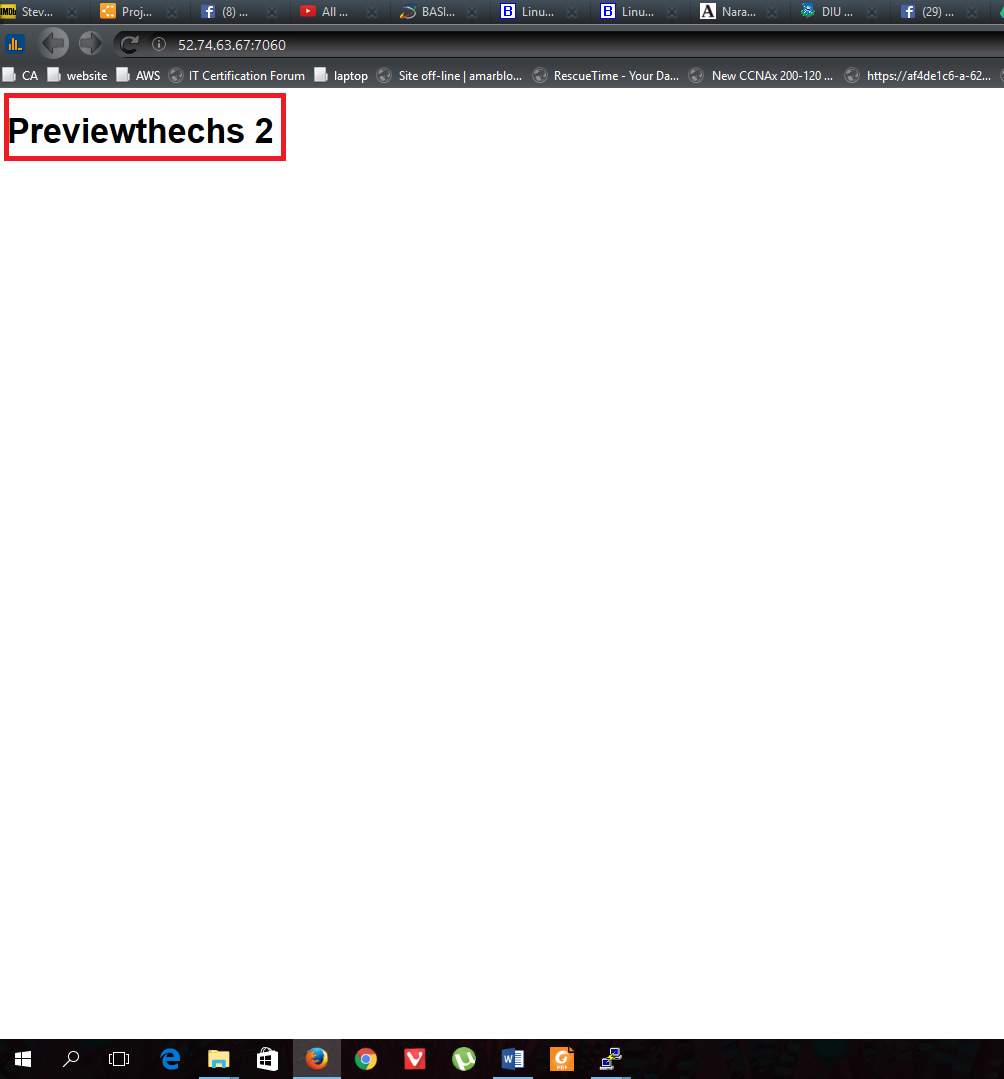
Figure 3.3.12: Site 2 output
Refresh again we see now site 3 is in front of us. Same thing load balancer doing over and over again.
3.4 Challenges
I faced many problems while working in cloud and making this report. I am using AWS free account, so there are many limitations to using their services. I can only use some basic services to develop a highly available, cost effective, fault tolerance scalable system. I also used the lucid chart to create UML Diagram and it is also a free account where is some limitation. I can create only 60 objects using a free account. I made my project angle of Service Providers because of my company only give those types of services. I made this system for the project only but it was not build based on any person or organization requested requirements.
CHAPTER 4: COMPETENCIES AND SMART PLAN
4.1 Competencies Earned
During this internship, I achieved many new skills which are very important for my future career.
- How to build a cloud architecture
- How analysis a cloud system
- Project management skill
- Server deployment and Maintenance
- System Automation.
- Security
4.2 Smart Plan
The growth of cloud computing continues at a phenomenal rate – and as a result, the employer demand for cloud professionals has exploded. In 2015, there were an estimated 18 million cloud computing jobs globally, according to WANTED Analytics, and it’s a number one hottest skillset in 2016.
So, it will be a good plan to build career as a Cloud Computing engineer. There are huge opportunities in our country. Some company recruiting Cloud Computing engineer. So, this is the 1st generation of cloud computing in Bangladesh. This is time to build a career as a Cloud Engineer.
Within 1 year I want to complete two AWS cloud certification course. And those are:
AWS Solutions Architect – Associate
AWS Certified Developer – Associate
4.3 Reflections
Where did you work? What was your position?
I worked at Preview Technologies Limited about 3.5 months as a junior cloud server engineer. I was responsible for Deploy and monitoring cloud servers/applications, Analysis the system and measure security threat and make report end of the day [14].
What tools did you use or learned to use?
I used putty as a terminal to access my cloud servers, puttyGen to use .pem and .ppk file. I used lucid chart for designing a cloud system. And MySQL Workbench to access cloud database through SSH [14].
What has DSP was done that has helped you obtain or better prepare yourself for your internship?
It really helped me to develop myself in terms of communicating effectively and concisely. I work in a fast-paced environment where constant communication with my team and other departments are crucial to project success [14].
What did you struggle with throughout your internship?
I struggled with learning Server configuration in ubuntu and built a system based on cloud services. It was very difficult for me to adapt with cloud within a short time [14].
What advice would you give to someone in your field?
In my field, you must be able to adapt to the ever-changing technologies. Because Every month’s new cloud services are coming. You have to be patient. Take your time and keep learning about cloud computing [14].
CHAPTER 5: CONCLUSION AND FUTURE CAREER
5.1 Discussion and Conclusion
Cloud computing is a newly developing paradigm of distributed computing. Virtualization in combination with utility computing model can make a difference in the IT industry and as well as in social perspective. Though cloud computing is still in its infancy but it’s clearly gaining momentum. Organizations like Google, Yahoo, Amazon are already providing cloud services. The products like Google App-Engine, Amazon EC2, Windows Azure are capturing the market with their ease of use, availability aspects, and utility computing model. Users don’t have to be worried about the hinges of distributed programming as they are taken care of by the cloud providers [15].
Finally, to guarantee the long-term success of Cloud Computing, the chapter tackles some significant challenges that face the Cloud paradigm. Challenges that need to be carefully addressed for future research like; user privacy, data security, data lock-in, availability, disaster recovery, performance, scalability, energy efficiency, and programmability [15].
5.2 Scope for Further Career
Cloud Computing is the most demandable IT sector now. Cloud Engineer has a bright future. According to the statistics provided by the Market Research Media, the worldwide market for Cloud Computing is likely to grow at a CAGR of 30% to reach US$ 270 billion by the year 2020. Considering the cutting-edge innovations and new industry-specific applications, Cloud Computing is fast emerging as an essential component of an enterprise’s IT framework [16].
Cloud computing is good for both big and small organization that’s why they have deployed the cloud technology in some suitable capacity. Enterprises need more IT professionals to work around ‘the cloud’. The Cloud Computing industry requires professionals with adept training and knowledge in both technical and managerial fields. The demand for IT professionals continues to rise at an exponential rate as more and more enterprises adopt Cloud Computing [16].
Here are some of the popular Cloud related job profiles:
- Cloud Software Engineer
- Cloud Project Manager
- Cloud Business Analyst
- Cloud Network Architect/Planner
- Cloud Product Manager
- Cloud Sales Executive
- Cloud Developer/Programmer
- Cloud Consultant
- Cloud Systems Engineer
- Cloud Systems Administrator
- Cloud Network Engineer
The demand for professionals with knowledge of Cloud Computing is expected to rise exponentially because more and more companies are implementing this technology.
References
[1] Dr. Birendra Goswami Usha Martin Academy, Ranchi,&Dr. S.N.Singh XISS, Ranchi Abstracts-Seminar on Cloud Computing 22.11.12
[2] Company overview > last accessed on 02-04-2017 at 1:00am.
[3] Preview thechnologies > last accessed on 02-04-2017 at 2:00am.
[4] Amazon Elastic Compute Cloud “Documentation” available at http://docs.aws.amazon.com/AWSEC2/latest/UserGuide/concepts.html >>
[5] Amazon Simple Storage Service “Documentation” available at http://docs.aws.amazon.com/AmazonS3/latest/gsg/GetStartedWithS3.html >> last accessed on 02-04-2017 at 2:30am.
[6] Amazon Virtual Private Cloud “Documentation” available at http://docs.aws.amazon.com/AmazonVPC/latest/GettingStartedGuide/getting-started-ipv4.html >> last accessed on 02-04-2017 at 2:45am.
[7] Amazon Relational Database Service “Documentation” http://docs.aws.amazon.com/AmazonRDS/latest/UserGuide/Welcome.html >> last accessed on 02-04-2017 at 3:55am.
[8] Amazon Simple Notification Service “Documentation” http://docs.aws.amazon.com/sns/latest/dg/welcome.html >> last accessed on 02-04-2017 at 10:00am.
[9] Amazon CloudWatch“Documentation” available at http://docs.aws.amazon.com/AmazonCloudWatch/latest/monitoring/WhatIsCloudWatch.html >> last accessed on 02-04-2017 at 10:15am.
[10] Elastic Load Balancing “Documentation” available at http://docs.aws.amazon.com/elasticloadbalancing/latest/userguide/what-is-load-balancing.html >> last accessed on 02-04-2017 at 10:25am.
[11] Auto Scaling “Documentation” available at http://docs.aws.amazon.com/autoscaling/latest/userguide/WhatIsAutoScaling.html >> last accessed on 02-04-2017 at 10:40am.
[12] Using nginx as HTTP load balancer, documentation, available at http://nginx.org/en/docs/http/load_balancing.html >> last accessed on 02-04-2017 at 12:00pm.
[13] Nginx Load Balancing HTTP Load Balancer, documentation, available at https://www.nginx.com/resources/admin-guide/load-balancer >> last accessed on 02-04-2017 at 12:45pm.
[14] Internship Reflection available at http://www.dspsjsu.org/internship-reflection >> last accessed on 02-04-2017 at 3:00pm.
[15] Abhirup Ghosh, Cloud Computing, Seminar Report , 11,5, 2015
[16] Cloud Computing and its Scope in Future available at http://www.inurture.co.in/cloud-computing-and-its-scope-in-future >> last accessed on 02-04-2017 at 4:00pm.
Cite This Work
To export a reference to this article please select a referencing stye below:
Related Services
View all


Related Content
All TagsContent relating to: "Computing"
Computing is a term that describes the use of computers to process information. Key aspects of Computing are hardware, software, and processing through algorithms.
Related Articles

DMCA / Removal Request
If you are the original writer of this dissertation and no longer wish to have your work published on the UKDiss.com website then please: