Security Measures for Software and Hardware Implementation
Info: 11571 words (46 pages) Dissertation
Published: 23rd Feb 2022
Contents
Overview
Summary of Task
Active Directory, DNS and Print Server
ACTIVE DIRECTORY
PRINT SERVER
EXHANGE SERVER
BARRACUDA EMAIL SPAM FILTER
MICROSOFT OUTLOOK
VPN SITE-TO-SITE
RADIUS SERVER AAA
TACACS + SERVER AAA
VULNERABILITY ASSESSMENT
NVD – NATIONAL VULNERABILITY DATABASE
CISCO IOS INTRUSION PREVENTION SYSTEM CONFIGURATION (IPS)
CISCO CONTEXT BASED ACCESS FIREWALL
CISCO ZONE BASED FIREWALL
FORTINET UNIFIED THREAT MANAGEMENT
CYBERROAM UNIFIED THREAT MANAGEMENT
RECOMMENDATION
Works Cited
Overview
This document describes the security measures for software and hardware implementation in which there will be a detailed configuration, installation and testing. Hardware such as the servers, software printer and firewall will be discussed. On the other hand, for some security methods, a brief explanation to describe the process and operation of procedures of security in the company.
Summary of Task
This assessment consists of installation configuration particularly servers and software firewall in which this will provide a better understanding for the process of the technologies. To be more specific, for hardware, Windows Servers, print services and authentication will be mentioned including the solutions for every user if it will be applicable or not. In addition, firewall, which will be technology relates to remote the Windows domain. For the default security in relate to the security, vulnerabilities will also mention to show the capabilities of securing the web at the same time Windows domain using remote access.
Active Directory, DNS and Print Server
ACTIVE DIRECTORY
Active Directory is like a container consists of large environments which has multiple domains having the information, systems, configurations, users, shares. In addition, it is designed by Microsoft for effective domain function for redundant and load balancing of stored data. (Microsoft Press, 1999) Before implementing active directory, it requires system components which needs to meet to support the hardware and software functionality which includes (Microsoft Corporation, 2015):
- Processor:
- Minimum: 1.4 GHz 64-bit processor
- RAM
- Minimum: 512 MB
- Disk Requirements
- Minimum: 32 GB
Active Directory Setup:
1. Install the Windows Server 2012 R2 and configure the IP Address for your network

Sample IP Address for Ethernet Properties
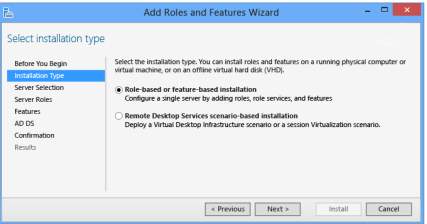
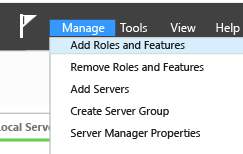
2. Once you input an IP Address to your server, locate for the server manager and select add roles and features and you need to select role-based or remote desktop for the installation type. Note: Always leave the selection for role-based or featured-based installation

Server Manager Dashboard
Add roles and Features
Installation Type
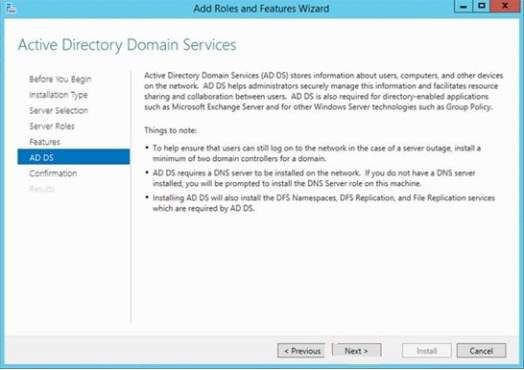
3. Select your desired server which been added to the pool and you need to promote the Active Directory Domain Services
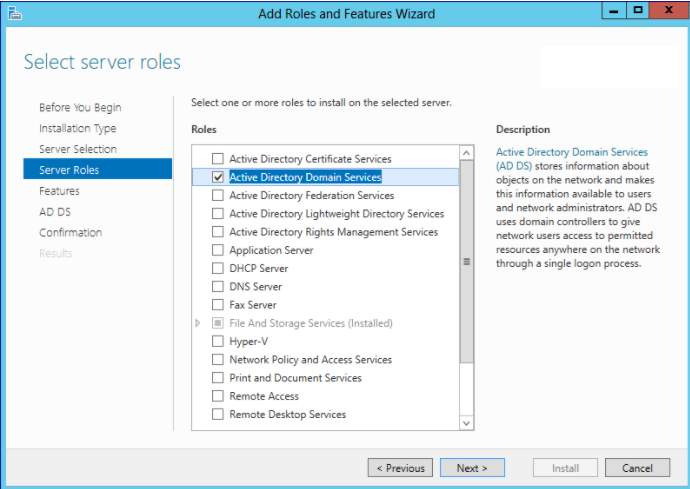
Selection of Server Role – AD DS (Active Directory Domain Services)
4. Click Next, then you need to add features
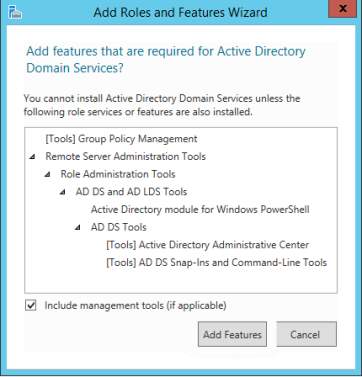
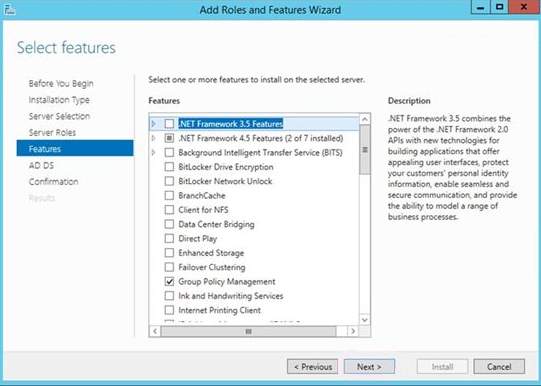
5. Click Next for the desired features for the server
Additional Features
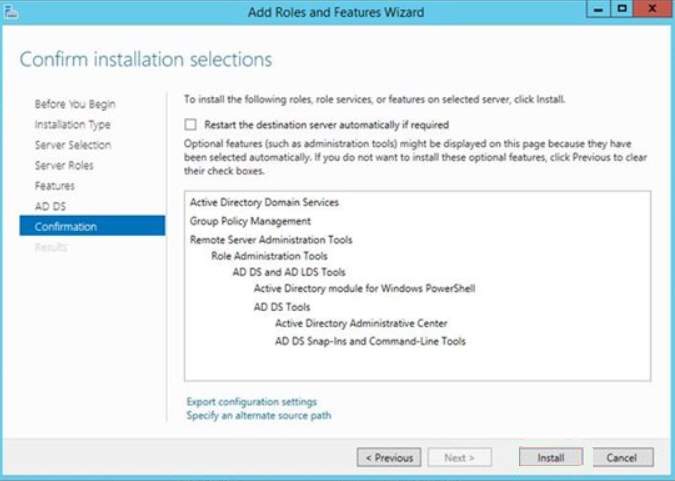
6. For the AD DS section summary and click Next.
7. For the confirmation, this will display the summary action done prior to the installation
8. The result of the adding the feature will display and you can click close to proceed

9. After adding a domain controller, add new forest and then input the root domain name
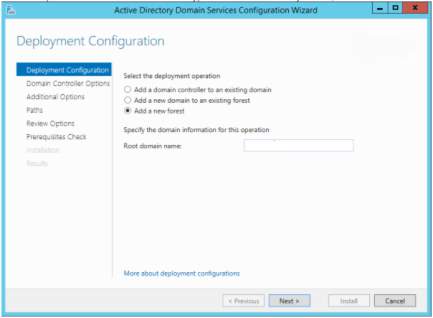
Deployment Configuration – Add new forest
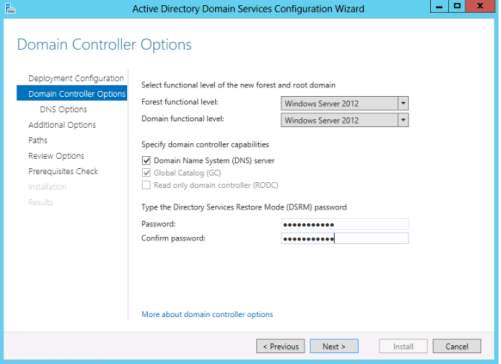
10. After adding new forest, domain controller option will display you need to select your desired forest and domain functional level for your domain controller and input some password for the Directory Services Restore Mode (DSRM)
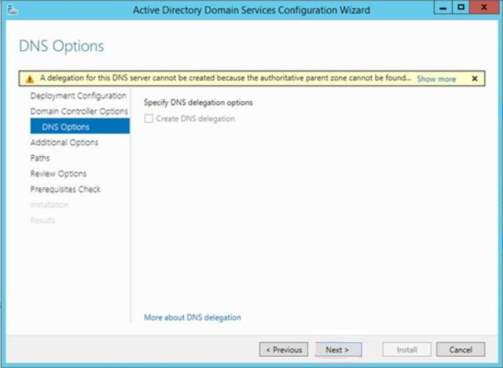
11. The DNS Option will display which allows you to configure DNS delegation and DNS administrative credentials. Click Next.
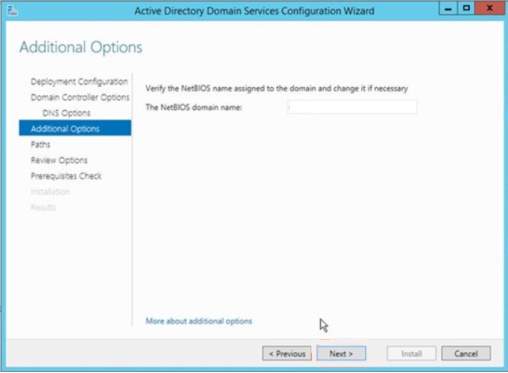
12. Additional option will appear to show the NetBIOS domain name and lets you configure the domain name which matches to the domain name provided in Deployment Configuration. Click Next
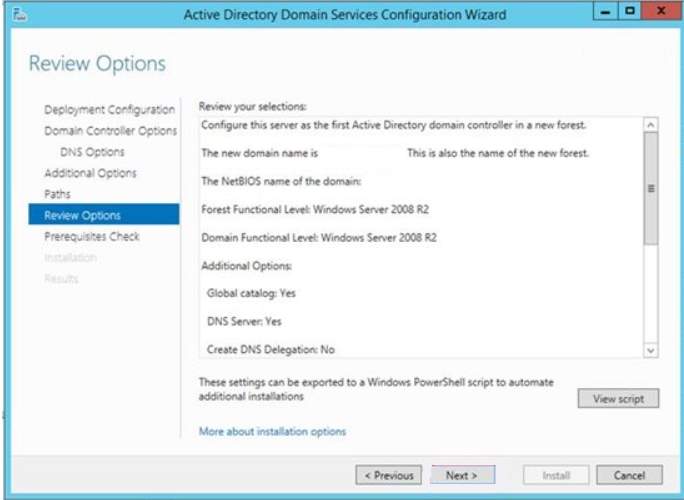
13. Click Next, the paths will let you select your desired location for the Active Directory database. Click Next
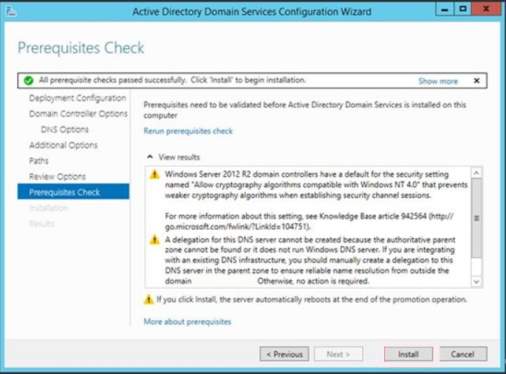
14. The Prerequisite Check will show to display all the result that will install to the Active Directory Domain Services
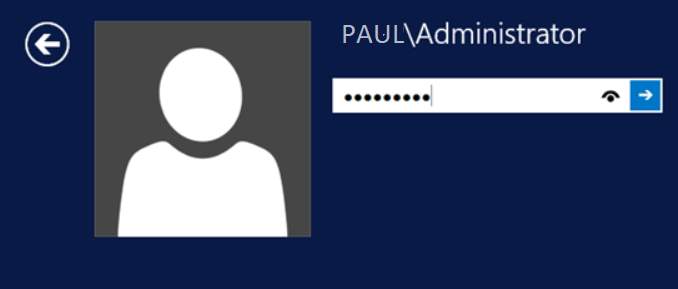
15. Once the installation is done, you can verify your credentials.
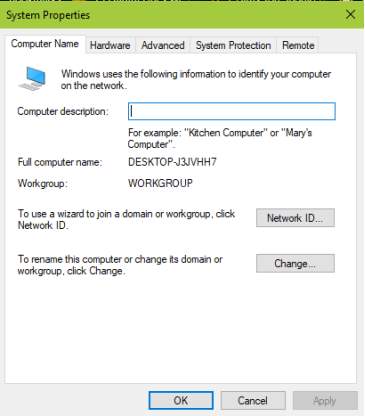
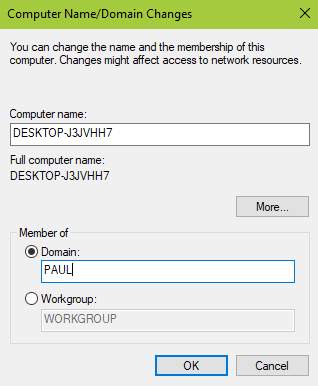
16. Change your desired domain name in your workstation. Click Change and input your domain name installed in the Active Directory Domain Services.
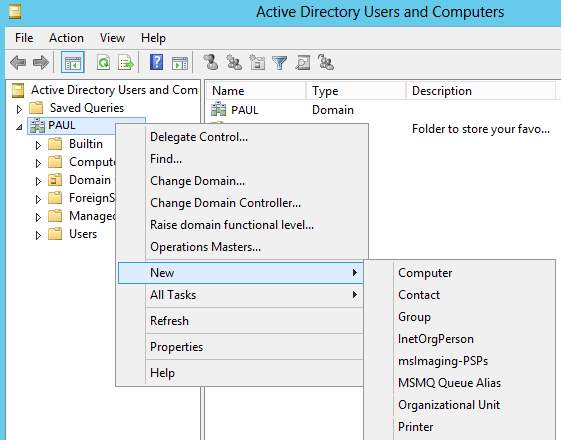
17. Creating an organizational unit for the Active Directory to handle users and other resources. Go to Active Directory Users and Computers and right click the users and computers. Choose New > Organizational Unit> Input the Name for the New Organizational Unit.
Organizational Unit Section
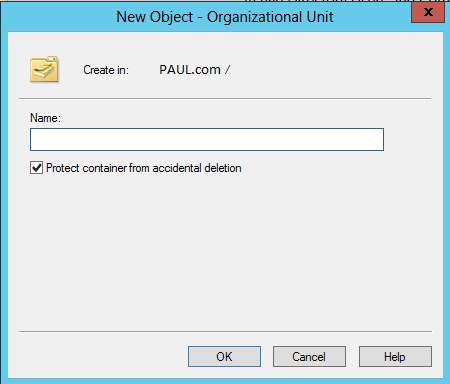
New Organizational Unit
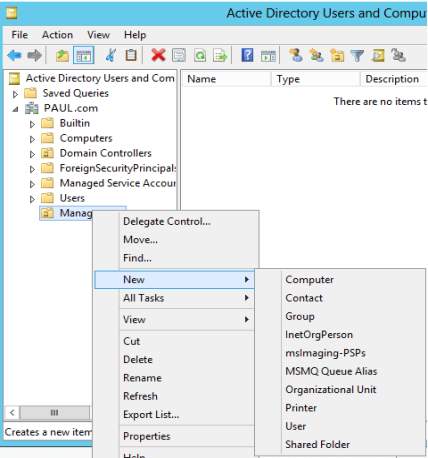
18. In the Organizational Unit, right-click then select the Users to create user logon name in the network. So the login is palejo@PAUL.com or PAULPAlejo.
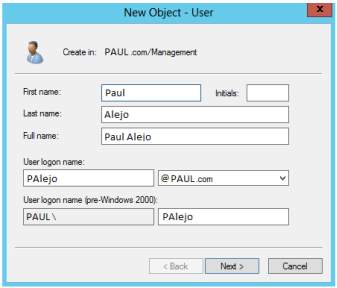
User for the Organizational Unit
New Object for User Organizational Unit
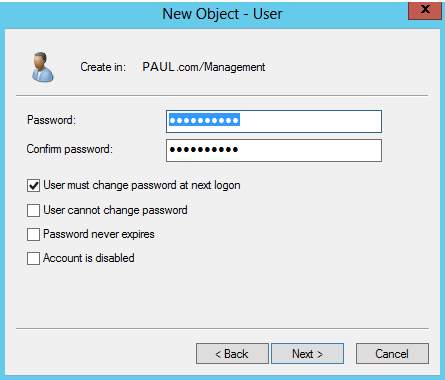
19. Enter your desired password for the user in the Organizational Unit and click Next. You can select in the four check box for the methods of the passwords.
Password for the New User in Organizational Unit
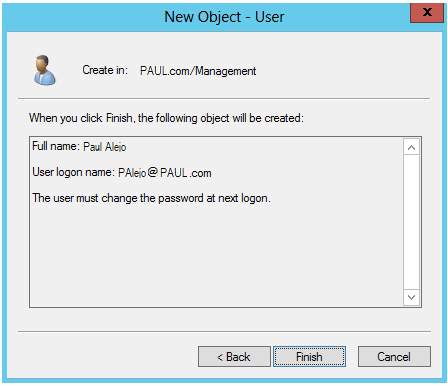
20. Confirmation that the user has been created from the Organizational Unit
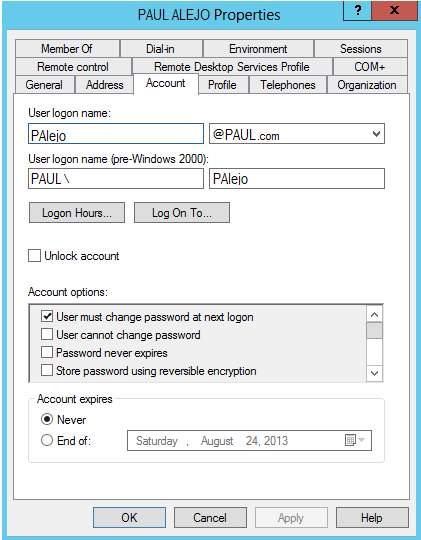
21. You can see the detailed information of the user by clicking the user then right click and properties.
PRINT SERVER
- Download an application software for the printer in any vendors that will serve an efficient management for printing and imaging services.
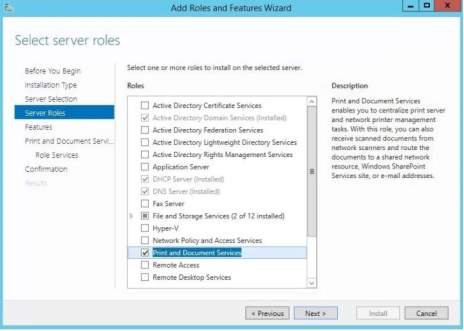
- As you download and install an application software for the printer, you need to add install and configure printing server for your Windows Server. Go to Server Manager and Click the Add roles and features, the same process adding Active Directory Domain Services. Click Next, then Installation Type will appear and you need to choose the default ‘Role based or feature-based installation. Next > Select a Server > Next and Server Roles will show and as you click next, a confirmation will appear if you want to add the feature and click “Add Features”.
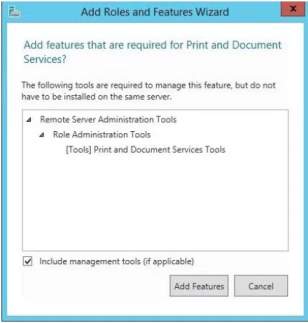
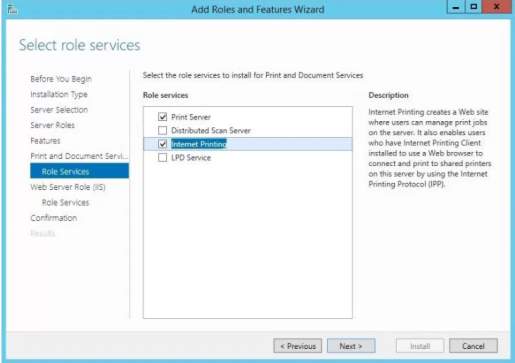
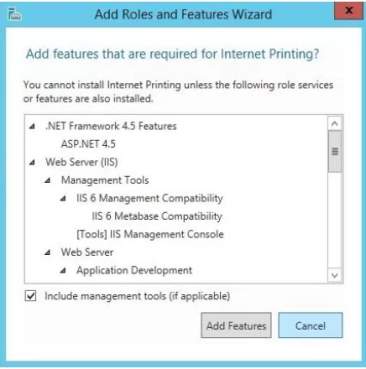
You need to add role services for the Print and Document Services to manage printing jobs in the server. You may choose from the four role services to manage client printing jobs. Click Next and a confirmation will appear to verify the addition for the Internet Printing and click Add Features.

There will be a confirmation displayed as you click Next and you will click Install. After the installation, the installation result will appear and verify all the process for adding the printer to Windows Server.
Add the printer in the print management and then right click the printer to then click Add printer.
You can choose the desired port that the printer requires for the network
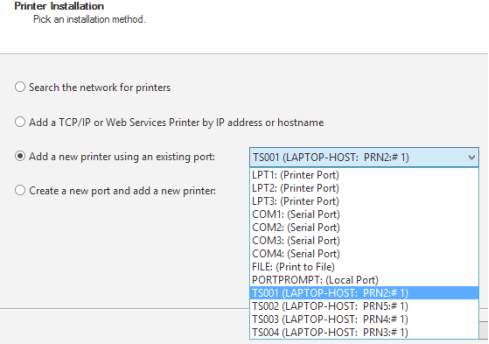
Once you are done selecting the port of the printer, you can install the driver to introduce the printer to the system and the network click Next.
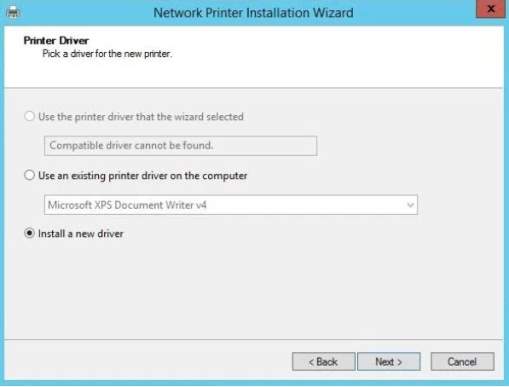
You can choose from the printer list or if you have CD, just click Have disk to install the program using CD.

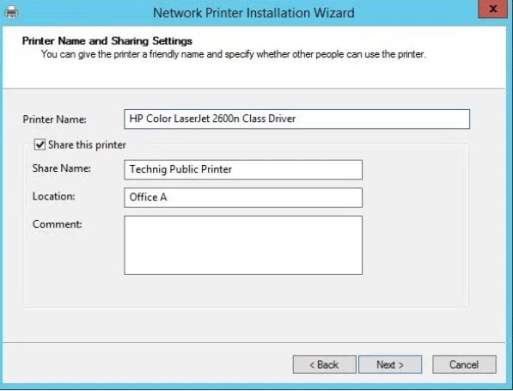
I select the HP Color Laser Jet in my network and input share name and the location

A completion installation wizard will display as you click next the status is shown to know all the installed driver and printer.
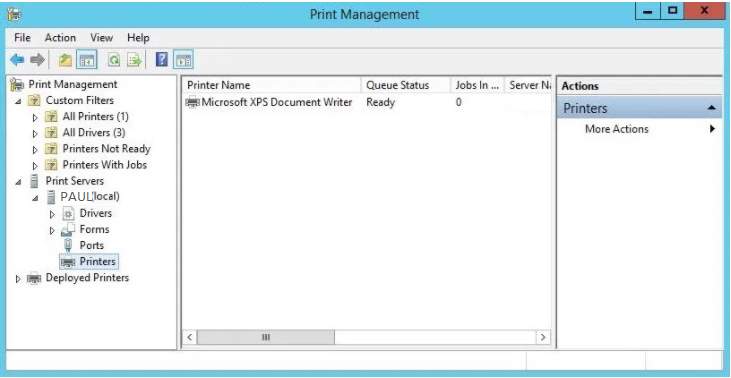
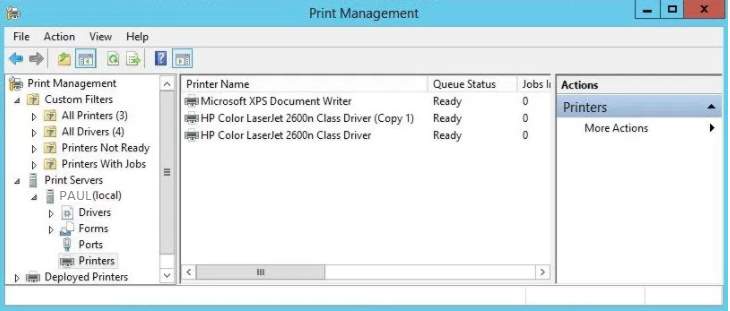
As you check the printer management the installed printer will display
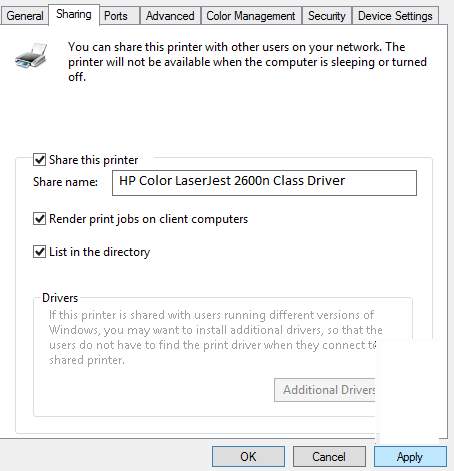
You can click the printer to manage the sharing for clients to use the printer. Hit the Share this printer and input the name of the shared printer. And click Apply and OK.
EXHANGE SERVER
Exchange Server is a collaboration program consists of emails, calendar, contacts and tasks and data storage which deployed in Microsoft Windows Server in an enterprise environment. There are components which is related to the Exchange Server such as the Microsoft Outlook, or any form of messaging platform which supports communication and storage. There are following requirements which the hardware and software should meet before deploying the server which includes the following by (Microsoft Corporation, 2017):
- Processor: x64-bit architecture-based, AMD64
- Memory: Mailbox 8GB minimum
- File size: 32GB
- Disk Space: 30GB
Steps to Install the Exchange Server:
1. Install first the Windows Server for the exchange server and locate the file using the command prompt and under the path of the installer, you must input these following commands to run the installer:
setup /prepareschema
setup /prepareAD /OrganizationName:Avonmore
setup /PrepareAllDomains
2. Once you input those commands, for the PowerShell you need the following commands:
Import-Module ServerManager
Add-WindowsFeature, NET-Framework,RSAT-ADDS,Web-Server,Web-Basic-Auth,Web-WindowsAuth,Web-Metabase,Web-Net-Ext,Web-Lgcy-Mgmt-Console,WAS-Process-Model,RSAT-Web
Server, Web-ISAPI-Ext, Web-Digest-Auth,Web-Dyn-Compression,NET-HTTP-Activation,Web-AspNet,Web-Client-Auth,Web-Dir-Browsing,Web-Http-Errors,Web-Http-Logging,Web-Http-Redirect,WebHttp-Tracing,Web-ISAPI-Filter,Web-Request-Monitor,Web-Static-Content,Web-WMI,RPC-Over-HTTPProxy –Restart
Set-Service NetTcpPortSharing –StartupType Automatic
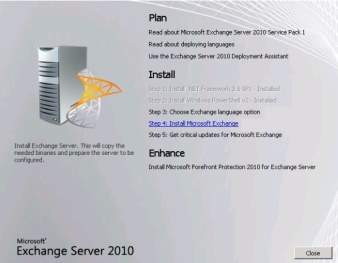
3. Now we input all the following commands as the prerequisite of Exchange Server this, it is prepared to install the exchange server but first choose your preferred language.
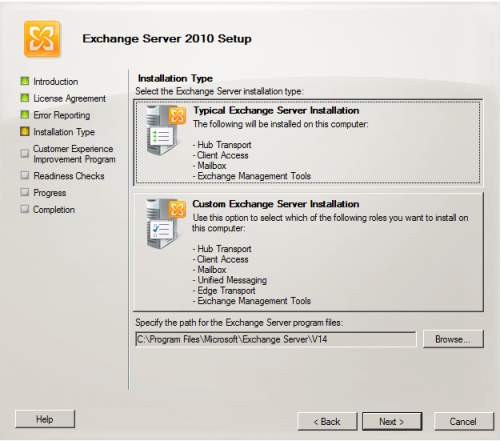
4. The introduction will display and as the process go on, after accepting the license agreement and configuring the Error Reporting, the Installation type will appear which you choose between typical or custom. There will be a path which will be the destination of the Exchange Server. Click Next.
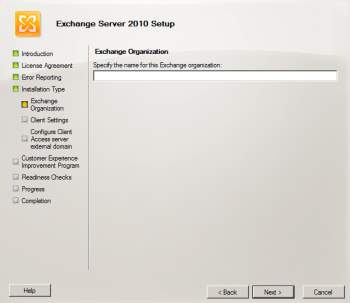
5. Exchange Organization will show in which it needs to input the desired name for the server and client settings will display to ask if the client computers are running Outlook. At the same time, you need to configure the client access server external domain for the client server role in the Internet use.
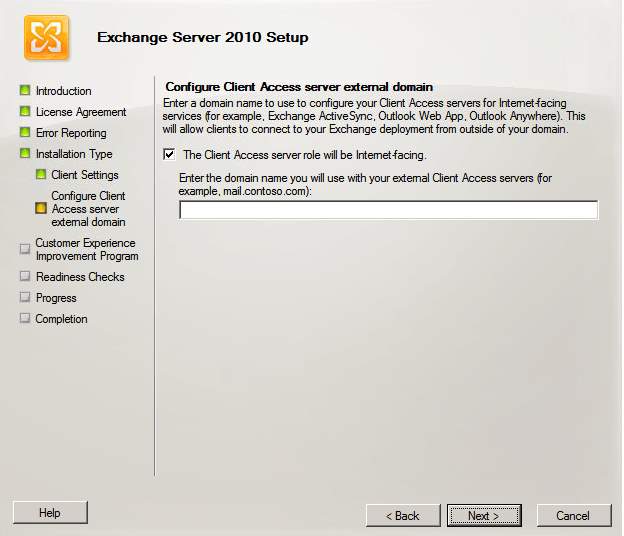
Configure Client Access Server External Domain
6. As for the Customer Experience Improvement Program, you choose the I don’t wish to join the program this time. Click next and Readiness Check will verify the Exchange Server for installation. The summary, succeeded, and failed process will show as the installation go through.
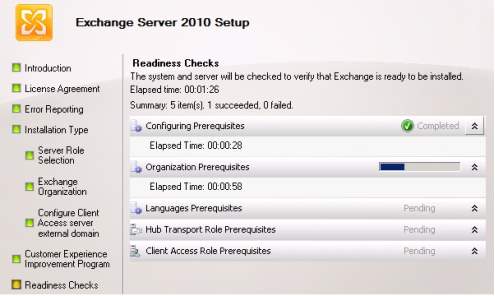

Summary, succeeded and failed checks
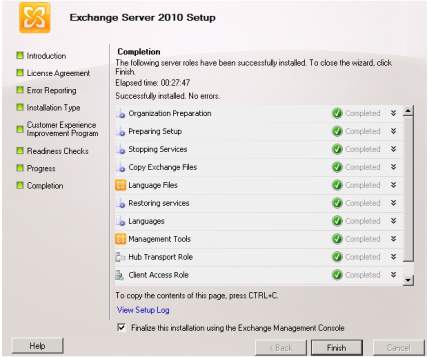
7. Click Install and the completion of the process will display and you need to reboot to take effect the installation of the server. Click Finish.
8. After the installation is installed, you need to configure the Mailbox Roles for users using hub transport, client access or mailbox needs to include for transporting mails and this can be done in Exchange Management Console. Once you opened the Exchange Management Console, you can choose Organizational Configuration to create new Mailbox Database to define the desired location of the emails.
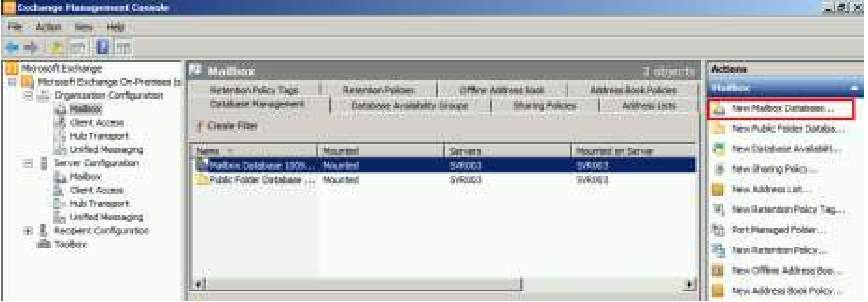
Exchange Management Console choosing Organization Configuration
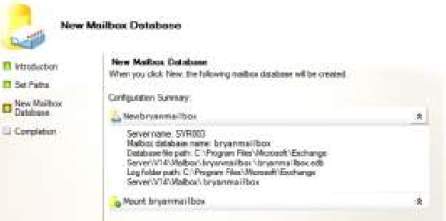
Created Mailbox Database
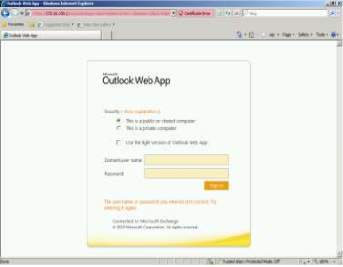
You can test your exchange server using the Web by inputting the address on the address bar. Note: the IP Address in the address bar must be the same configured in the Exchange Management Console.
BARRACUDA EMAIL SPAM FILTER
Barracuda is network security technology which identify the incoming and outgoing mail whether if it is malicious that may affect the operation of communication of Internet and the clients. It is a spam detector, which a spam is known as a junk mail that contains inappropriate content, and it evaluates and filters any file having the embedded hidden information that may pass through the network of the business which. Here is the sample illustration of barracuda spam filter by (Barracuda, n.d.):
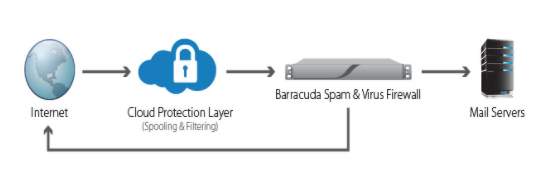
Spam Protection (Barracuda, n.d.)
Setup Installation of Barracuda Spam Filter Protection to the Exchange Server
1. You must configure first the Barracuda Message Archiver to enable SMTP forwarding to allow IP Address from Exchange Server. Go to MAIL SOURCES > SMTP and in the Trusted SMTP Servers portion, input the IP Address of the exchange server.
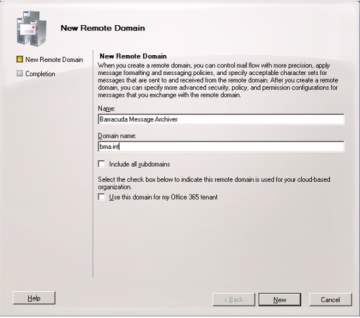
2. To create remote domain, this must support the Mail Contact used by the Exchange Server to route in the SMTP traffic. Open the Exchange Management Console > Organizational Configuration > Hub Transport > select the remote domain. In the action portion, click New Remote Domain and input your desired Name for the domain.
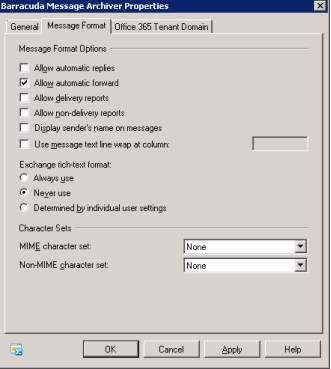
3. For verification, you can see the properties of the Barracuda Message Archiver and ensure the journal messages will store in the domain.
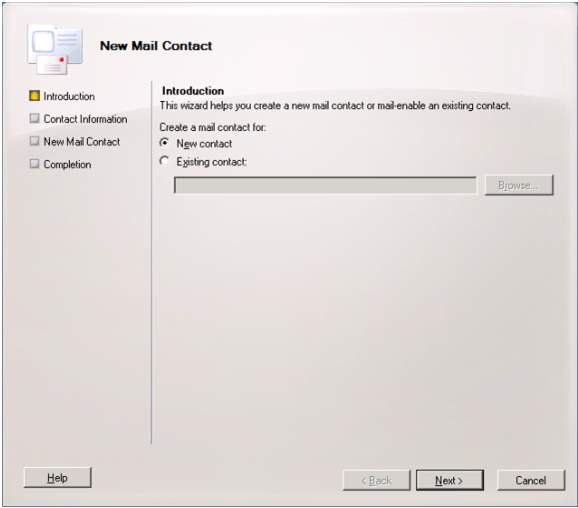
4. After creating remote domain to control all the messaging policies, you must create a new Mail Contact which designated for the user’s information. Select new and click next.
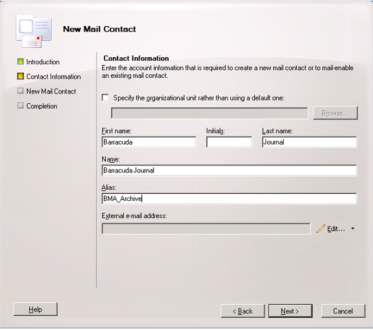
5. Input all the details of the recipient including the first name, last name and email for the SMTP address which it should be paired in the domain name. Click Next as you finish the process and the created mail contact will display and click finish.
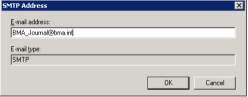
SMTP Address
Details of New Mail Contact
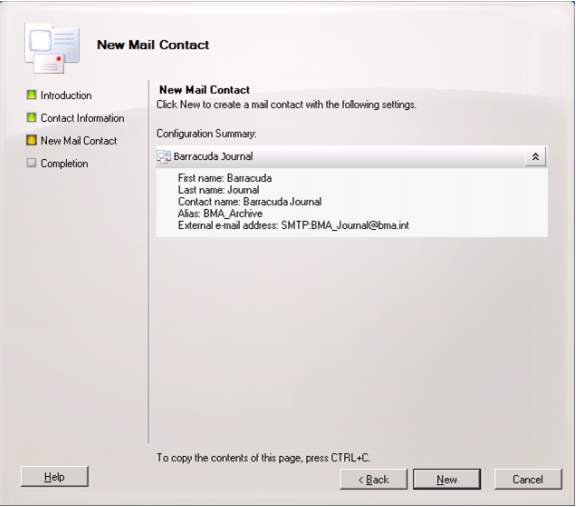
Created Mail Contact
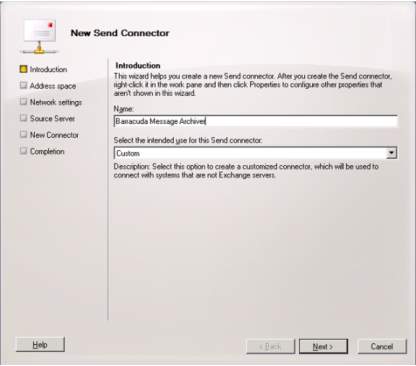
6. After creating a mail contact, create a connector to relate the exchange server to barracuda spam filter. Open the Exchange Management Console and go to Hub Transport then select Send Connector. Find the New Send Connector and input your desired name for the connector.
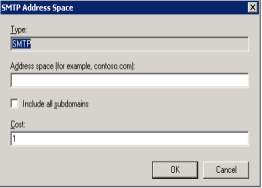
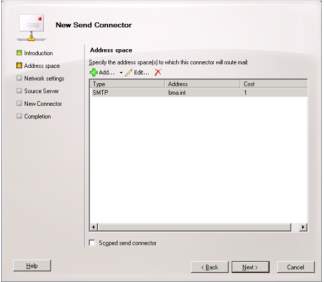
7. For the address space section, you can select Custom and click next. In the Address space field, you need to input the domain name and then click Add. You can edit the created address space if there will be update and changes in the connector. For the network settings, you must select the route mail through the following smart hosts and click next.
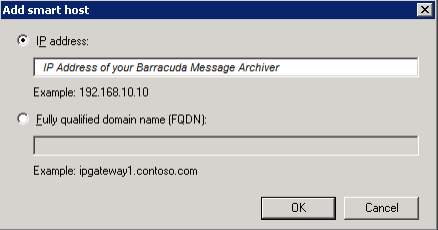
8. You can enter your IP Address of your Archiver in the smart host to connect the remote domain and the remote connector. In the connector properties you need to clear the Maximum message size and click apply and OK.
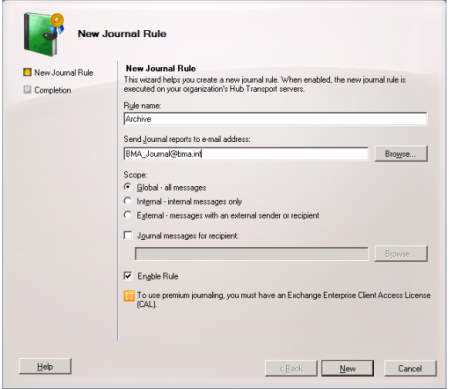
9. After creating a connector, the journaling rule must be applied to store configuration, changes made by the Contact mail. Click the enable rule and hit Finish. Note: the journal must support the Microsoft Exchange Server to complete the journaling rule.
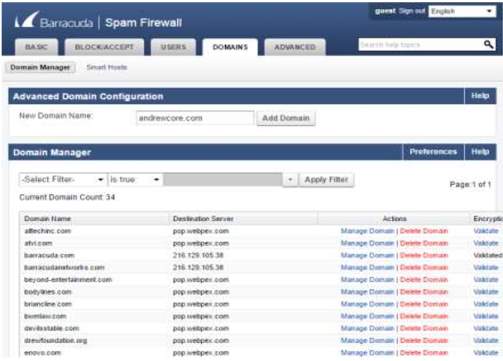
10. In the barracuda firewall, you can allow or deny domain using web application to manage all the domain communicating the server.
Domain Manager – Allow or Deny Domain
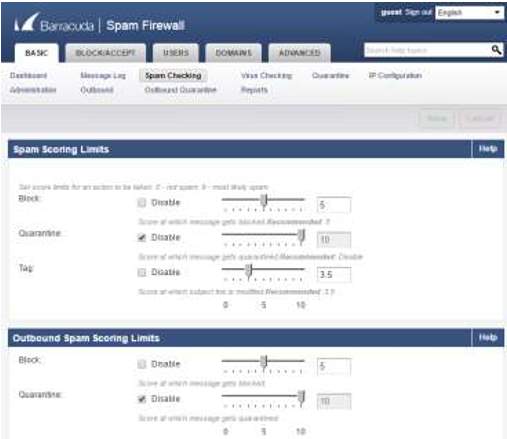
11. There will be a spam scoring limit that will monitor all the incoming spam at the same time the outgoing span scoring limits
12. In the web application you can also see the IP addresses which the administrator will grant an access or not to allow connection to the network server.
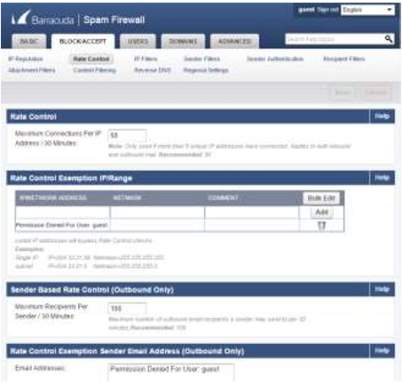
Rate Control for IP Range

13. There is a section that will filter all the mails including domain which you can manage whether it will be tagged, quarantine or block.
MICROSOFT OUTLOOK
Microsoft Outlook is a management software which developed by Microsoft for sending and receiving emails. This is a program provides storage, organization of users and files, security, and any other form of information management. In addition, it uses POP3 and Web email service for desktop or domain accounts. On the other hand, this can be used as a SharePoint, standalone software or exchange server that has calendar, management of events, contact information used by businesses worldwide. (Technopedia, n.d.)
Steps to manage the Microsoft Outlook
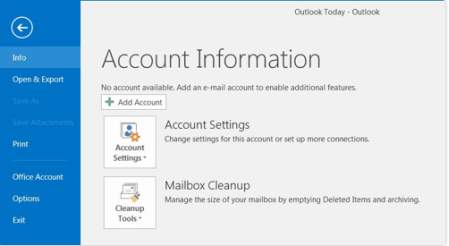
1. In the Microsoft Outlook, locate the file tab and select the Add Account and this will create accounts preferred by the user to connect to the Exchange Server.
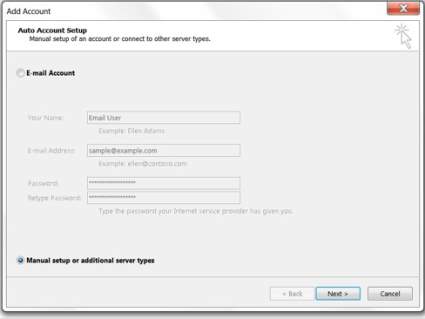
2. You can choose from manual setting up of email or automatic email account. Click Next.
3. Choose your desired email account type but this will depend on the company requirements. In this example, POP or IMAP was chosen. Click Next.
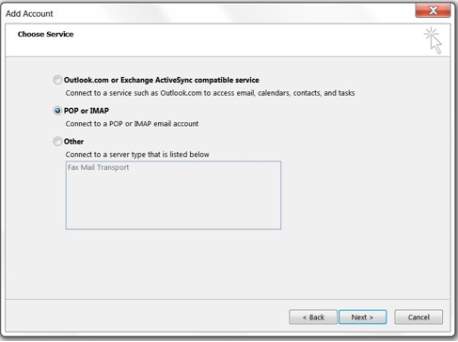
POP or IMAP email account type
4. In the account settings, the created email will appear and you can modify the settings configured in the Outlook however please be aware for changing the email account’s connection type because if it will be deleted, this will never be retrieved.
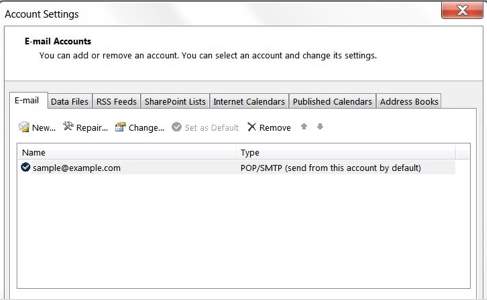
Email Accounts Configured in Microsoft Outlook
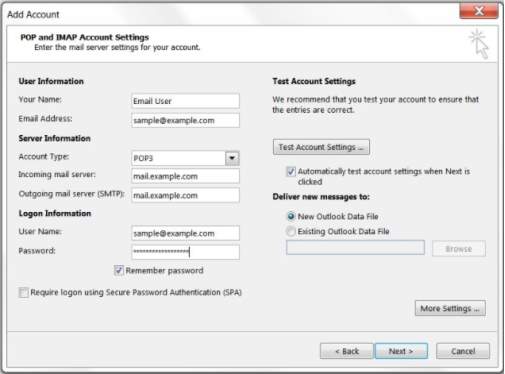
5. For Adding an account to the Microsoft Outlook, you need to fill up some information to set the details for the server. You must enter your name, email, account type, username and password. Click Next.
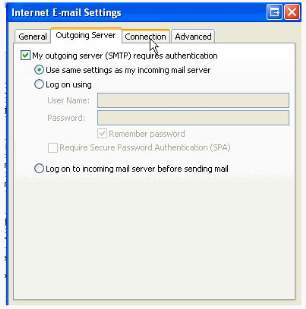
6. To configure for the outgoing server, this will require for authentication using the created user for POP and IMAP Account Settings. The “My outgoing server (SMTP) as my incoming mail server must be checked and choose either the same settings as the incoming mail server or other credential.
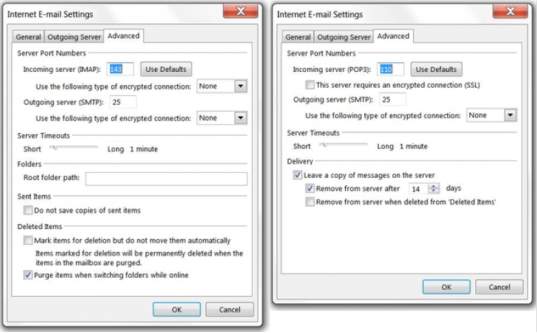
7. You can configure the ports and encryption in the Internet E-mail settings particularly in the Advanced Settings either POP or IMAP with the corresponding ports. For IMAP use port 143, in POP3 use port 110.
POP or IMAP Advanced Settings for Port and Encryption
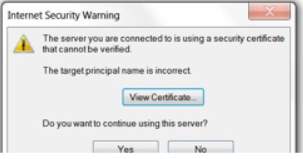
8. For testing the configure user email in the Microsoft Exchange, click Next to establish connection between the server and test configuration and there will be an Internet Security Warning asking for certificate installed in the mail server. There is an option for viewing the certificate if the certificate is invalid however, if the certificate is valid you can proceed to use the server. Then if the test is successful, your email is good to use.
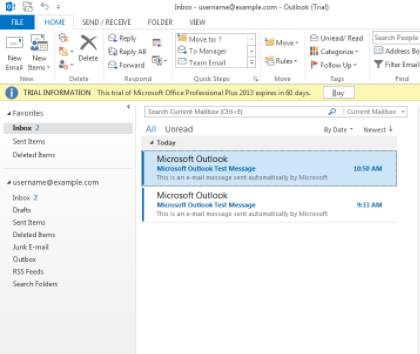
9. Testing the email in the Microsoft Outlook, this will display in the dashboard on the left side
10. Microsoft Outlook testing via Web application (Yahoo mail website)
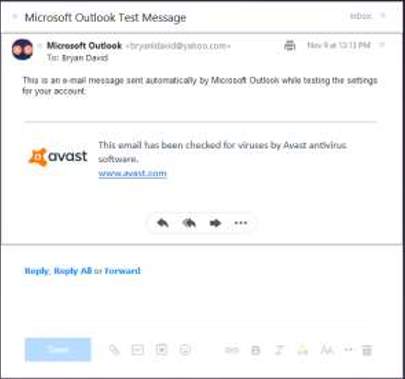
Microsoft Outlook Test Message
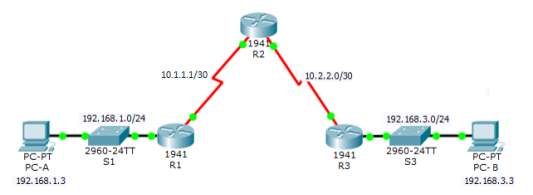
VPN SITE-TO-SITE
Site-to-site VPN is a security technology that provides connection through the tunnel from site to another site securely and reliable. This will prevent malicious attackers to access the private network of the company because when passing through the tunnel it is encrypted. There is an authentication must be deployed for the IPSec providing the traffic to be authentication when passing through tunnel. (Myerson, n.d.)
Site-to-Site VPN Topology
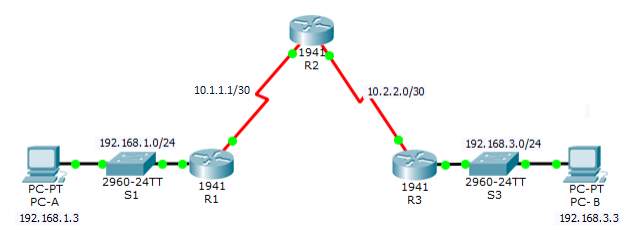
| Device | Interface | IP Address | Subnet Mask | Default Gateway | Switch Port |
| R1 | FA0/0 | 192.168.1.1 | 255.255.255.0 | N/A | SW1 FA0/1 |
| S0/0/0 (DCE) | 10.1.1.1 | 255.255.255.252 | N/A | N/A | |
| R2 | S0/0/0 | 10.1.1.2 | 255.255.255.252 | N/A | N/A |
| S0/0/1 (DCE) | 10.2.2.2 | 255.255.255.252 | N/A | N/A | |
| R3 | FA0/0 | 192.168.3.1 | 255.255.255.0 | N/A | SW2 FA0/2 |
| S0/0/1 | 10.2.2.1 | 255.255.255.252 | N/A | N/A | |
| PC-A | NIC | 192.168.1.3 | 255.255.255.0 | 192.168.1.1 | SW1 FA0/2 |
| PC-B | NIC | 192.168.3.3 | 255.255.255.0 | 192.168.1.2 | SW2 FA0/2 |
CONFIGURATION
ROUTER 1
hostname R1
crypto isakmp policy 10
encraes 256
authentication pre-share
group 5
lifetime 3600
crypto isakmp key cisco123 address 10.2.2.1
crypto ipsec security‐association lifetime seconds 1800
crypto ipsec transform‐set 50 esp‐aes 256 esp‐sha‐hmac
crypto map CMAP 10 ipsec‐isakmp
set peer 10.2.2.1
set pfs group5
set security‐association lifetime seconds 900
set transform‐set 50 match address 101
interface FastEthernet0/0
ip address 192.168.1.1 255.255.255.0
duplex auto
speed auto
interface Serial0/0/0
ip address 10.1.1.1 255.255.255.252
clock rate 64000
crypto map CMAP
router eigrp 100
network 192.168.1.0
network 10.1.1.0 0.0.0.3
no auto‐summary
access‐list 101 permit ip 192.168.1.0 0.0.0.255 192.168.3.0 0.0.0.255
line con 0
exec-timeout 5 0
password 7 0822455D0A165445415F59
logging synchronous
login
line vty 0 4
password 7 0822455D0A165445415F59
login
ROUTER 2
hostname R2
interface Serial0/0/0
ip address 10.1.1.2 255.255.255.252
interface Serial0/0/1
ip address 10.2.2.2 255.255.255.252
clock rate 64000
router eigrp 100
network 10.1.1.0 0.0.0.3
network 10.2.2.0 0.0.0.3
no auto‐summary
ROUTER 3
hostname R3
crypto isakmp policy 10
encraes 256
authentication pre-share
group 5
lifetime 3600
crypto isakmp key cisco123 address 10.1.1.1
crypto ipsec security‐association lifetime seconds 1800
crypto ipsec transform‐set 50 esp‐aes 256 esp‐sha‐hmac
crypto map CMAP 10 ipsec‐isakmp
set peer 10.1.1.1
setpfs group5
set security‐association lifetime seconds 900
set transform‐set 50 match address 101
interface FastEthernet0/0
ip address 192.168.3.1 255.255.255.0
duplex auto
speed auto
interface Serial0/0/1
ip address 10.2.2.1 255.255.255.252
crypto map CMAP
router eigrp 100
network 10.2.2.0 0.0.0.3
network 192.168.3.0
no auto‐summary
access‐list 101 permit ip 192.168.3.0 0.0.0.255 192.168.1.0 0.0.0.255
line con 0
exec‐timeout 5 0
password 7 0822455D0A165445415F59
logging synchronous
login
line vty 0 4
exec‐timeout 5 0
password 7 0822455D0A165445415F59
login
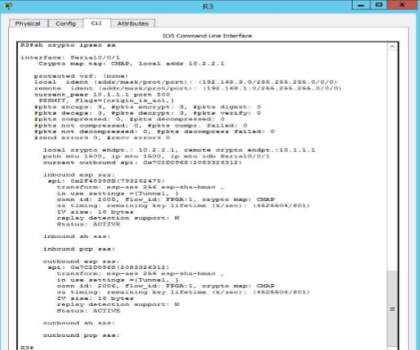
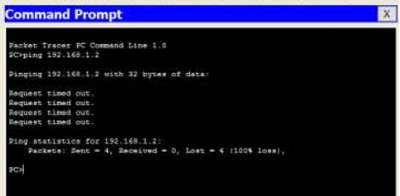
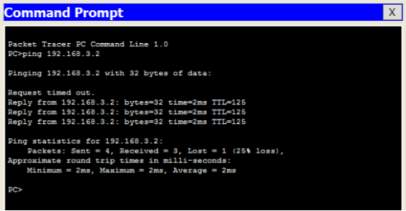
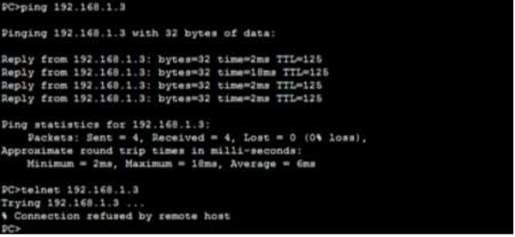
R1 – Verification of R1 connection for inbound and outbound – ACTIVE
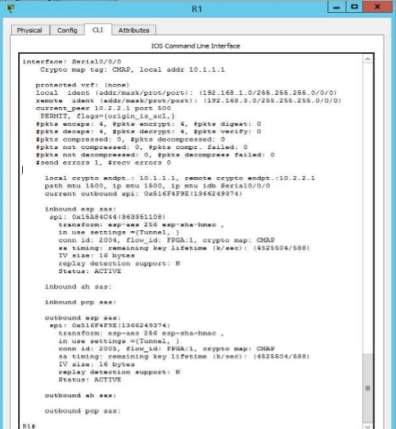
R1 – Verification of R1 connection for inbound and outbound – ACTIVE
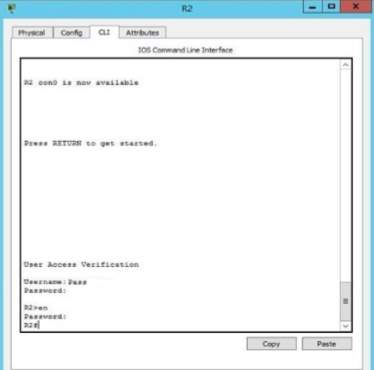
RADIUS SERVER AAA
RADIUS means Remote Authentication Dial-In User Service which an application communicates with AAA (Authentication, authorization, accounting) to act as the database storing the information of the network. RADIUS uses UDP protocol and the user generate a dial-in for access and the server will verify the information using authentication and accounting. (Wilkins, 2015)
RADIUS SERVER AAA TOPOLOGY
| Device | Interface | IP Address | Subnet Mask | Default Gateway | Switch Port |
| R1 | FA0/0 | 192.168.1.1 | 255.255.255.0 | N/A | SW1 FA0/1 |
| S0/0/0 (DCE) | 10.1.1.1 | 255.255.255.252 | N/A | N/A | |
| R2 | S0/0/0 | 10.1.1.2 | 255.255.255.252 | N/A | N/A |
| S0/0/1 (DCE) | 10.2.2.2 | 255.255.255.252 | N/A | N/A | |
| R3 | FA0/0 | 192.168.3.1 | 255.255.255.0 | N/A | SW2 FA0/2 |
| S0/0/1 | 10.2.2.1 | 255.255.255.252 | N/A | N/A | |
| PC-A | NIC | 192.168.1.3 | 255.255.255.0 | 192.168.1.1 | SW1 FA0/2 |
| PC-B | NIC | 192.168.3.3 | 255.255.255.0 | 192.168.1.2 | SW2 FA0/2 |
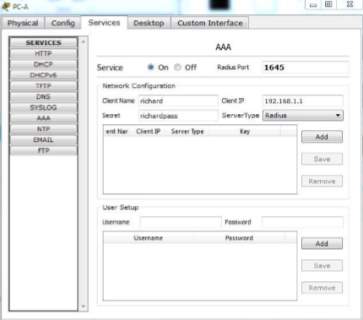
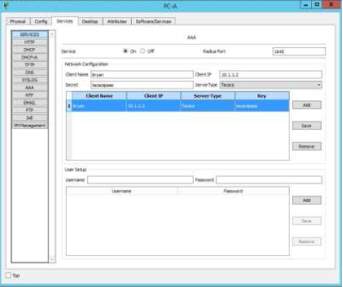
Configure the AAA in the services section of the workstations in the network. Click add to input the Client name, IP Address, server type and the key.
CONFIGURATION
Router 1
hostname R1
enable secret 5 $1$mERr$WvpW0n5HghRrqnrwXCUUl
aaa new‐model
aaa authentication login default group radius none
no ip cef
no ipv6 cef
no ip domain‐lookup
spanning‐tree mode pvst
interface FastEthernet0/0
ip address 192.168.1.1 255.255.255.0
duplex auto
speed auto
interface Serial0/0/0
ip address 10.1.1.1 255.255.255.252
clock rate 64000
router eigrp 100
network 192.168.1.0
network 10.1.1.0 0.0.0.3
no auto‐summary
ip classless
ip flow‐export version 9
radius‐server host 192.168.1.3 auth‐port 1645 key password
line con 0
exec‐timeout 5 0
password 7 0822455D0A165445415F59
logging synchronous
line vty 0 4
exec‐timeout 5 0
password 7 0822455D0A165445415F59
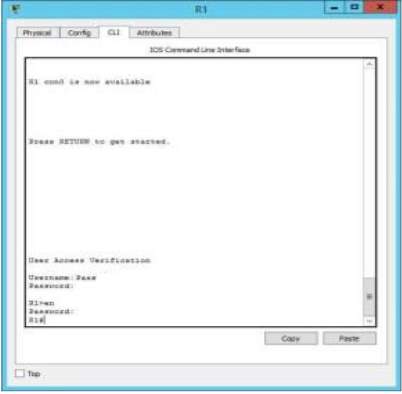
R1 – Verification of credential in the router
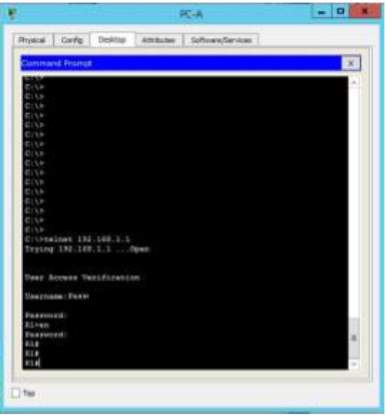
Workstation Verification using Telnet
TACACS + SERVER AAA
TACACS means Terminal Access Controller Access-Control System Plus that has been developed in some of the shortcomings of RADIUS. At the same time, TACACS and RADIUS provide the same service for AAA systems but the only difference is the way it handles the security. Unfortunately, TACACS uses TCP (Transmission Control Protocol) instead of UDP that uses RADIUS which makes the TACACS more reliable for network flaws. It has the TACACS+ which offer a better service for TCP for modern networks. (Wilkins, 2015)
TACACS + TOPOLOGY

| Device | Interface | IP Address | Subnet Mask | Default Gateway | Switch Port |
| R1 | FA0/0 | 192.168.1.1 | 255.255.255.0 | N/A | SW1 FA0/1 |
| S0/0/0 (DCE) | 10.1.1.1 | 255.255.255.252 | N/A | N/A | |
| R2 | S0/0/0 | 10.1.1.2 | 255.255.255.252 | N/A | N/A |
| S0/0/1 (DCE) | 10.2.2.2 | 255.255.255.252 | N/A | N/A | |
| R3 | FA0/0 | 192.168.3.1 | 255.255.255.0 | N/A | SW2 FA0/2 |
| S0/0/1 | 10.2.2.1 | 255.255.255.252 | N/A | N/A | |
| PC-A | NIC | 192.168.1.3 | 255.255.255.0 | 192.168.1.1 | SW1 FA0/2 |
| PC-B | NIC | 192.168.3.3 | 255.255.255.0 | 192.168.1.2 | SW2 FA0/2 |
The same process as the RADIUS but the difference is the Server Type which is TACACS.
CONFIGURATION
hostname R2
enable secret 5 $1$mERr$WvpW0n5HghRrqnrwXCUUl.
Username Pass secret 5 $1$mERr$WvpW0n5HghRrqnrwXCUUl.
interface Serial0/0/0
ip address 10.1.1.2 255.255.255.252
interface Serial0/0/1
ip address 10.2.2.2 255.255.255.252
clock rate 64000
router eigrp 100
network 10.1.1.0 0.0.0.3
network 10.2.2.0 0.0.0.3
no auto‐summary
tacacs‐server host 192.168.1.3 key Passtacacspass
login local
line aux 0
line vty 0 4
R2 – Verification of Credential in the Router
VULNERABILITY ASSESSMENT
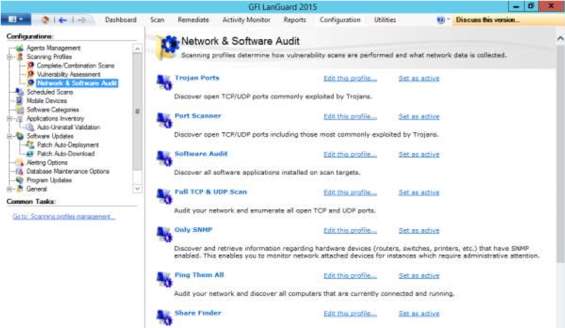
GFI Languard is a network assistant with some expertise in security, vulnerability, patching and management of network. It provides automated scanning of network to monitor or review for better performance of the network business. In addition, it generates reports to present solution for attacks and to assess all possible vulnerabilities. This will analyze the network hardware as well as the installed software to maximize the use for the network and protect from malicious attackers. The GFI Languard primary goal is to scan, analyze and remediate the server within your network. Scanning for possible vulnerabilities and missing patches to apply immediate solution, viewing network security condition and generate output for improvement of the network and solve the network failure, utilization of hardware using remote desktop. (GFI LanGuard , n.d.)
Installation Guide and Setting up LAN Guard
1. First is to install GFI LanGuard using administrator credential and designate the location of the software. Click Next
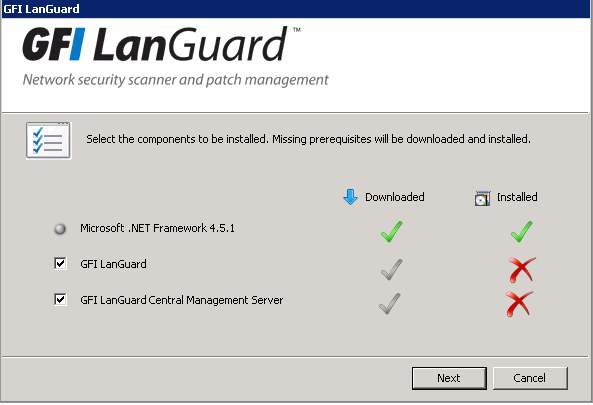

2. Sign your GFI Account for the installation but if you don’t have an account, register first in the website. Enter the license key for verification of the software. Click OK. You need to configure the database server with Windows Authentication.
3. Accept the license Agreement and proceed to Attendant service attendant to register your account in the GFI LANGuard under a domain of the server. Click Next and install to finish the installation.
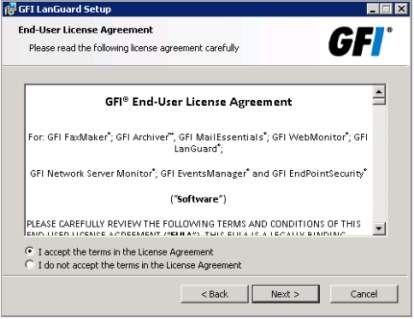
License Agreement
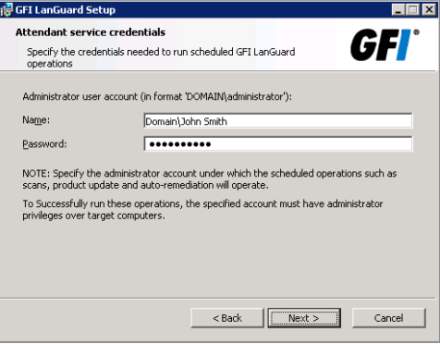
Attendant service credentials
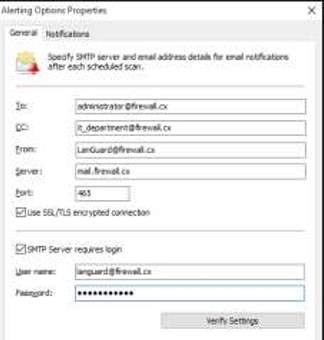
4. Setup your email to receive an alert coming from the GFI LANGuard. Under the Alerting Option, there you can see filling the information of your email.
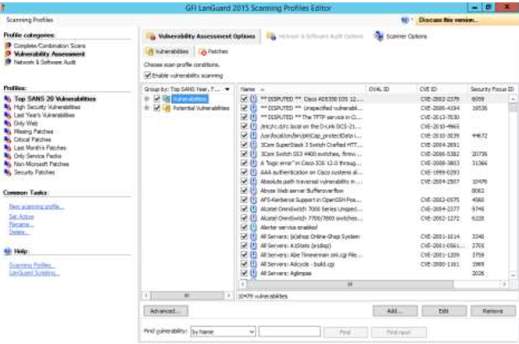
5. The section of Vulnerability Assessment Settings will display the profile for the scanned vulnerability based on the priority. This will active the scanning to access all vulnerability profile for resolving the issues.
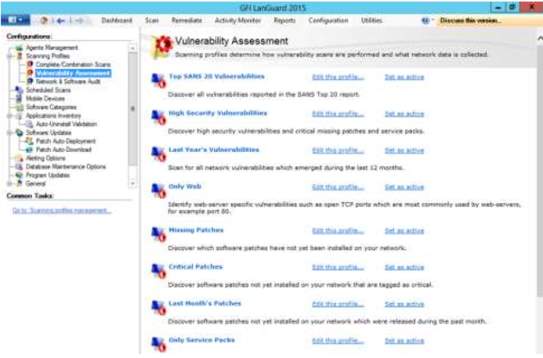
6. Vulnerability profile can be modified by the administrator to manage solution of the network.
7. The section for auditing the profile will provide management for network and software for better performance of the network data. There

8. In the administrator perspective, there is a privilege to manage users to schedule the vulnerability scanning. In the scan option, you can specify your desired schedule to execute the scanning. You can choose the type of scanning for the target and input the time and evaluate the summary for clarification of scanning.
Schedule the Vulnerability Scan
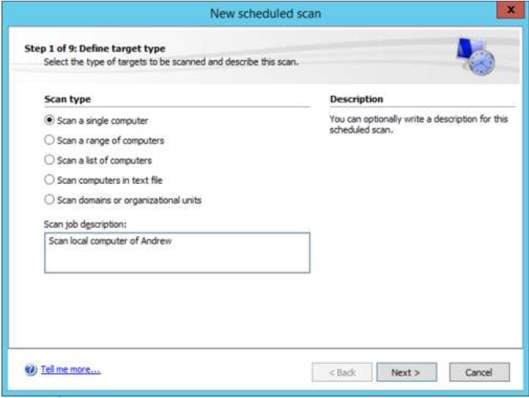
Scan type for the target
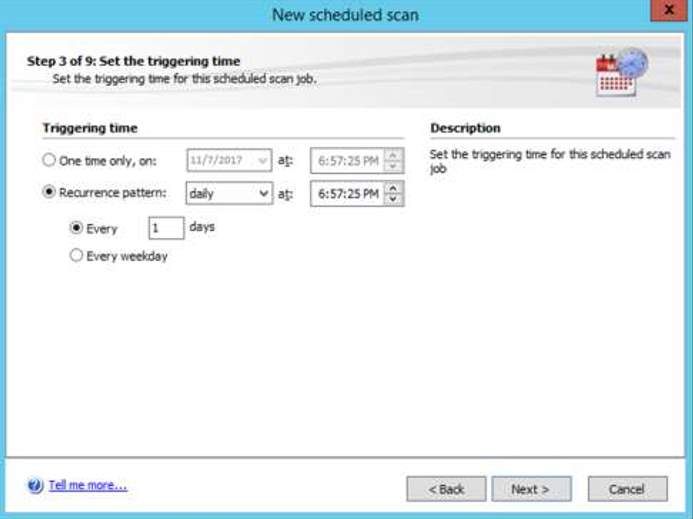
Setting the time of the scan
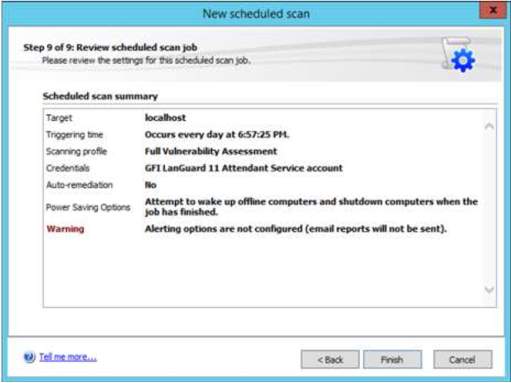
Successful scheduling of vulnerability scan
NVD – NATIONAL VULNERABILITY DATABASE
NVD or National Vulnerability Database produced by National Institute Standard for cyber security vulnerability based in U.S government to provide information regarding vulnerability trends and statistic for the reference of the users. It represents as the standard for vulnerability management used by Security Content Automation Protocol (SCAP). This helps the business to specify the products to use in a certain vulnerability since there are a lot of security measures to protect the network including checklists, security measurements and misconfiguration. NVD uses Common Weakness Enumeration Specification (CWE) which provides information for identifying, reviewing, evaluating the network or infrastructure for vulnerability measures. (National Institute of Standards and Technology, 2016)
Listed are some of the scored vulnerabilities:
- CVE-2017-16907 Detail (US-CERT/NIST, 2017)
- Description – In Horde Groupware 5.2.19, there is XSS via the Color field in a Create Task List action.
- Source – US-CERT/NIST
- Last Modified – 11/20/2017
- CVE-2017-16892 Detail (US-CERT/NIST, 2017)
- Description – In Bftpd before 4.7, there is a memory leak in the file rename function.
- Source – US-CERT/NIST
- Last Modified – 11/19/2017
- CVE-2017-14077 Detail (US-CERT/NIST, 2017)
- Description – HTML Injection in Securimage 3.6.4 and earlier allows remote attackers to inject arbitrary HTML into an e-mail message body via the $_SERVER[‘HTTP_USER_AGENT’] parameter to example_form.ajax.php or example_form.php.
- Source – US-CERT/NIST
- Last Modified – 11/17/2017
- CVE-2017-1000217 Detail (US-CERT/NIST, 2017)
- Description – Opencast 2.3.2 and older versions are vulnerable to script injections through media and metadata in the player and media module resulting in arbitrary code execution, fixed in 2.3.3 and 3.0
- Source – US-CERT/NIST
- Last Modified – 11/17/2017
- CVE-2017-1000128 Detail (US-CERT/NIST, 2017)
- Description – Exiv2 0.26 contains a stack out of bounds read in JPEG2000 parser
- Source – US-CERT/NIST
- Last Modified – 11/17/2017
CISCO IOS INTRUSION PREVENTION SYSTEM CONFIGURATION (IPS)
Cisco IOS Intrusion Prevention System (IPS) provides prevention from network attacks using deep-packet inspection including effective and reliable security in the network. IPS secures the network from attacks which increase the performance for the communication and services. Immediate action for possible network failure or issues and flexibility in terms of updating and improvement of LAN and WAN. In addition, wide-range of full potential of securing the network using the firewall. (Cisco Corporation, n.d.)
CISCO IOS INTRUSION PREVENTION SYSTEM (IPS) TOPOLOGY
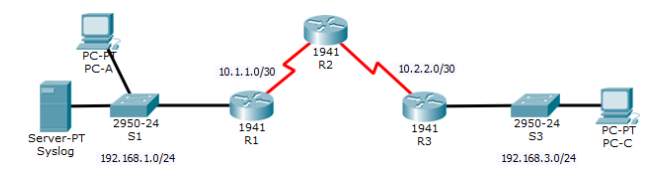
| Device | Interface | IP Address | Subnet Mask | Default Gateway |
| R1 | FA0/0 | 192.168.1.1 | 255.255.255.0 | N/A |
| S0/0/0 (DCE) | 10.1.1.1 | 255.255.255.252 | N/A | |
| R2 | S0/0/0 | 10.1.1.2 | 255.255.255.252 | N/A |
| S0/0/1 (DCE) | 10.2.2.2 | 255.255.255.252 | N/A | |
| R3 | FA0/0 | 192.168.3.1 | 255.255.255.0 | N/A |
| S0/0/1 | 10.2.2.1 | 255.255.255.252 | N/A | |
| PC-A | NIC | 192.168.1.3 | 255.255.255.0 | 192.168.1.1 |
| PC-C | NIC | 192.168.3.3 | 255.255.255.0 | 192.168.3.1 |
CONFIGURATION
hostname R1
enable secret 5 $1$mERr$oM/JyxYqfgpr/DlQ0ZM/h.
no ip cef
no ipv6 cef
no ip domain-lookup
spanning-tree mode pvst
ip ips config location flash:ipsdir retries 1
ip ips name iosips
ip ips signature-category
category all
retired true
category ios_ips basic
retired false
interface FastEthernet0/0
ip address 192.168.1.1 255.255.255.0
ip ips iosips out
duplex auto
speed auto
interface Serial0/0/0
ip address 10.1.1.1 255.255.255.0
router eigrp 10
network 192.168.1.0
network 10.0.0.0
auto-summary
logging 192.168.1.50
line con 0
exec-timeout 0 0
password pass
logging synchronous
login
line aux 0
exec-timeout 0 0
password pass
login
line vty 0 4
exec-timeout 0 0
password pass
login
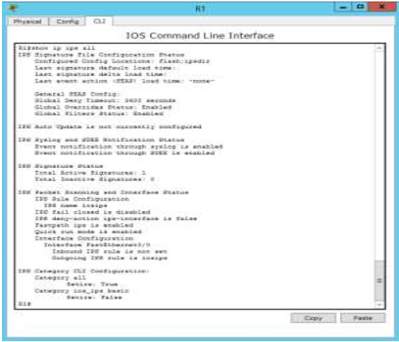
R1 – Verification command “show ip ips all” for IPS configuration status summary
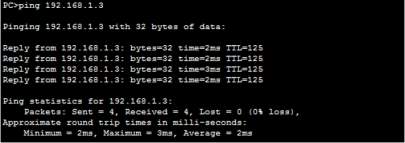
PC-C to PC-A – SUCCESS – ping test – “deny-packet inline”
PC-A to PC-C SUCCESS ping test
CISCO CONTEXT BASED ACCESS FIREWALL
Cisco Context Based Access Firewall or CBAC is component which inspects and review the incoming traffic from the internal network and it support from the access lists to record from the application layer. Basically the process of the firewall is to block inbound traffic unless it is allowed to pass through the firewall as well as outbound traffic. (stretch, 2009)
CISCO CONTEXT BASED ACCESS FIREWALL TOPOLOGY
| Device | Interface | IP Address | Subnet Mask | Default Gateway |
| R1 | FA0/0 | 192.168.1.1 | 255.255.255.0 | N/A |
| S0/0/0 (DCE) | 10.1.1.1 | 255.255.255.252 | N/A | |
| R2 | S0/0/0 | 10.1.1.2 | 255.255.255.252 | N/A |
| S0/0/1 (DCE) | 10.2.2.2 | 255.255.255.252 | N/A | |
| R3 | FA0/0 | 192.168.3.1 | 255.255.255.0 | N/A |
| S0/0/1 | 10.2.2.1 | 255.255.255.252 | N/A | |
| PC-A | NIC | 192.168.1.3 | 255.255.255.0 | 192.168.1.1 |
| PC-C | NIC | 192.168.3.3 | 255.255.255.0 | 192.168.3.1 |
R3 CONFIGURATION
hostname R3
no ip cef
no ipv6 cef
no ip domain-lookup
ip inspect name IR icmp audit-trail on timeout 3600
ip inspect name IR telnet audit-trail on timeout 3600
ip inspect name IR http audit-trail on timeout 3600 spanning-tree mode pvst
interface FastEthernet0/0
ip address 192.168.3.1 255.255.255.0
duplex auto
speed auto
interface Serial0/0/1
ip address 10.2.2.1 255.255.255.252
ip access-group ACL in
ip inspect IR out
ip classless
ip route 192.168.3.0 255.255.255.0 10.2.2.2
ip route 10.2.2.0 255.255.255.252 10.2.2.2
ip route 10.1.1.0 255.255.255.252 10.2.2.2
ip route 192.168.1.0 255.255.255.252 10.2.2.2
ip flow-export version 9
ip access-list extended ACL
deny ip any any
logging 192.168.1.3
line con 0
line aux 0
line vty 0 4
login
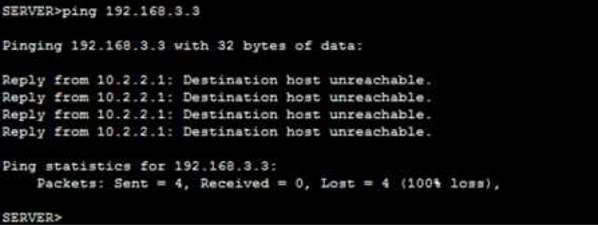
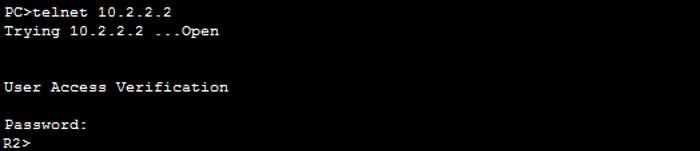
Verification PC-C to R2 – TELNET – show ip inspect sessions

Verification PC-C to PC-A – PING – ALLOW / TELNET – DENY
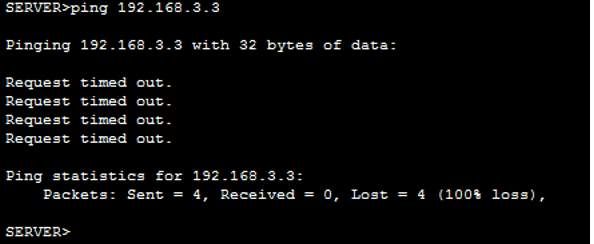
Verification PC-A to PC-C – PING – BLOCK TRAFFIC
CISCO ZONE BASED FIREWALL
Zone Based Firewall from the name itself exist in the security zones with certain policy whether to grant access or deny from another site or network. As the zones are distinguished, you must enforce the direction of the traffic based on the company and security requirements. In this process, this will create reliable and secure connection from the zone pairs. (Wilkins, 2011)
ZONE BASED FIREWALL TOPOLOGY
| Device | Interface | IP Address | Subnet Mask | Default Gateway |
| R1 | FA0/0 | 192.168.1.1 | 255.255.255.0 | N/A |
| S0/0/0 (DCE) | 10.1.1.1 | 255.255.255.252 | N/A | |
| R2 | S0/0/0 | 10.1.1.2 | 255.255.255.252 | N/A |
| S0/0/1 (DCE) | 10.2.2.2 | 255.255.255.252 | N/A | |
| R3 | FA0/0 | 192.168.3.1 | 255.255.255.0 | N/A |
| S0/0/1 | 10.2.2.1 | 255.255.255.252 | N/A | |
| PC-A | NIC | 192.168.1.3 | 255.255.255.0 | 192.168.1.1 |
| PC-C | NIC | 192.168.3.3 | 255.255.255.0 | 192.168.3.1 |
CONFIGURATION
hostname R3
enable secret 5 $1$mERr$TfFTxE.mmb5O5BVC56ndL0
spanning-tree mode pvst
class-map type inspect match-all IN classMAP match access-group 101
policy-map type inspect POLICY map
class type inspect IN classMAP
inspect
zone security INzone
zone security OUTzone
zone-pair security ZONE pair source IN zone destination OUT zone
service-policy type inspect POLICY map
interface FastEthernet0/1
ip address 192.168.3.1 255.255.255.0
zone-member security IN zone
duplex auto
speed auto
interface Serial0/0/1
ip address 10.2.2.1 255.255.255.252
zone-member security OUT zone
ip classless ip route 10.2.2.0 255.255.255.252 10.2.2.2
ip route 10.1.1.0 255.255.255.252 10.2.2.2
ip route 192.168.1.0 255.255.255.0 10.2.2.2
access-list 101 permit ip 192.168.3.0 0.0.0.255 any
line con 0
exec-timeout 0 0
password pass line aux
logging synchronous
login
line aux 0
line vty 0 4
exec-timeout 0 0
password pass
login
Verification PC-C to PC-A- PING – INSIDE zone to OUTSIDE zone
Verification PC-C to R2 – TELNET – INSIDE zone to OUTSIDE zone
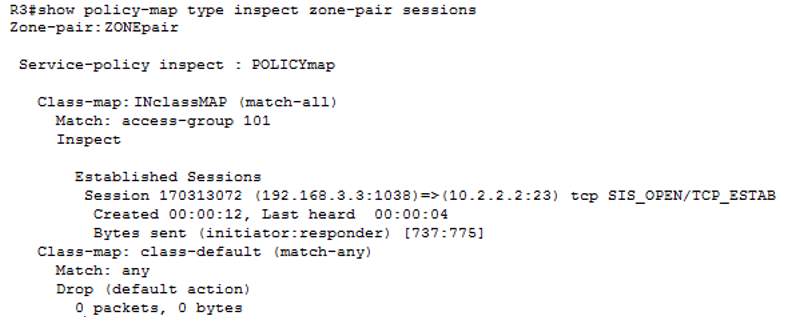
R3 – Verification command – show policy-map type inspect zone-pair sessions
Verification PC-A to PC-C- PING – OUTSIDE zone to INSIDE zone
Verification R2 to PC-C – PING

FORTINET UNIFIED THREAT MANAGEMENT
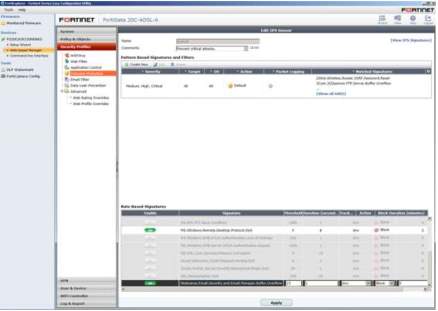
Fortinet Unified threat management or Fortinet UTM provides consolidation from small and medium business to maximize the resources for the revenue at the same time the network security measures would utilize the protection from any malicious attacks. Normally, it is deployed in the web, network, email security simultaneously along with networking capabilities or cloud-based management. (Fortinet, n.d.)
Setting up IPS (Intrusion Prevention System)
1. In the dashboard of IPS, configure the profiles under Intrusion Protection whether to allow or deny the network and hit apply.
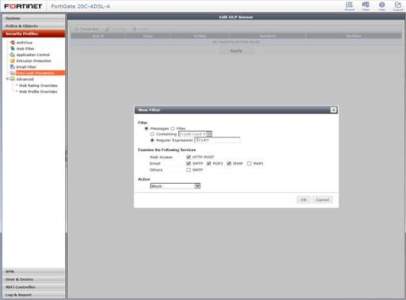
2. Filter the security threats under data leak prevention
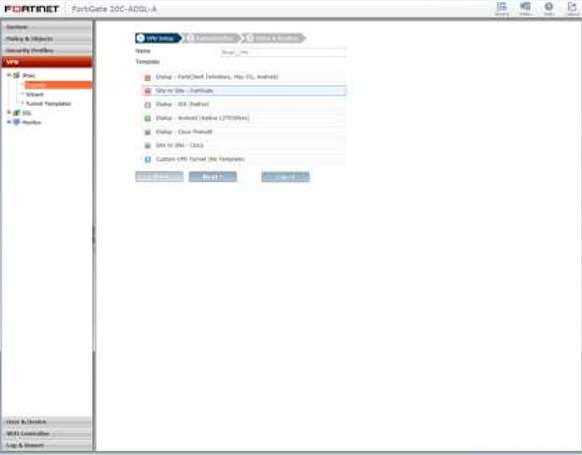
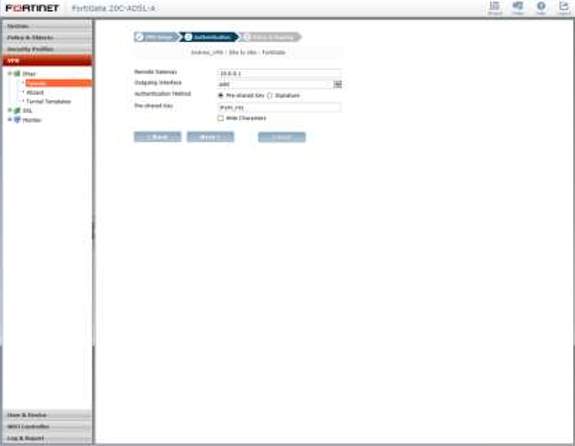
3. Configure all the VPN Tunnels using the IPS with Source and Destination address and on the next step authentication of tunnel.
CYBERROAM UNIFIED THREAT MANAGEMENT
Cyberoam Unified Threat Management is a security hardware that provides broad protection from large enterprise protecting all possible malicious actions through the organization operations. This is considered as the Layer 8 multi-core security technology offering effective availability using the hardware at the same time the software. In addition, this provides future reliable network throughput from its flexibility and configuration to allow ports provide faster UTM for the segments. (Sophos, n.d.)
Installation Guide for Cyberroam Unified Threat Management
1. First download the software for the Cyberroam in the Sophos website
2. As you install the software, login credential will appear to input your username and password to access the Cyberroam and you must run the virtual machine.
3. To access the Cyberroam, use the web browser (Internet Explorer) and access the IP Address designed for Cyberroam (http://172.16.16.16). Use admin for username and password.
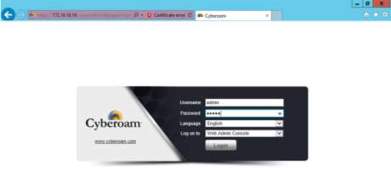
Login Credential for the Web application
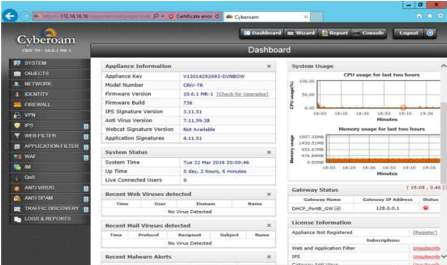
4. The dashboard for the Cyberroam will display, showing the status and information of the firewall. In addition, many features on the left portion of the dashboard which you can maximize the potential of the firewall.
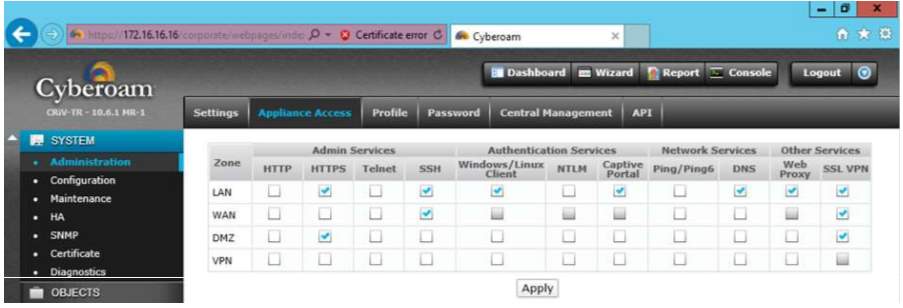
5. As the administrator, you can manage policies and restriction in the Appliance Access using checklist to utilize the designated protocol for the users. Any changes has been done, hit the apply.
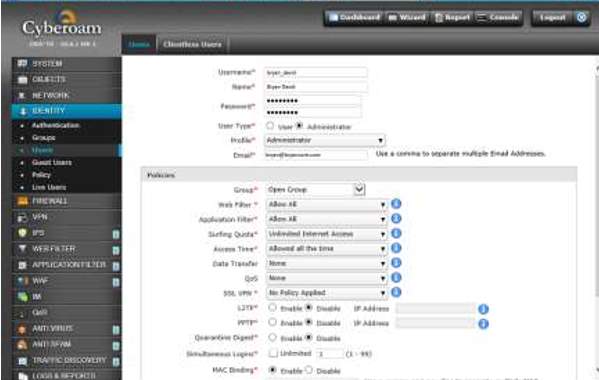
6. As the administrator, you can setup access privilege for the user under Identity Policy to manage policies required for the user.
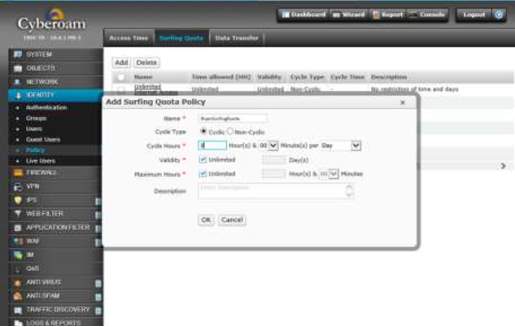
7. There is another feature where you can limit the surfing capability of the user for security reasons.
Adding Surfing Quota Policy Section
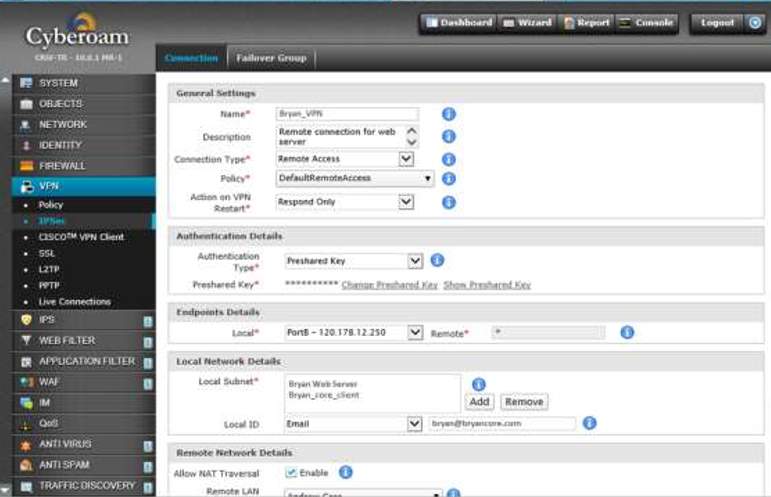
8. Remote VPN should be enabled for the users to connect via Web accessing the private network but first you need to fill up required details.
RECOMMENDATION
Building network requires a lot of consideration such as the hardware, software, management, security and administration. Businesses primary goal is to give satisfaction to the customers which in return the result of the service determine if the business achieving the goal. However, this can be made with fulfilling the accurate implementation of technology to give service to the client.
In this document there are three keys which needs to achieve namely the hardware/software requirements, security and application. Firstly, the hardware and software requirement, this is the foundation of the corporate network whether it will match the clients need to the infrastructure network. Specification in the hardware and software is really important when building the network because the requirement of the software should coordinate with the hardware to run the network effectively. Considering the cost for building the network must be approved by the company and giving an attention for future growth. For software perspective, this must be up-to-date which it will support and improve the performance of the network having legal and licensed software.
Secondly, effective security technology is essential also which this will protect from any kind of malicious activities. In addition, scalable storage for future purpose to back up and store all the information needed to prevent data loss, corruption of files and unrecoverable database. Lastly, application of hardware/software requirements as well as enforcing security methods in the network. This can be done by professionals or specialist to provide support and guidance throughout the operation of the network. In addition, applying some methods to prevent attacks such vulnerabilities and securing the private network using VPN. Using remote access will give an advantage to secure data under publicity passing through Internet.
In a nutshell, technologies such as servers, firewall and software create an infrastructure to maintain and serve clients with their own perspective of storing, security, maintenance and reliable data communication. Stable relationship with clients and future client indicates that the foundation for building the network is strong enough particularly fulfilling the requirements as well as the people managing the operation and services.
Works Cited
Barracuda. (n.d.). Barracuda Spam Firewall. Retrieved from https://www.barracuda.com/landing/pages/spamfirewall
Barracuda. (n.d.). InclusionsLibraryBMA. Retrieved from http://www.barracuda-tw.com/file/download/download_20140725111914_ykX9q.pdf
Bipin. (2013, July 26). Create User Account in Server 2012 Domain Controller. Retrieved from http://www.mustbegeek.com/create-user-account-in-server-2012-domain-controller/
BradHeld. (2014, January 19). Building Your First Domain Controller on 2012 R2. Retrieved from https://social.technet.microsoft.com/wiki/contents/articles/22622.building-your-first-domain-controller-on-2012-r2.aspx
Cenerelli, K. (2017, September 3). Windows 2012 R2: Active Directory Installation. Retrieved from https://social.technet.microsoft.com/wiki/contents/articles/20834.windows-2012-r2-active-directory-installation.aspx
Cisco Corporation. (n.d.). Cisco IOS Intrusion Prevention System (IPS). Retrieved from https://www.cisco.com/c/en/us/products/security/ios-intrusion-prevention-system-ips/index.html
Cisco Network Academy. (n.d.). Packet Tracer – Configure IOS Intrusion Prevention System (IPS). Retrieved from file:///C:/Users/paul7/Desktop/5.4.1.2%20Packet%20Tracer%20-%20Configure%20IOS%20Intrusion%20Prevention%20System%20(IPS)%20Using%20CLI.pdf
Cisco Networking Academy. (n.d.). Packet Tracer – Configure and Verify a Site-to-Site IPsec VPN. Retrieved from file:///C:/Users/paul7/Desktop/8.4.1.2%20Packet%20Tracer%20-%20Configure%20and%20Verify%20a%20Site-to-Site%20IPsec%20VPN%20Using%20CLI.pdf
dpepper. (2017, January 5). How To Set up Email in Outlook 2016. Retrieved from https://www.liquidweb.com/kb/how-to-set-up-email-in-outlook-2016/
FAQforge. (n.d.). How to Install and Configure a Print Server in Windows Server 2012 R2. Retrieved from https://www.faqforge.com/windows-server-2012-r2/install-configure-print-server-windows-server-2012-r2/
Fortinet. (n.d.). Unified Threat Management. Retrieved from https://www.fortinet.com/products/utm.html
GFI LanGuard . (n.d.). How GFI LanGuard works. Retrieved from http://manuals.gfi.com/en/languard/content/acm/topics/about/how_gfi_languard_works.htm
Microsoft Corporation. (2015, October 15). System Requirements and Installation Information for Windows Server 2012 R2. Retrieved from https://technet.microsoft.com/en-us/library/dn303418(v=ws.11).aspx
Microsoft Corporation. (2017, May 16). Exchange 2016 system requirements. Retrieved from https://technet.microsoft.com/en-us/library/aa996719(v=exchg.160).aspx
Microsoft Press. (1999). Active Directory. Retrieved from https://msdn.microsoft.com/en-us/library/bb742424.aspx#mainSection
Microsoft Press. (2017, May 31). Install a New Windows Server 2012 Active Directory Forest (Level 200). Retrieved from https://docs.microsoft.com/en-us/windows-server/identity/ad-ds/deploy/install-a-new-windows-server-2012-active-directory-forest–level-200-
Myerson, J. (n.d.). Are there security benefits to using a site-to-site VPN? Retrieved from http://searchsecurity.techtarget.com/answer/Are-there-security-benefits-to-using-a-site-to-site-VPN
National Institute of Standards and Technology. (2016, September 21). National Vulnerability Database (NVD). Retrieved from https://www.nist.gov/programs-projects/national-vulnerability-database-nvd
Shais. (2017, February 22). Install and Configure Print Server on Windows Server 2012 R2. Retrieved from https://www.technig.com/install-and-configure-print-server/
Smith, R. (2014, October 27). 3 Ways to Create New Active Directory Users. Retrieved from https://www.petri.com/3-ways-to-create-new-active-directory-users
Sophos. (n.d.). Cyberoam Unified Threat Management . Retrieved from https://www.cyberoam.com/utm.html
stretch. (2009, March 10). IOS Context-Based Access Control (CBAC). Retrieved from http://packetlife.net/blog/2009/mar/10/ios-context-based-access-control-cbac/
stretch. (2012, January 30). IOS Zone-Based Firewall. Retrieved from http://packetlife.net/blog/2012/jan/30/ios-zone-based-firewall/
Technopedia. (n.d.). Microsoft Outlook. Retrieved from https://www.techopedia.com/definition/355/microsoft-outlook
US-CERT/NIST. (2017, November 20). CVE-2017-16907 Detail. Retrieved from https://nvd.nist.gov/vuln/detail/CVE-2017-16907
US-CERT/NIST. (2017, November 17). CVE-2017-1000128 Detail. Retrieved from https://nvd.nist.gov/vuln/detail/CVE-2017-1000128
US-CERT/NIST. (2017, November 17). CVE-2017-1000217 Detail. Retrieved from https://nvd.nist.gov/vuln/detail/CVE-2017-1000217
US-CERT/NIST. (2017, November 17). CVE-2017-14077 Detail. Retrieved from https://nvd.nist.gov/vuln/detail/CVE-2017-14077
US-CERT/NIST. (2017, November 19). CVE-2017-16892 Detail. Retrieved from https://nvd.nist.gov/vuln/detail/CVE-2017-16892
Wilkins, S. (2011, February 28). IOS Zone-based Firewall Configuration Overview. Retrieved from http://www.pearsonitcertification.com/articles/article.aspx?p=1680699
Wilkins, S. (2015, December 8). TACACS+ vs. RADIUS: Similarities and Differences. Retrieved from http://www.pearsonitcertification.com/articles/article.aspx?p=2449614
Cite This Work
To export a reference to this article please select a referencing stye below:
Related Services
View all


Related Content
All TagsContent relating to: "Cyber Security"
Cyber security refers to technologies and practices undertaken to protect electronics systems and devices including computers, networks, smartphones, and the data they hold, from malicious damage, theft or exploitation.
Related Articles

DMCA / Removal Request
If you are the original writer of this dissertation and no longer wish to have your work published on the UKDiss.com website then please: